Fork me on GitHub

分类 编程语言 下的文章

Java 21 初体验

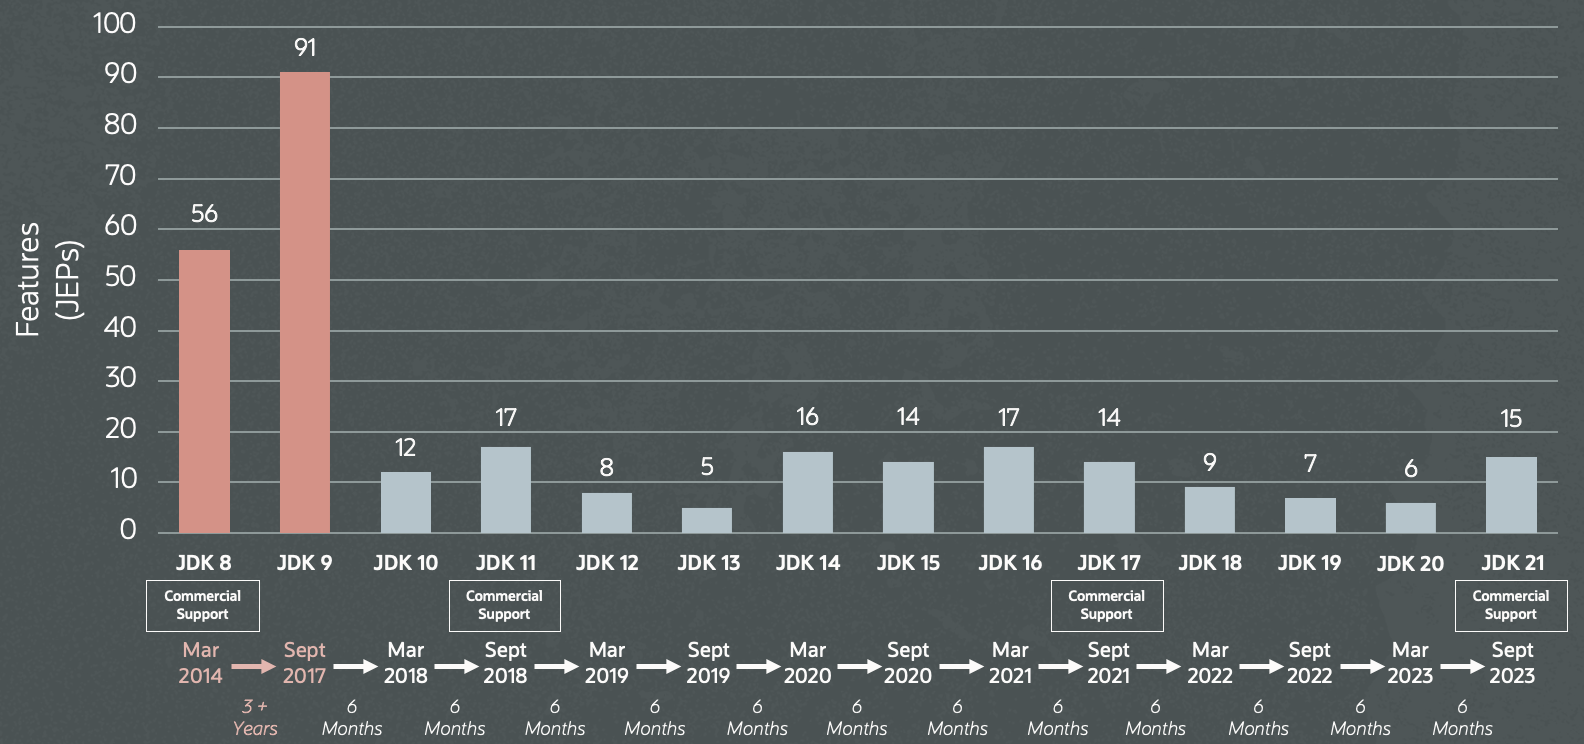
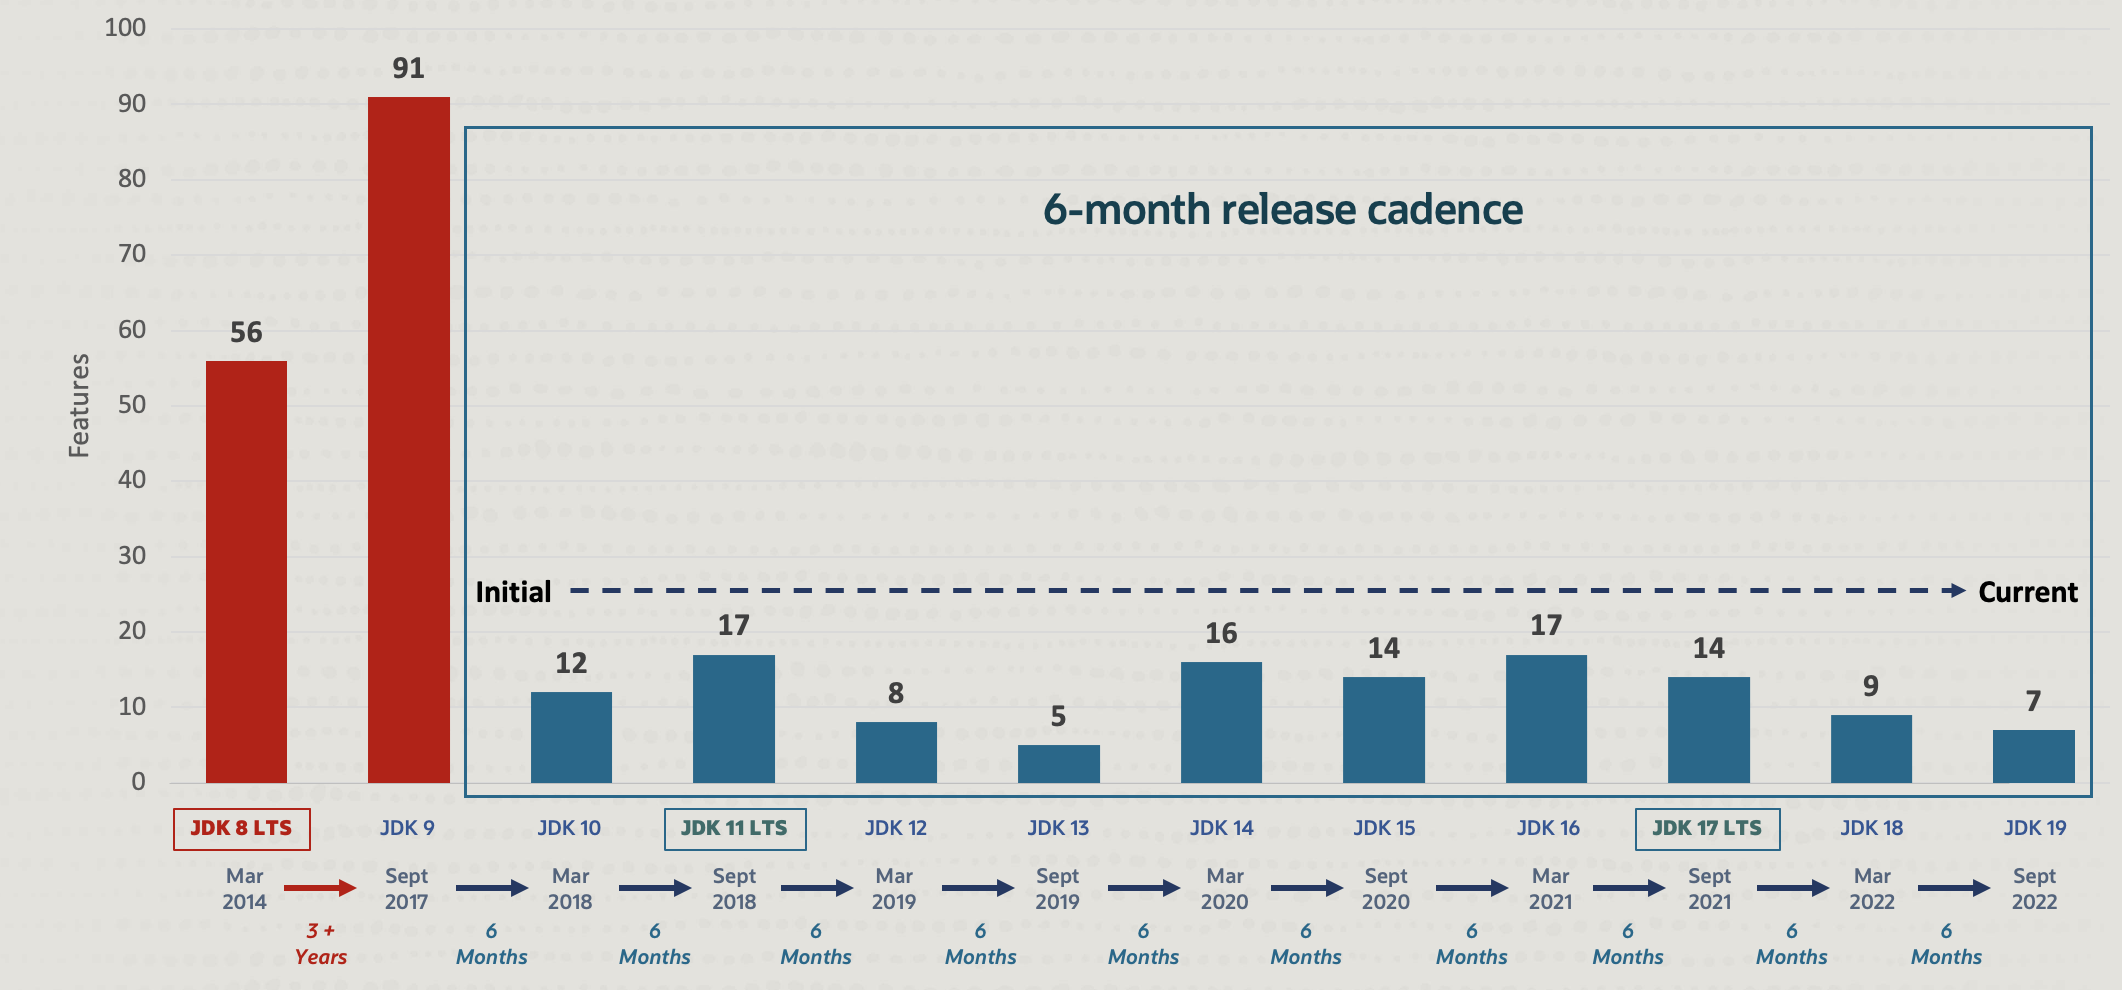
2023 年 9 月 19 日,Java 21 发布正式版本,这是 Java 时隔两年发布的又一个 LTS 版本,上一个 LTS 版本是 2021 年 9 月 14 日发布的 Java 17

jdk-versions.png

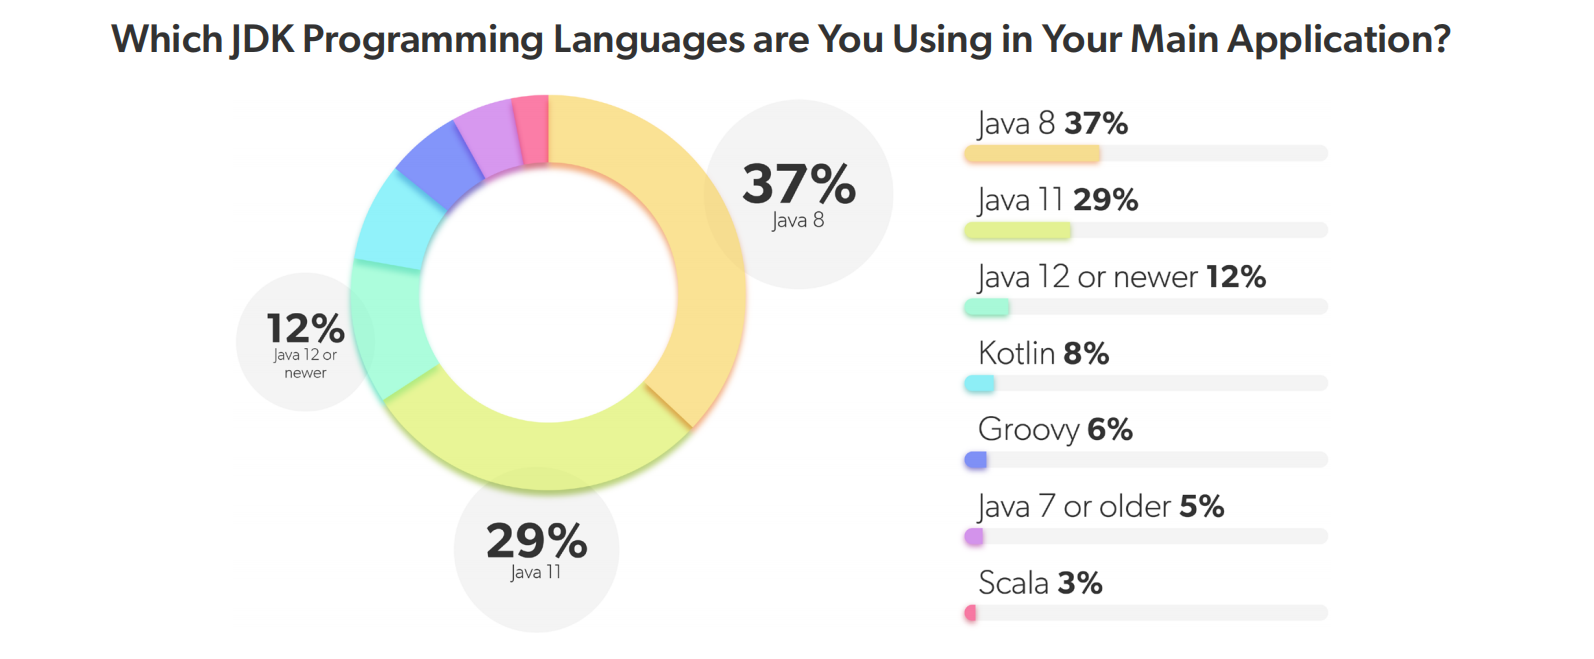
Java 17 目前是使用最广泛的版本,但随着 Java 21 的发布,这一局面估计会很快被打破,这是因为 Java 21 可能是几年内最为重要的版本,它带来了一系列重要的功能和特性,包括 记录模式switch 模式匹配字符串模板分代式 ZGC不需要定义类的 Main 方法,等等等等,不过其中最为重要的一项,当属由 Loom 项目 发展而来的 虚拟线程。Java 程序一直以文件体积大、启动速度慢、内存占用多被人诟病,但是有了虚拟线程,再结合 GraalVM 的原生镜像,我们就可以写出媲美 C、Rust 或 Go 一样小巧灵活、高性能、可伸缩的应用程序。

转眼间,距离 Java 21 发布已经快 3 个月了,网上相关的文章也已经铺天盖地,为了不使自己落伍,于是便打算花点时间学习一下。尽管在坊间一直流传着 版本任你发,我用 Java 8 这样的说法,但是作为一线 Java 开发人员,最好还是紧跟大势,未雨绸缪,有备无患。而且最重要的是,随着 Spring Boot 2.7.18 的发布,2.x 版本将不再提供开源支持,而 3.x 不支持 Java 8,最低也得 Java 17,所以仍然相信这种说法的人除非不使用 Spring Boot,要么不升级 Spring Boot,否则学习 Java 新版本都是势在必行。

准备开发环境

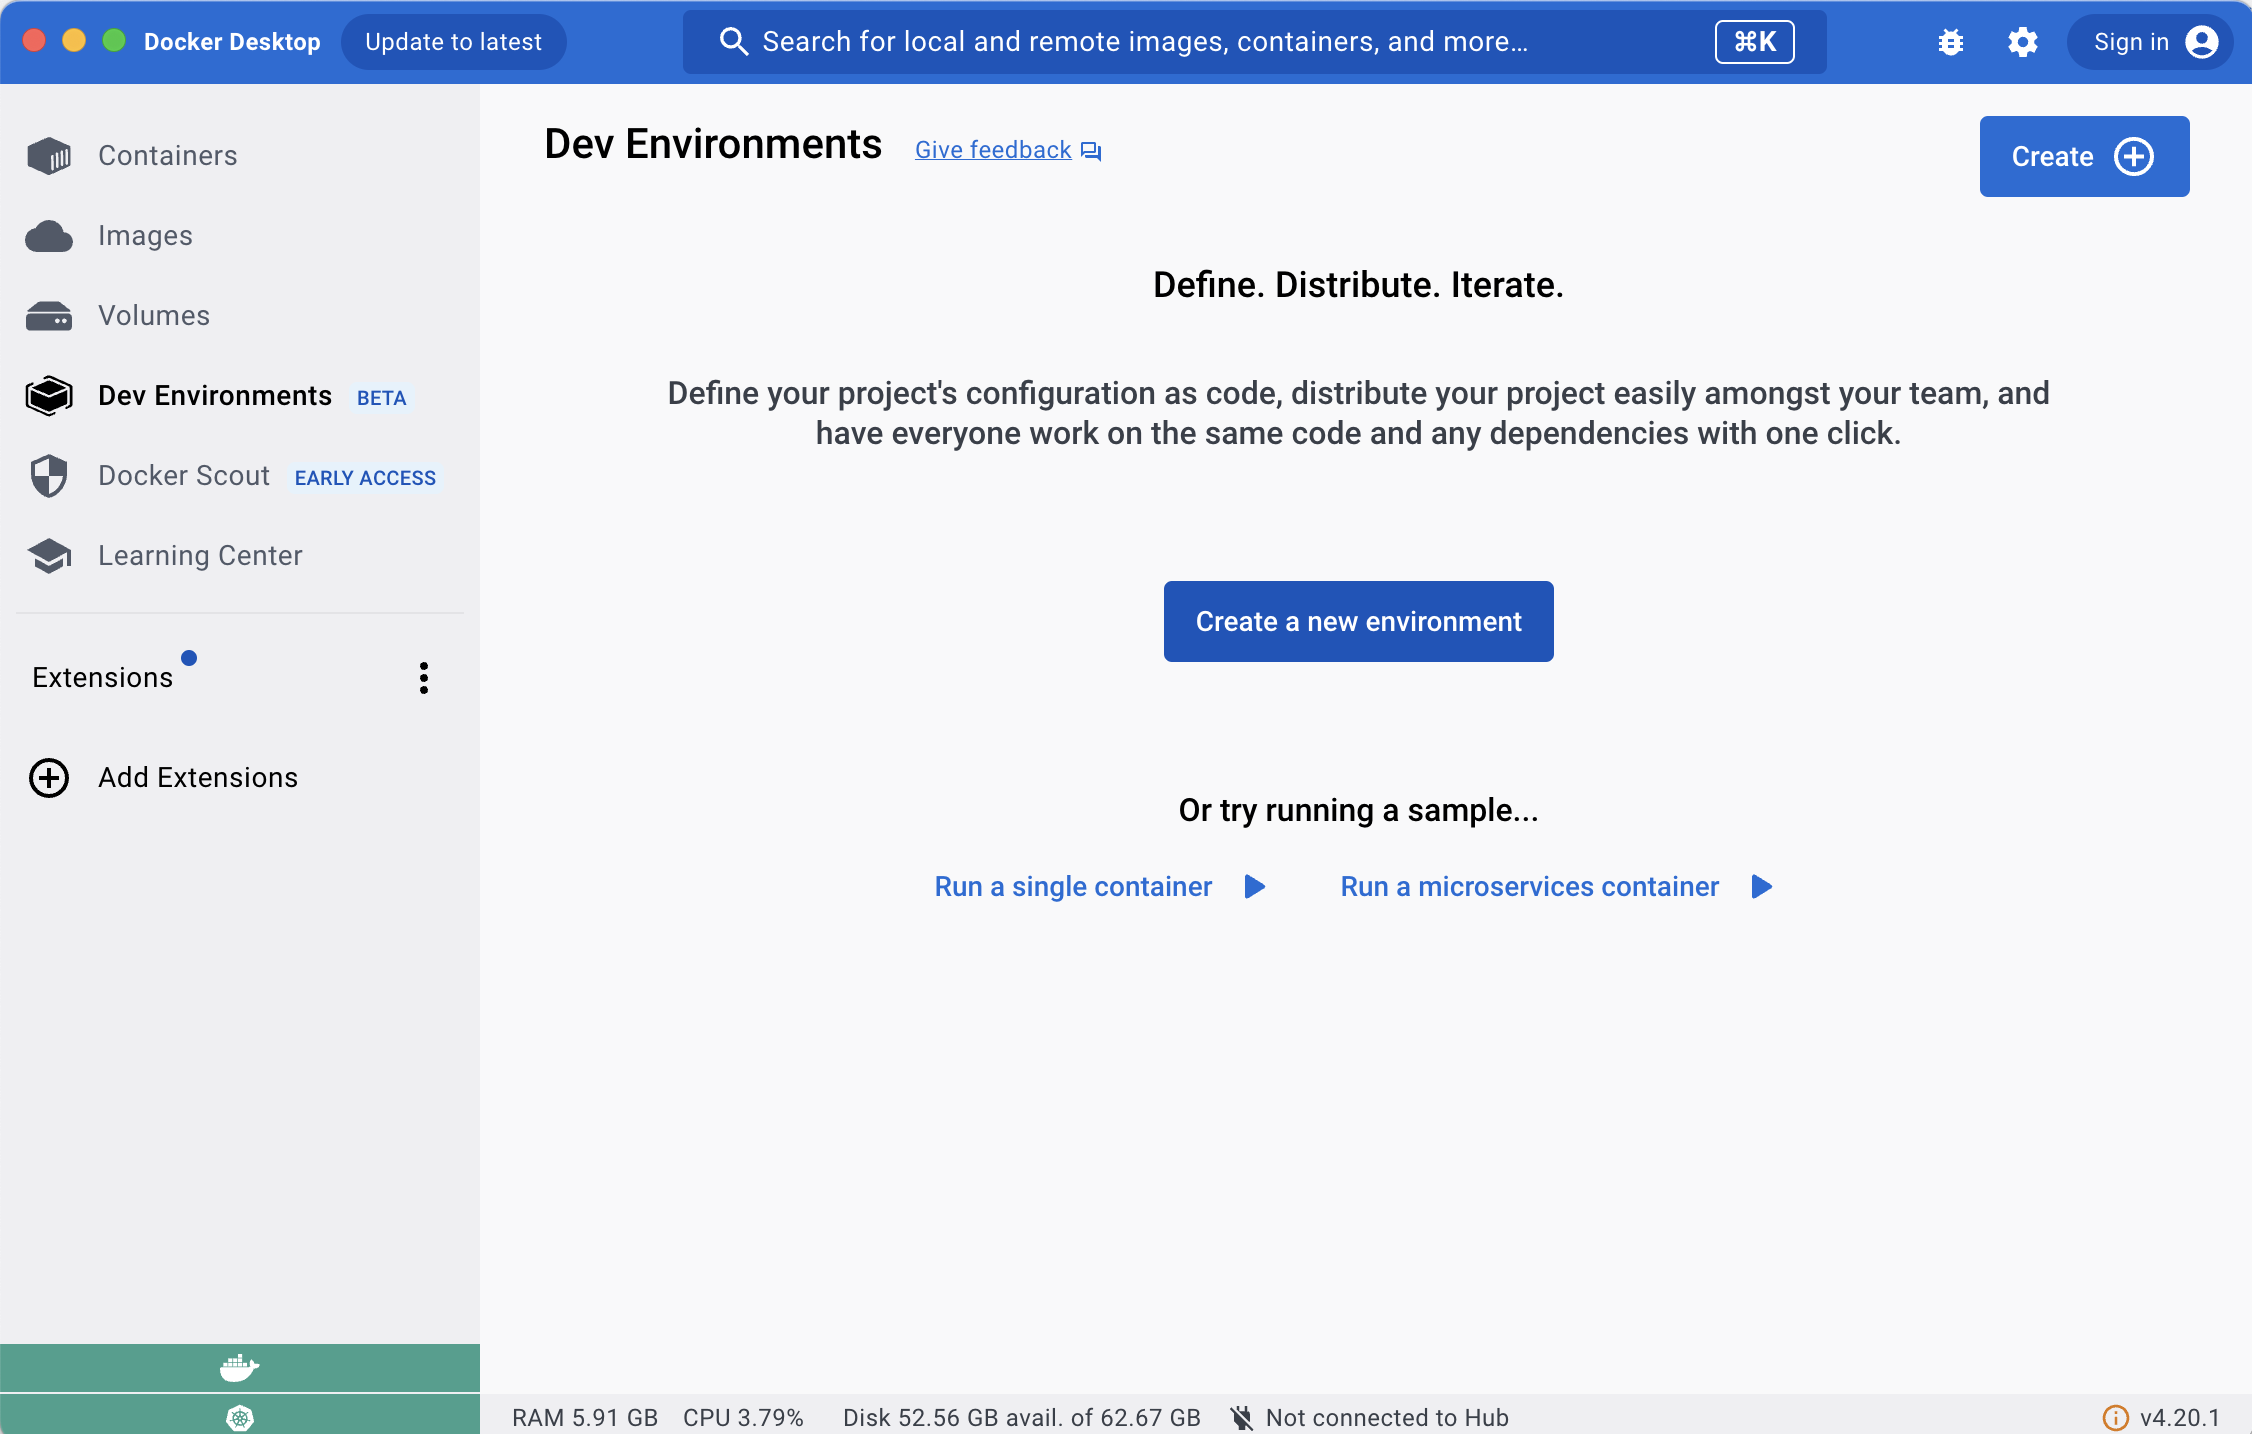
我这里使用 Docker Desktop 的 Dev Environments 作为我们的实验环境。Dev Environments 是 Docker Desktop 从 3.5.0 版本开始引入的一项新特性,目前还处于 Beta 阶段,它通过配置文件的方式方便开发人员创建容器化的、可复用的开发环境,结合 VSCode 的 Dev Containers 插件 以及它丰富的插件生态可以帮助开发人员迅速展开编码工作,而不用疲于开发环境的折腾。

dev-environments.png

Dev Environments 的界面如上图所示,官方提供了两个示例供参考,一个是单容器服务,一个是多容器服务:

我们可以直接从 Git 仓库地址来创建开发环境,就如官方提供的示例一样,也可以从本地目录创建开发环境,默认情况下,Dev Environments 会自动检测项目的语言和依赖,不过自动检测的功能并不是那么准确,比如我们的目录是一个 Java 项目,Dev Environments 会使用 docker/dev-environments-java 镜像来创建开发环境,而这个镜像使用的是 Java 11,并不是我们想要的。

如果自动检测失败,就会使用 docker/dev-environments-default 这个通用镜像来创建开发环境。

所以我们还得手动指定镜像,总的来说,就是在项目根目录下创建一个 compose-dev.yaml 配置文件,内容如下:

services:
  app:
    entrypoint:
    - sleep
    - infinity
    image: openjdk:21-jdk
    init: true
    volumes:
    - type: bind
      source: /var/run/docker.sock
      target: /var/run/docker.sock

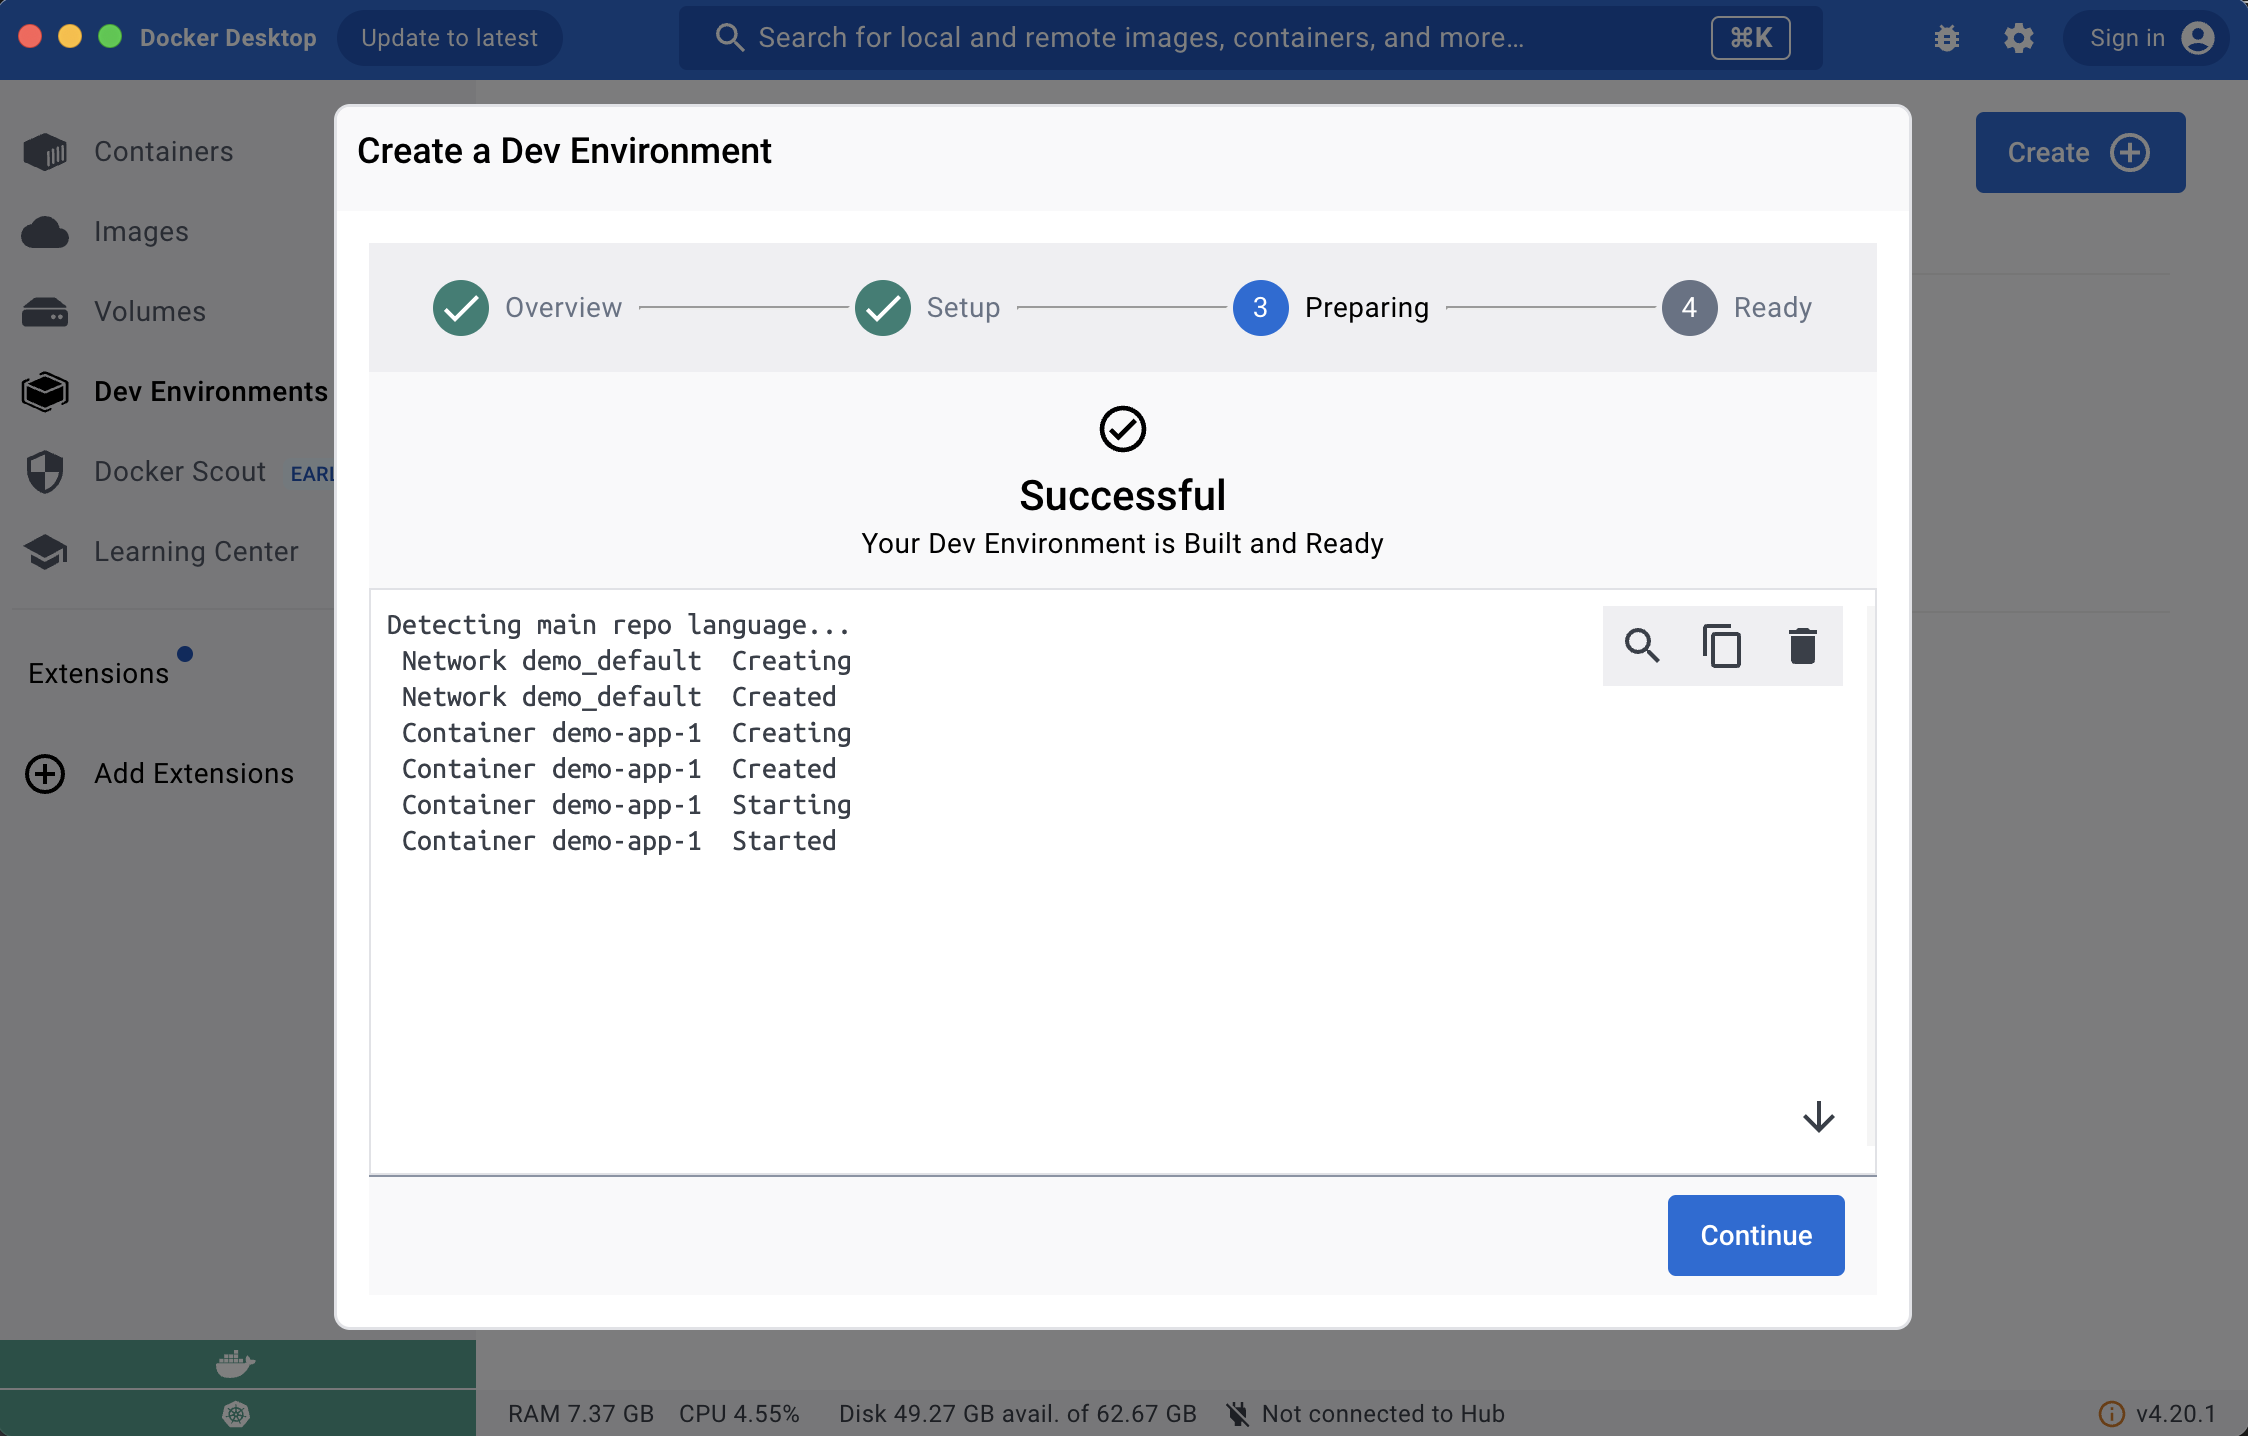
然后再使用 Dev Environments 打开该目录,程序会自动拉取该镜像并创建开发环境:

dev-environments-created.png

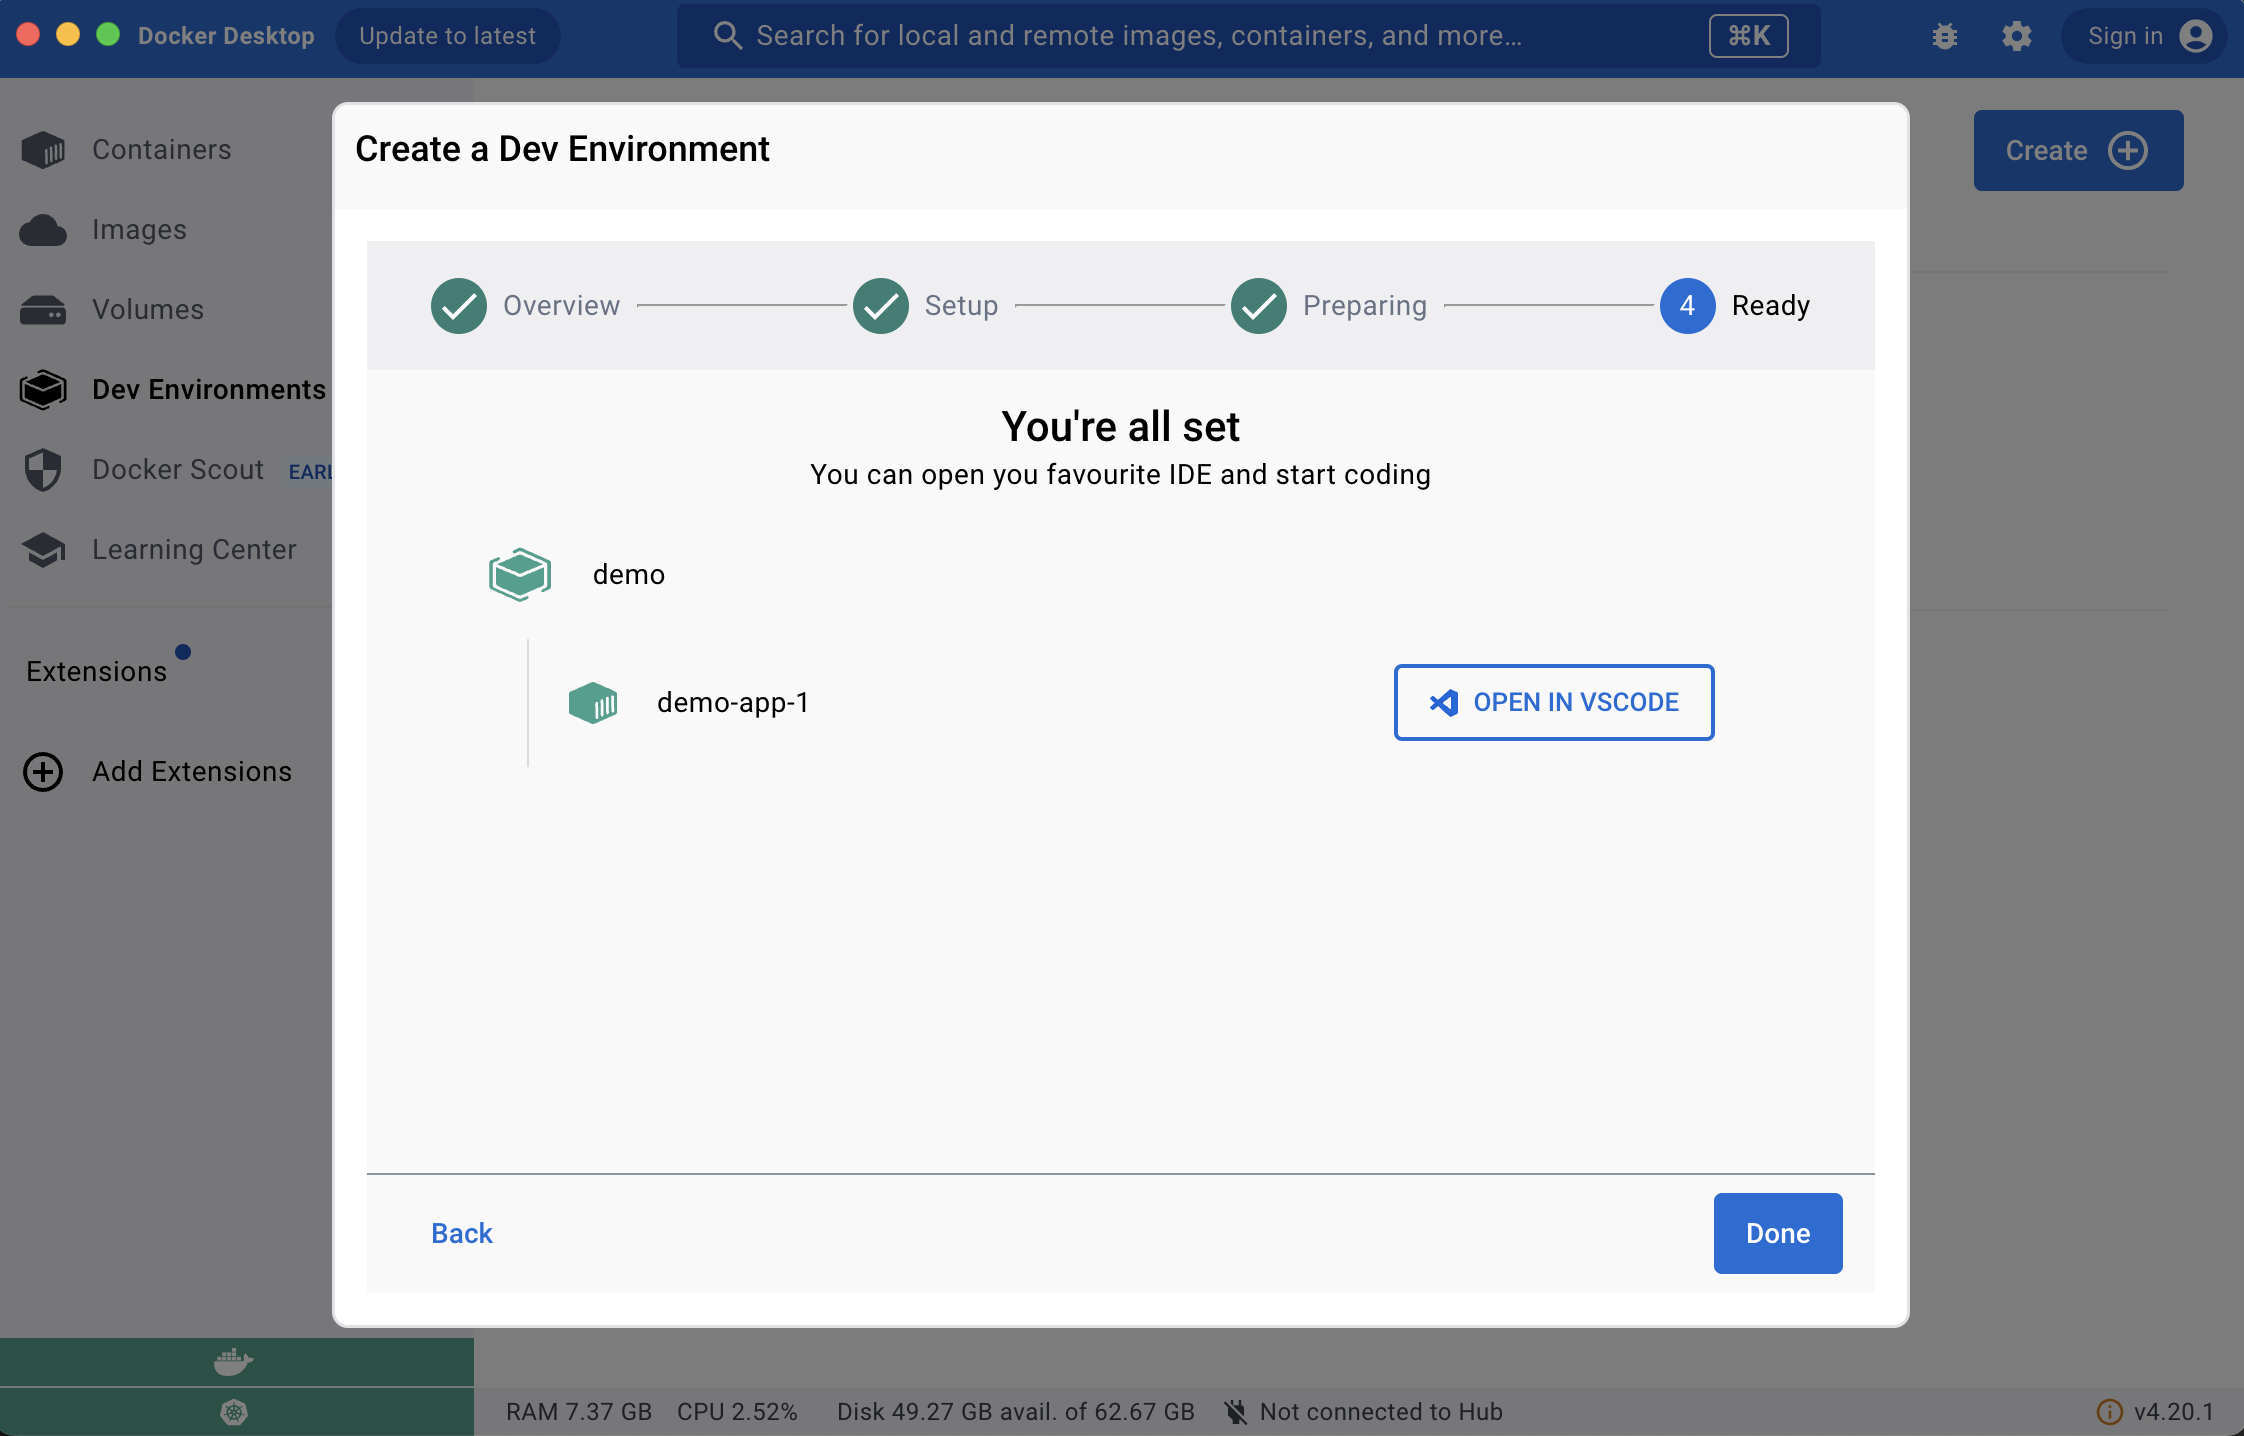
开发环境创建成功后,我们就可以使用 VSCode 打开了:

dev-environments-done.png

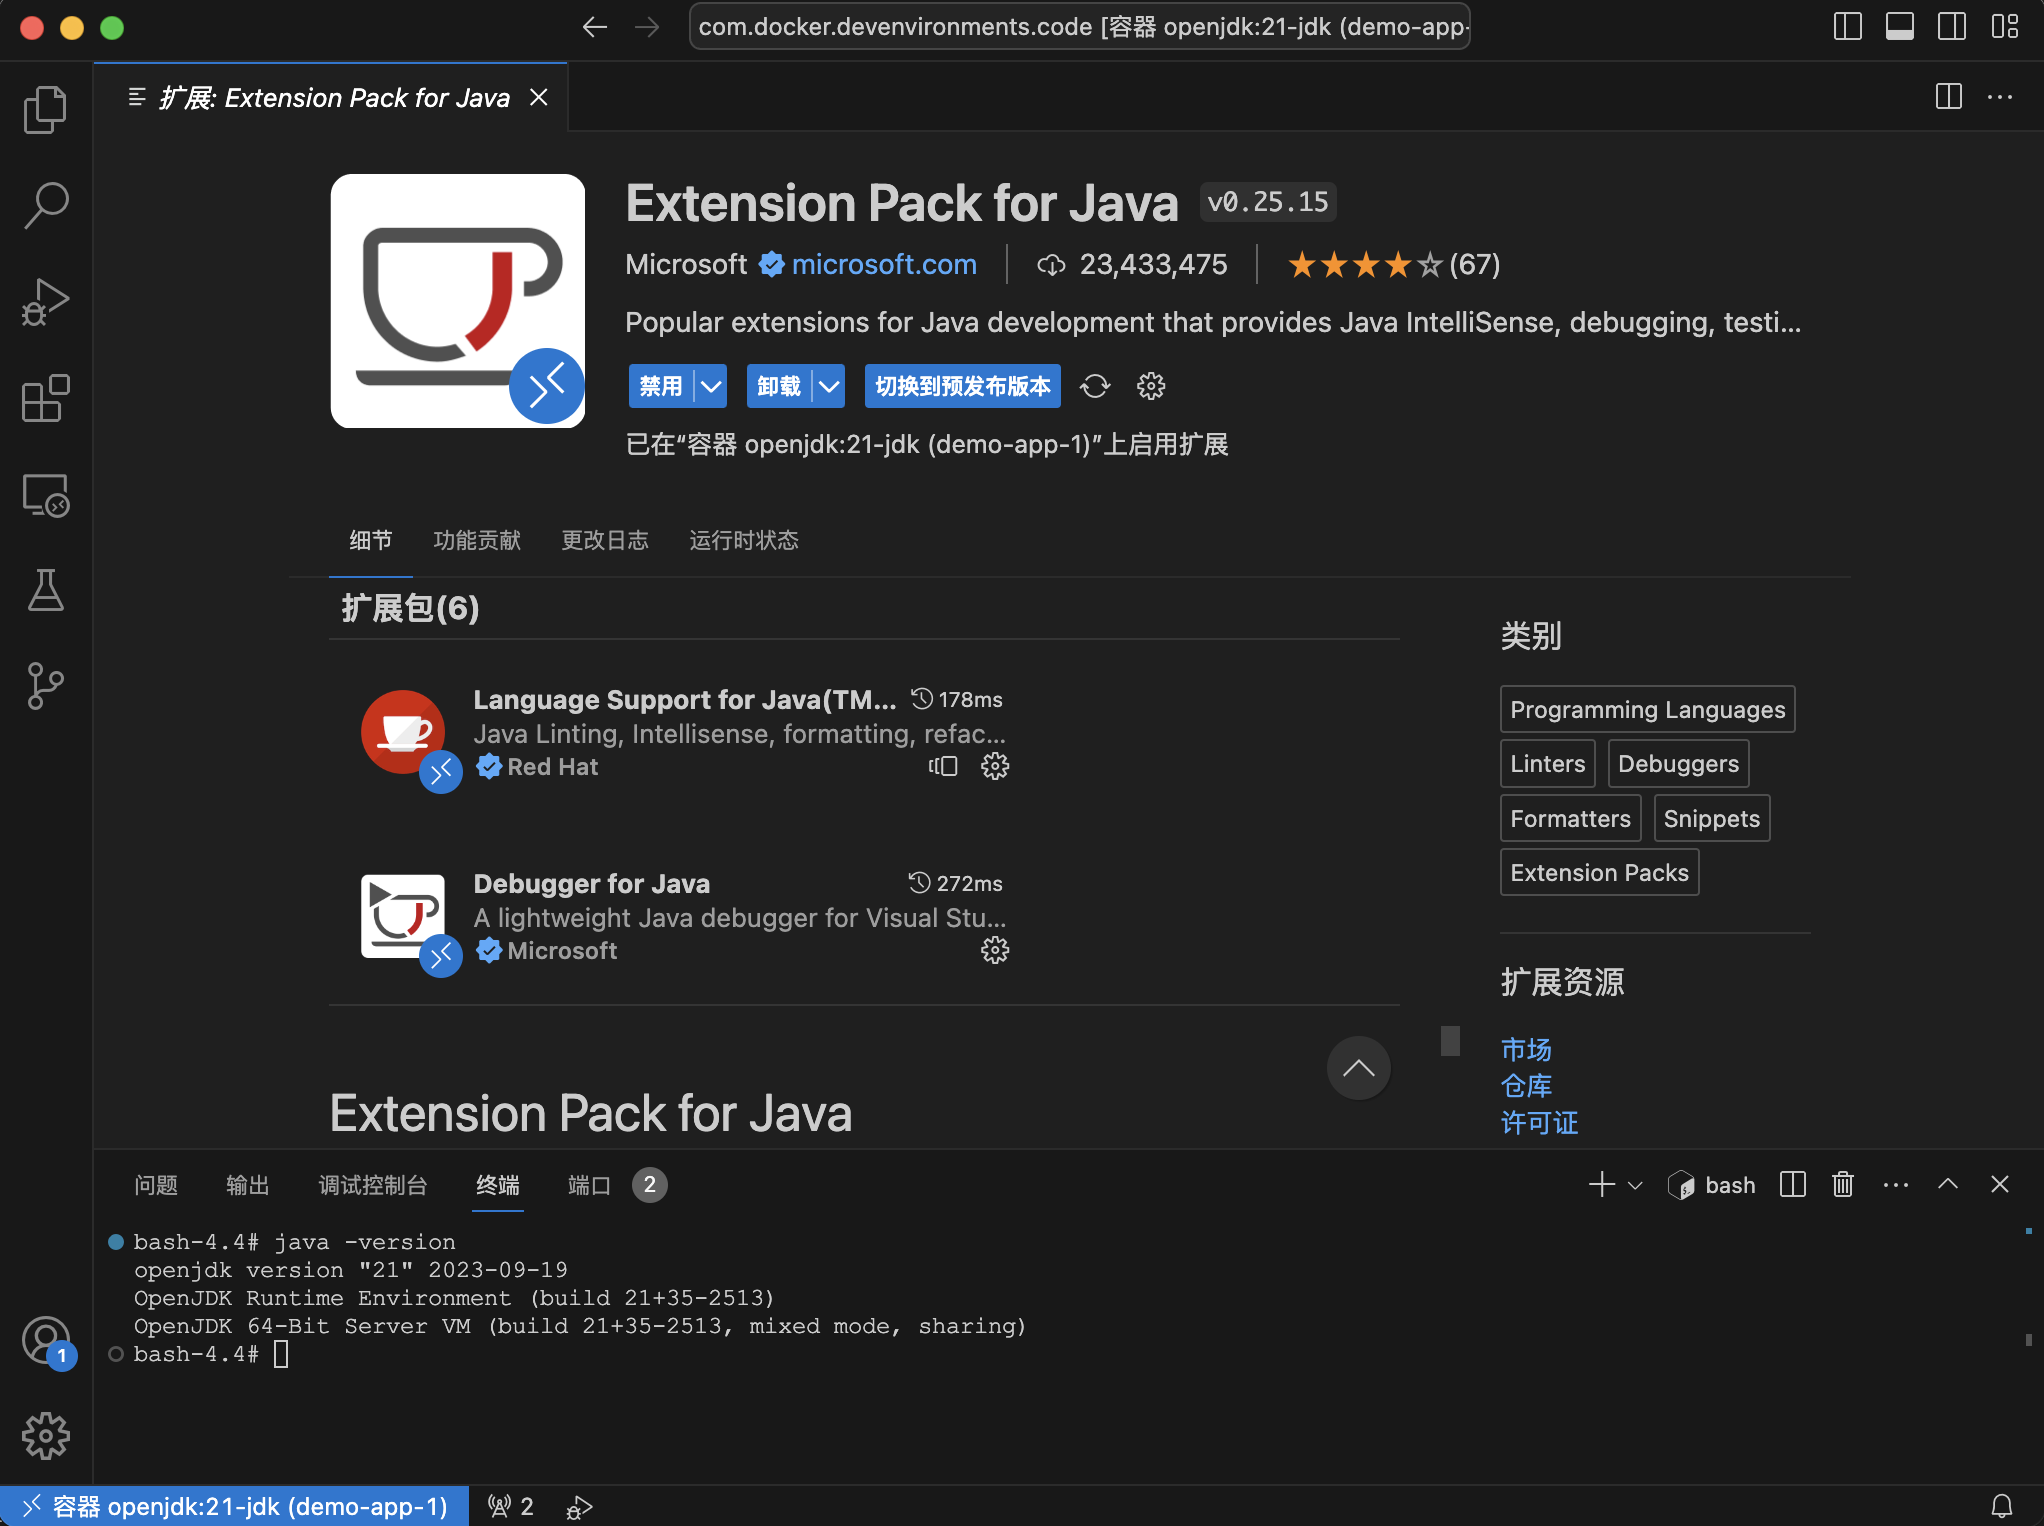
使用 VSCode 打开开发环境,实际上就是使用 VSCode 的 Dev Containers 插件 连接到容器里面,打开终端,敲入 java -version 命令:

bash-4.4# java -version
openjdk version "21" 2023-09-19
OpenJDK Runtime Environment (build 21+35-2513)
OpenJDK 64-Bit Server VM (build 21+35-2513, mixed mode, sharing)

由于这是一个崭新的环境,我们还要为 VSCode 安装一些开发所需的插件,比如 Extension Pack for Java

vscode-dev-env.png

至此我们就得到了一个非常干净纯粹的 Java 21 开发环境。

接下来,我们就在这个全新的开发环境中一览 Java 21 的全部特性,包括下面 15 个 JEP:

由于内容较多,我将分成三个篇幅来介绍,这是第一篇,主要介绍前 5 个特性。

字符串模板(预览版本)

字符串模板是很多语言都具备的特性,它允许在字符串中使用占位符来动态替换变量的值,这种构建字符串的方式比传统的字符串拼接或格式化更为简洁和直观。相信学过 JavaScript 的同学对下面这个 Template literals 的语法不陌生:

const name = 'zhangsan'
const age = 18
const message = `My name is ${name}, I'm ${age} years old.`
console.log(message)

如上所示,JavaScript 通过反引号 ` 来定义字符串模板,而 Java 21 则引入了一个叫做 模版表达式(Template expressions) 的概念来定义字符串模板。下面是一个简单示例:

String name = "zhangsan";
int age = 18;
String message = STR."My name is \{name}, I'm \{age} years old.";
System.out.println(message);

看上去和 JavaScript 的 Template literals 非常相似,但还是有一些区别的,模版表达式包含三个部分:

  • 首先是一个 模版处理器(template processor):这里使用的是 STR 模板处理器,也可以是 RAWFMT 等,甚至可以自定义;
  • 中间是一个点号(.);
  • 最后跟着一个字符串模板,模板中使用 \{name}\{age} 这样的占位符语法,这被称为 内嵌表达式(embedded expression)

当模版表达式运行的时候,模版处理器会将模版内容与内嵌表达式的值组合起来,生成结果。

不过,当我们执行上述代码时,很可能会报 Invalid escape sequence (valid ones are \b \t \n \f \r \" \' \\ ) 这样的错:

preview-feature-error.png

这是因为字符串模板还只是一个预览特性,根据 JEP 12: Preview Features,我们需要添加 --enable-preview 参数开启预览特性,使用 javac 编译时,还需要添加 --release 参数。使用下面的命令将 .java 文件编译成 .class 文件:

$ javac --enable-preview --release 21 StringTemplates.java 
Note: StringTemplates.java uses preview features of Java SE 21.
Note: Recompile with -Xlint:preview for details.

再使用下面的命令运行 .class 文件:

$ java --enable-preview StringTemplates
My name is zhangsan, I'm 18 years old.

从 Java 11 开始,我们可以直接运行 .java 文件了,参见 JEP 330,所以上面的两个命令也可以省略成一个命令:

$ java --enable-preview --source 21 StringTemplates.java

STR 模版处理器

STR 模板处理器中的内嵌表达式还有很多其他写法,比如执行数学运算:

int x = 1, y = 2;
String s1 = STR."\{x} + \{y} = \{x + y}";

调用方法:

String s2 = STR."Java version is \{getVersion()}";

访问字段:

Person p = new Person(name, age);
String s3 = STR."My name is \{p.name}, I'm \{p.age} years old.";

内嵌表达式中可以直接使用双引号,不用 \" 转义:

String s4 = STR."I'm \{age >= 18 ? "an adult" : "a child"}.";

内嵌表达式中可以编写注释和换行:

String s5 = STR."I'm \{
    // check the age
    age >= 18 ? "an adult" : "a child"
}.";

多行模板表达式

在 Java 13 的 JEP 355 中首次引入了 文本块(Text Blocks) 特性,并经过 Java 14 的 JEP 368 和 Java 15 的 JEP 378 两个版本的迭代,使得该特性正式可用,这个特性可以让我们在 Java 代码中愉快地使用多行字符串。在使用文本块之前,定义一个 JSON 格式的字符串可能会写出像下面这样无法直视的代码来:

String json1 = "{\n" +
               "  \"name\": \"zhangsan\",\n" +
               "  \"age\": 18\n" +
               "}\n";

但是在使用文本块之后,这样的代码就变得非常清爽:

String json2 = """
               {
                 "name": "zhangsan",
                 "age": 18
               }
               """;

文本块以三个双引号 """ 开始,同样以三个双引号结束,看上去和 Python 的多行字符串类似,不过 Java 的文本块会自动处理换行和缩进,使用起来更方便。上面的文本块在 Java 中输出如下:

{
  "name": "zhangsan",
  "age": 18
}

注意开头没有换行,结尾有一个换行。而在 Python 中输出如下:


               {
                 "name": "zhangsan",
                 "age": 18
               }

不仅开头和结尾都有换行,而且每一行有很多缩进,这里可以看出 Python 的处理很简单,它直接把 """ 之间的内容原样输出了,而 Java 是根据最后一个 """ 和内容之间的相对缩进来决定输出。很显然,我们更喜欢 Java 这样的输出结果,如果希望 Python 有同样的输出结果,就得这样写:

json = """{
  "name": "zhangsan",
  "age": 18
}
"""

这在代码的可读性上就比不上 Java 了,这里不得不感叹 Java 的设计,在细节的处理上做的确实不错。

言归正传,说回字符串模板这个特性,我们也可以在文本块中使用,如下:

String json3 = STR."""
               {
                 "name": "\{name}",
                 "age": \{age}
               }
               """;

FMT 模板处理器

FMT 是 Java 21 内置的另一个模版处理器,它不仅有 STR 模版处理器的插值功能,还可以对输出进行格式化操作。格式说明符(format specifiers) 放在嵌入表达式的左侧,如下所示:

%7.2f\{price}

支持的格式说明符参见 java.util.Formatter 文档。

不过在我的环境里编译时,会报错 cannot find symbol: variable FMT,就算是把镜像更换成 openjdk:22-jdk 也是一样的错,不清楚是为什么。

有序集合

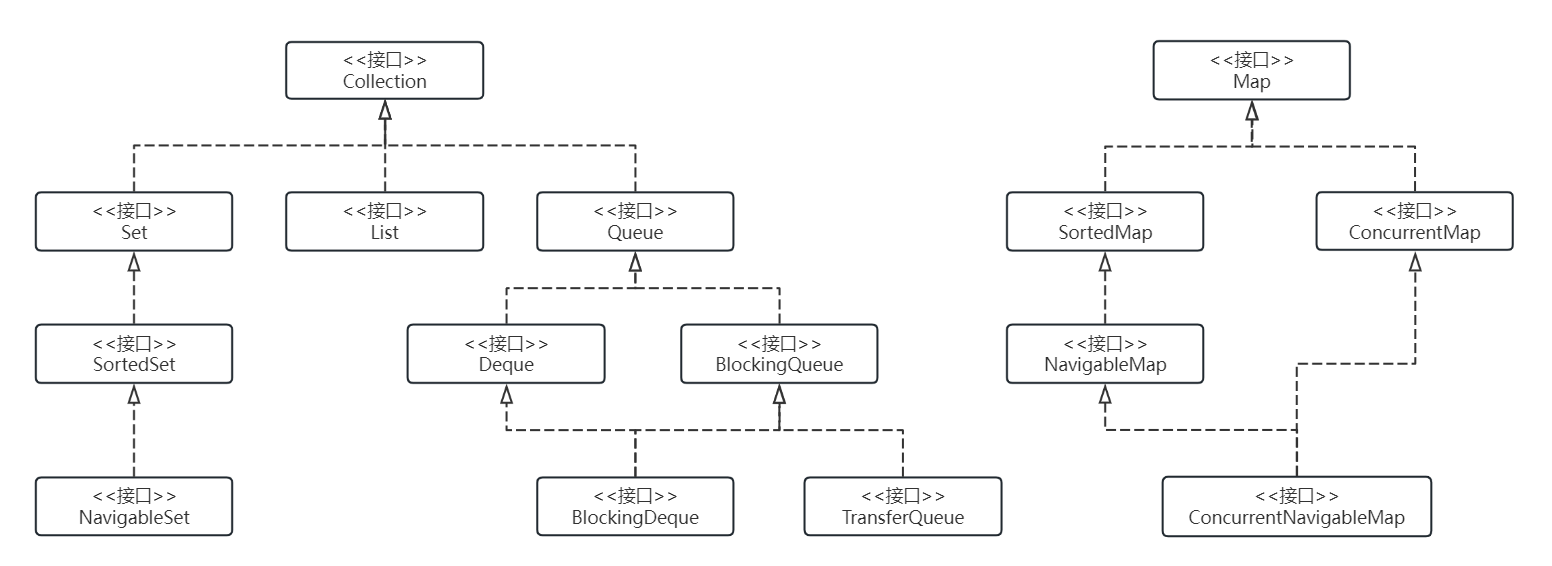
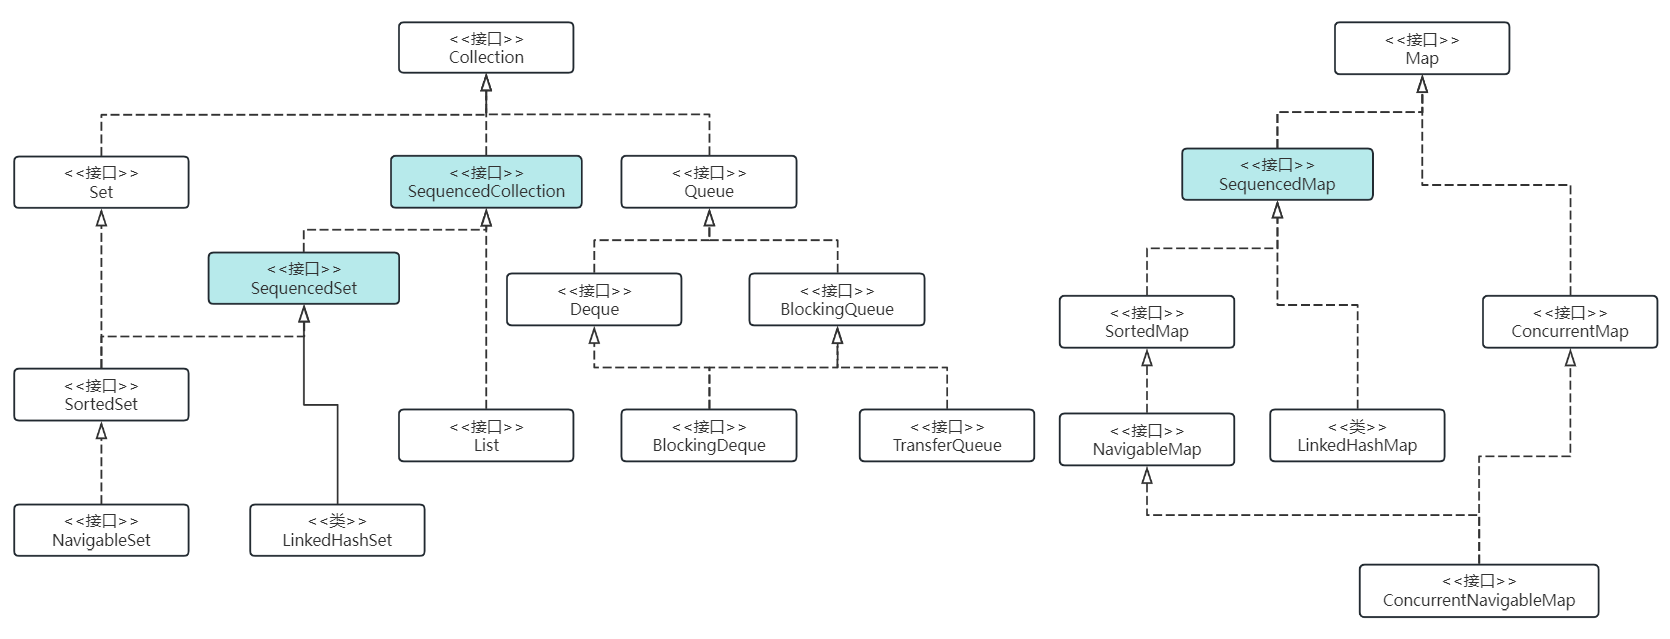
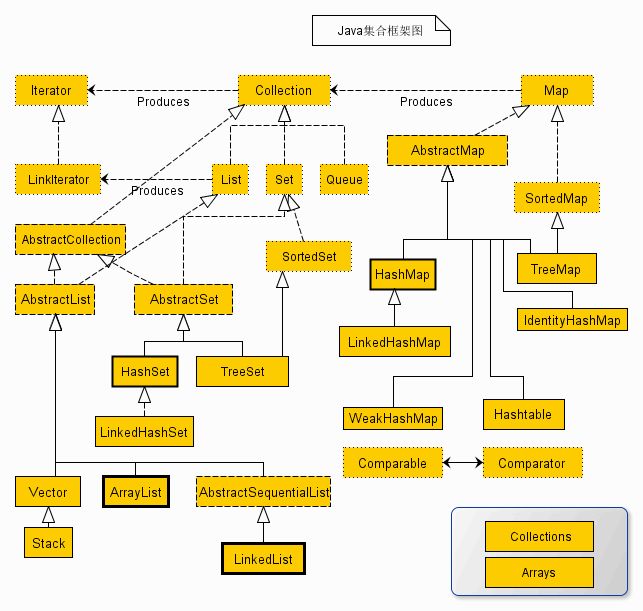
Java 集合框架(Java Collections Framework,JCF) 为集合的表示和操作提供了一套统一的体系架构,让开发人员可以使用标准的接口来组织和操作集合,而不必关心底层的数据结构或实现方式。JCF 的接口大致可以分为 CollectionMap 两组,一共 15 个:

jcf-interfaces.png

在过去的 20 个版本里,这些接口已经被证明非常有用,在日常开发中发挥了重要的作用。那么 Java 21 为什么又要增加一个新的 有序集合(Sequenced Collections) 接口呢?

不一致的顺序操作

这是因为这些接口在处理集合顺序问题时很不一致,导致了无谓的复杂性,比如要获取集合的第一个元素:

获取第一个元素
Listlist.get(0)
Dequedeque.getFirst()
SortedSetsortedSet.first()
LinkedHashSetlinkedHashSet.iterator().next()

可以看到,不同的集合有着不同的实现。再比如获取集合的最后一个元素:

获取最后一个元素
Listlist.get(list.size() - 1)
Dequedeque.getLast()
SortedSetsortedSet.last()
LinkedHashSet-

List 的实现显得非常笨重,而 LinkedHashSet 根本没有提供直接的方法,只能将整个集合遍历一遍才能获取最后一个元素。

除了获取集合的第一个元素和最后一个元素,对集合进行逆序遍历也是各不相同,比如 NavigableSet 提供了 descendingSet() 方法来逆序遍历:

for (var e : navSet.descendingSet()) {
    process(e);
}

Deque 通过 descendingIterator() 来逆序遍历:

for (var it = deque.descendingIterator(); it.hasNext();) {
    var e = it.next();
    process(e);
}

List 则是通过 listIterator() 来逆序遍历:

for (var it = list.listIterator(list.size()); it.hasPrevious();) {
    var e = it.previous();
    process(e);
}

由此可见,与顺序相关的处理方法散落在 JCF 的不同地方,使用起来极为不便。于是,Java 21 为我们提供了一个描述和操作有序集合的新接口,这个接口定义了一些与顺序相关的方法,将这些散落在各个地方的逻辑集中起来,让我们更方便地处理有序集合。

统一的有序集合接口

与顺序相关的操作主要包括三个方面:

  • 获取集合的第一个或最后一个元素
  • 向集合的最前面或最后面插入或删除元素
  • 按照逆序遍历集合

为此,Java 21 新增了三个有序接口:SequencedCollectionSequencedSetSequencedMap,他们的定义如下:

interface SequencedCollection<E> extends Collection<E> {
    SequencedCollection<E> reversed();
    void addFirst(E);
    void addLast(E);
    E getFirst();
    E getLast();
    E removeFirst();
    E removeLast();
}

interface SequencedSet<E> extends Set<E>, SequencedCollection<E> {
    SequencedSet<E> reversed();
}

interface SequencedMap<K,V> extends Map<K,V> {
    SequencedMap<K,V> reversed();
    SequencedSet<K> sequencedKeySet();
    SequencedCollection<V> sequencedValues();
    SequencedSet<Entry<K,V>> sequencedEntrySet();
    V putFirst(K, V);
    V putLast(K, V);
    Entry<K, V> firstEntry();
    Entry<K, V> lastEntry();
    Entry<K, V> pollFirstEntry();
    Entry<K, V> pollLastEntry();
}

他们在 JCF 大家庭中的位置如下图所示:

sequenced-collection.png

有了这些接口,对于所有的有序集合,我们都可以通过下面的方法来获取第一个和最后一个元素:

System.out.println("The first element is: " + list.getFirst());
System.out.println("The last element is: " + list.getLast());

逆序遍历也变得格外简单:

list.reversed().forEach(it -> System.out.println(it));

分代式 ZGC

想要搞清楚 Java 21 中的 分代式 ZGC(Generational ZGC) 这个特性,我们需要先搞清楚什么是 ZGC。

ZGC 简介

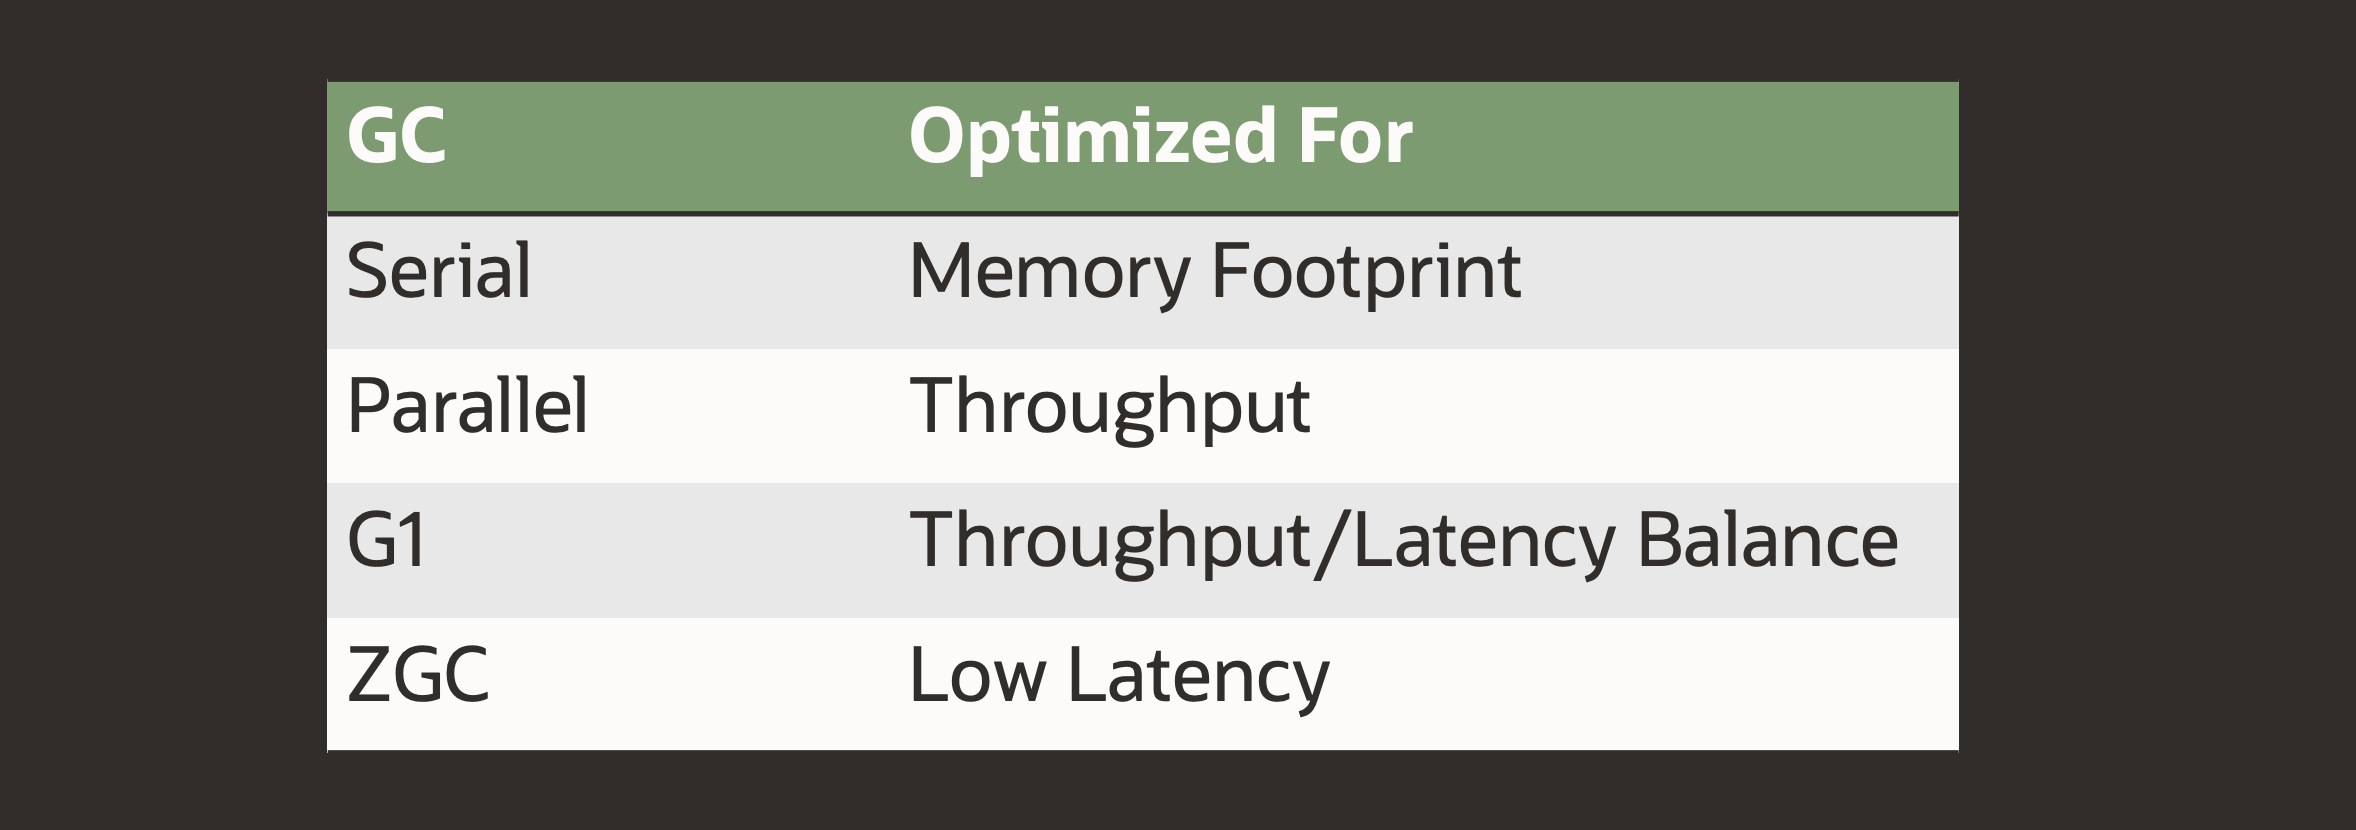
ZGC(The Z Garbage Collector) 是由 Oracle 开发的一款垃圾回收器,最初在 Java 11 中以实验性功能推出,并经过几个版本的迭代,最终在 Java 15 中被宣布为 Production Ready,相比于其他的垃圾回收器,ZGC 更适用于大内存、低延迟服务的内存管理和回收。下图展示的是不同的垃圾回收器所专注的目标也各不相同:

gc-landscape.png

低延迟服务的最大敌人是 GC 停顿,所谓 GC 停顿指的是垃圾回收期间的 STW(Stop The World),当 STW 时,所有的应用线程全部暂停,等待 GC 结束后才能继续运行。要想实现低延迟,就要想办法减少 GC 的停顿时间,根据 JEP 333 的介绍,最初 ZGC 的目标是:

  • GC 停顿时间不超过 10ms;
  • 支持处理小到几百 MB,大到 TB 量级的堆;
  • 相对于使用 G1,应用吞吐量的降低不超过 15%;

经过几年的发展,目前 ZGC 的最大停顿时间已经优化到了不超过 1 毫秒(Sub-millisecond,亚毫秒级),且停顿时间不会随着堆的增大而增加,甚至不会随着 root-set 或 live-set 的增大而增加(通过 JEP 376 Concurrent Thread-Stack Processing 实现),支持处理最小 8MB,最大 16TB 的堆:

zgc-goals.png

ZGC 之所以能实现这么快的速度,不仅是因为它在算法上做了大量的优化和改进,而且还革命性的使用了大量的创新技术,包括:

  • Concurrent:全链路并发,ZGC 在整个垃圾回收阶段几乎全部实现了并发;
  • Region-based:和 G1 类似,ZGC 是一种基于区域的垃圾回收器;
  • Compacting:垃圾回收的过程中,ZGC 会产生内存碎片,所以要进行内存整理;
  • NUMA-aware:NUMA 全称 Non-Uniform Memory Access(非一致内存访问),是一种多内存访问技术,使用 NUMA,CPU 会访问离它最近的内存,提升读写效率;
  • Using colored pointers:染色指针是一种将数据存放在指针里的技术,ZGC 通过染色指针来标记对象,以及实现对象的多重视图;
  • Using load barriers:当应用程序从堆中读取对象引用时,JIT 会向应用代码中注入一小段代码,这就是读屏障;通过读屏障操作,不仅可以让应用线程帮助完成对象的标记(mark),而且当对象地址发生变化时,还能自动实现对象转移(relocate)和重映射(remap);

关于这些技术点,网上的参考资料有很多,有兴趣的同学可以通过本文的更多部分进一步学习,其中最有意思的莫过于 染色指针读屏障,下面重点介绍这两项。

染色指针

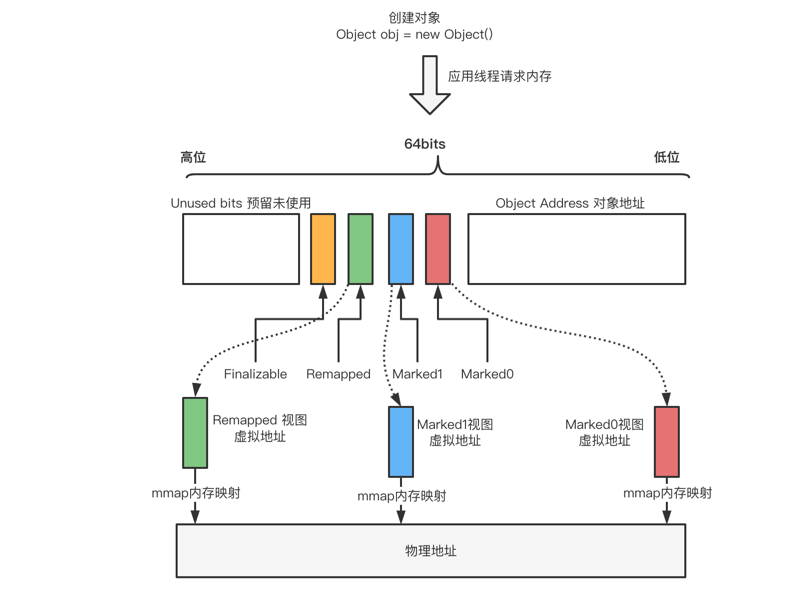
在 64 位的操作系统中,一个指针有 64 位,但是由于内存大小限制,其实有很多高阶位是用不上的,所以我们可以在指针的高阶位中嵌入一些元数据,这种在指针中存储元数据的技术就叫做 染色指针(Colored Pointers)。染色指针是 ZGC 的核心设计之一,以前的垃圾回收器都是使用对象头来标记对象,而 ZGC 则通过染色指针来标记对象。ZGC 将一个 64 位的指针划分成三个部分:

colored-pointers.png

其中,前面的 16 位暂时没用,预留给以后使用;后面的 44 位表示对象的地址,所以 ZGC 最大可以支持 2^44=16T 内存;中间的 4 位即染色位,分别是:

  • Finalizable:标识这个对象只能通过 Finalizer 才能访问;
  • Remapped:标识这个对象是否在转移集(Relocation Set)中;
  • Marked1:用于标记可到达的对象(活跃对象);
  • Marked0:用于标记可到达的对象(活跃对象);

此外,染色指针不仅用来标记对象,还可以实现对象地址的多重视图,上述 Marked0、Marked1、Remapped 三个染色位其实代表了三种地址视图,分别对应三个虚拟地址,这三个虚拟地址指向同一个物理地址,并且在同一时间,三个虚拟地址有且只有一个有效,整个视图映射关系如下:

zgc-mmap.png

这三个地址视图的切换是由垃圾回收的不同阶段触发的:

  • 初始化阶段:程序启动时,ZGC 完成初始化,整个堆内存空间的地址视图被设置为 Remapped;
  • 标记阶段:当进入标记阶段时,视图转变为 Marked0 或者 Marked1;
  • 转移阶段:从标记阶段结束进入转移阶段时,视图再次被设置为 Remapped;

读屏障

读屏障(Load Barriers) 是 ZGC 的另一项核心技术,当应用程序从堆中读取对象引用时,JIT 会向应用代码中注入一小段代码:

load-barriers.png

在上面的代码示例中,只有第一行是从堆中读取对象引用,所以只会在第一行后面注入代码,注入的代码类似于这样:

String n = person.name; // Loading an object reference from heap
if (n & bad_bit_mask) {
    slow_path(register_for(n), address_of(person.name));
}

这行代码虽然简单,但是用途却很大,在垃圾回收的不同阶段,触发的逻辑也有所不同:在标记阶段,通过读屏障操作,可以让应用线程帮助 GC 线程一起完成对象的标记或重映射;在转移阶段,如果对象地址发生变化,还能自动实现对象转移。

ZGC 工作流程

整个 ZGC 可以划分成下面六个阶段:

zgc-phases.png

其中有三个是 STW 阶段,尽管如此,但是 ZGC 对 STW 的停顿时间有着严格的要求,一般不会超过 1 毫秒。这六个阶段的前三个可以统称为 标记(Mark)阶段

  • Pause Mark Start - 标记开始阶段,将地址视图被设置成 Marked0 或 Marked1(交替设置);这个阶段会 STW,它只标记 GC Roots 直接可达的对象,GC Roots 类似于局部变量,通过它可以访问堆上其他对象,这样的对象不会太多,所以 STW 时间很短;
  • Concurrent Mark/Remap - 并发标记阶段,GC 线程和应用线程是并发执行的,在第一步的基础上,继续往下标记存活的对象;另外,这个阶段还会对上一个 GC 周期留下来的失效指针进行重映射修复;
  • Pause Mark End - 标记结束阶段,由于并发标记阶段应用线程还在运行,所以可能会修改对象的引用,导致漏标,这个阶段会标记这些漏标的对象;

ZGC 的后三个阶段统称为 转移(Relocation)阶段(也叫重定位阶段):

  • Concurrent Prepare for Relocate - 为转移阶段做准备,比如筛选所有可以被回收的页面,将垃圾比较多的页面作为接下来转移候选集(EC);
  • Pause Relocate Start - 转移开始阶段,将地址视图从 Marked0 或者 Marked1 调整为 Remapped,从 GC Roots 出发,遍历根对象的直接引用的对象,对这些对象进行转移;
  • Concurrent Relocate - 并发转移阶段,将之前选中的转移集中存活的对象移到新的页面,转移完成的页面即可被回收掉,并发转移完成之后整个 ZGC 周期完成。注意这里只转移了对象,并没有对失效指针进行重映射,ZGC 通过转发表存储旧地址到新地址的映射,如果这个阶段应用线程访问这些失效指针,会触发读屏障机制自动修复,对于没有访问到的失效指针,要到下一个 GC 周期的并发标记阶段才会被修复。

为什么要分代?

在 ZGC 面世之前,Java 内置的所有垃圾回收器都实现了分代回收(G1 是逻辑分代):

垃圾回收器(别名)用法说明
Serial GC、Serial Copying-XX:+UseSerialGC串行,用于年轻代,使用复制算法
Serial Old、MSC-XX:+UseSerialOldGC串行,用于老年代,使用标记-整理算法
ParNew GC-XX:+UseParNewGCSerial GC 的并行版本,用于年轻代,使用复制算法
Parallel GC、Parallel Scavenge-XX:+UseParallelGC并行,用于年轻代,使用复制算法
Parallel Old、Parallel Compacting-XX:+UseParallelOldGC并行,用于老年代,使用标记-整理算法
CMS、Concurrent Mark Sweep-XX:+UseConcMarkSweepGC并发,用于老年代,使用标记-清除算法
G1、Garbage First-XX:+UseG1GC并发,既可以用于年轻代,也可以用于老年代,使用复制 + 标记-整理算法,用来取代 CMS

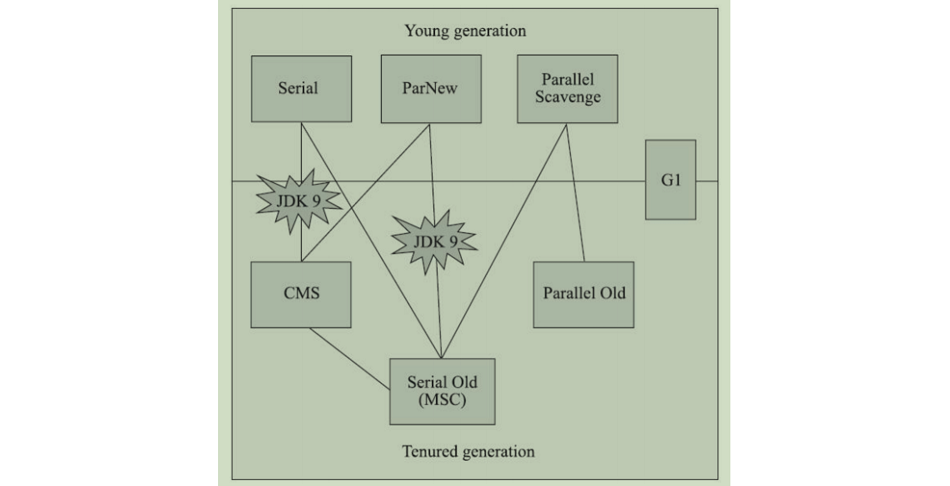
这些分代回收器之间可以搭配使用,周志明老师在《深入理解 Java 虚拟机》这本书中总结了各种回收器之间的关系:

gc-pairs.png

其中,Serial + CMS 和 ParNew + Serial Old 这两个组件在 Java 9 之后已经被取消,而 CMS 与 Serial Old 之间的连线表示 CMS 在并发失败的时候(Concurrent Mode Failure)会切换成 Serial Old 备用方案。

分代的基本思想源自于 弱分代假说(Weak Generational Hypothesis),这个假说认为绝大部分对象都是朝生夕死的,也就是说年轻对象往往很快死去,而老对象往往会保留下来。根据这个假说,JVM 将内存区域划分为 年轻代(Young Generation)老年代(Old Generation),新生代又进一步划分为 伊甸园区(Eden)第一幸存区(S0)第二幸存区(S1)

伊甸园区用来分配新创建的对象,如果没有足够的空间,就会触发一次 年轻代 GC(Young GC,Minor GC) 来释放内存空间,这里一般使用 标记-复制(Mark-Copy) 算法,将存活的对象标记下来,然后复制到一个幸存区中;年轻代的内存空间一般较小,所以可以更频繁地触发 GC,清理掉那些朝生夕死的对象,从而提高应用程序的性能;如果 GC 后伊甸园区还没有足够的空间存放新创建的对象,或者幸存区中某个对象的存活时间超过一定的阈值,这时就会将对象分配到老年代,如果老年代的空间也满了,就会触发一次 老年代 GC(Old GC,Full GC);老年代的内存空间要大的多,而且其中的对象大部分是存活的,GC 发生的频率要小很多,所以不再使用标记-复制算法,而是采用移动对象的方式来实现内存碎片的整理。

但是在上面的 ZGC 的工作流程中,我们却没有看到分代的影子,这也就意味着每次 ZGC 都是对整个堆空间进行扫描,尽管 ZGC 的 STW 时间已经被优化到不到 1ms,但是其他几个阶段是和应用线程一起执行的,这势必会影响到应用程序的吞吐量。让 ZGC 支持分代是一项巨大的工程,开发团队足足花了三年时间才让我们有幸在 Java 21 中体验到这一令人激动的特性。

除了 ZGC,Java 11 之后还引入了一些新的垃圾回收器:

垃圾回收器用法说明
ZGC-XX:+UseZGC低延迟 GC,from JDK 11
Epsilon GC-XX:+UseEpsilonGCNo-op GC,什么都不做,用于测试,from JDK 11
Shenandoah-XX:+UseShenandoahGCCPU 密集型 GC,from JDK 12

ZGC 实践

使用 -XX:+PrintCommandLineFlags,可以打印出 Java 的默认命令行参数:

$ java -XX:+PrintCommandLineFlags -version
-XX:ConcGCThreads=1 -XX:G1ConcRefinementThreads=4 -XX:GCDrainStackTargetSize=64 -XX:InitialHeapSize=128639872 -XX:MarkStackSize=4194304 -XX:MaxHeapSize=2058237952 -XX:MinHeapSize=6815736 -XX:+PrintCommandLineFlags -XX:ReservedCodeCacheSize=251658240 -XX:+SegmentedCodeCache -XX:+UseCompressedOops -XX:+UseG1GC 
openjdk version "21" 2023-09-19
OpenJDK Runtime Environment (build 21+35-2513)
OpenJDK 64-Bit Server VM (build 21+35-2513, mixed mode, sharing)

从上面的结果可以看出,Java 21 默认使用的仍然是 G1 垃圾回收器,它从 Java 9 就开始做为默认垃圾回收器了。

注意:Java 8 中默认的垃圾回收器是 Parallel GC。

如果想开启 ZGC,我们需要加上 -XX:+UseZGC 参数:

$ java -XX:+UseZGC -Xmx100M -Xlog:gc ZgcTest.java

其中 -Xlog:gc 参数表示打印出 GC 过程中的日志(就是 Java 8 的 -XX:+PrintGC 参数),输出结果如下:

[0.157s][info][gc] Using The Z Garbage Collector
[0.420s][info][gc] GC(0) Garbage Collection (Warmup) 14M(14%)->12M(12%)
[0.472s][info][gc] GC(1) Garbage Collection (System.gc()) 18M(18%)->8M(8%)

也可以使用 -Xlog:gc* 参数打印出 GC 过程中的详细日志(就是 Java 8 的 -XX+PrintGCDetails 参数),输出结果如下:

$ java -XX:+UseZGC -Xmx100M -Xlog:gc* ZgcTest.java
[0.010s][info][gc,init] Initializing The Z Garbage Collector
[0.011s][info][gc,init] Version: 21+35-2513 (release)
[0.011s][info][gc,init] Using legacy single-generation mode
[0.011s][info][gc,init] Probing address space for the highest valid bit: 47
[0.011s][info][gc,init] NUMA Support: Disabled
[0.011s][info][gc,init] CPUs: 4 total, 4 available
[0.011s][info][gc,init] Memory: 7851M
[0.011s][info][gc,init] Large Page Support: Disabled
[0.011s][info][gc,init] GC Workers: 1 (dynamic)
[0.011s][info][gc,init] Address Space Type: Contiguous/Unrestricted/Complete
[0.011s][info][gc,init] Address Space Size: 1600M x 3 = 4800M
[0.011s][info][gc,init] Heap Backing File: /memfd:java_heap
[0.011s][info][gc,init] Heap Backing Filesystem: tmpfs (0x1021994)
[0.012s][info][gc,init] Min Capacity: 8M
[0.012s][info][gc,init] Initial Capacity: 100M
[0.012s][info][gc,init] Max Capacity: 100M
[0.012s][info][gc,init] Medium Page Size: N/A
[0.012s][info][gc,init] Pre-touch: Disabled
[0.012s][info][gc,init] Available space on backing filesystem: N/A
[0.014s][info][gc,init] Uncommit: Enabled
[0.014s][info][gc,init] Uncommit Delay: 300s
[0.134s][info][gc,init] Runtime Workers: 1
[0.134s][info][gc     ] Using The Z Garbage Collector
[0.149s][info][gc,metaspace] CDS archive(s) mapped at: [0x0000006800000000-0x0000006800cb0000-0x0000006800cb0000), size 13303808, SharedBaseAddress: 0x0000006800000000, ArchiveRelocationMode: 1.
[0.149s][info][gc,metaspace] Compressed class space mapped at: 0x0000006801000000-0x0000006841000000, reserved size: 1073741824
[0.149s][info][gc,metaspace] Narrow klass base: 0x0000006800000000, Narrow klass shift: 0, Narrow klass range: 0x100000000
[0.357s][info][gc,start    ] GC(0) Garbage Collection (Warmup)
[0.357s][info][gc,task     ] GC(0) Using 1 workers
[0.357s][info][gc,phases   ] GC(0) Pause Mark Start 0.007ms
[0.366s][info][gc,phases   ] GC(0) Concurrent Mark 8.442ms
[0.366s][info][gc,phases   ] GC(0) Pause Mark End 0.005ms
[0.366s][info][gc,phases   ] GC(0) Concurrent Mark Free 0.000ms
[0.367s][info][gc,phases   ] GC(0) Concurrent Process Non-Strong References 1.092ms
[0.367s][info][gc,phases   ] GC(0) Concurrent Reset Relocation Set 0.000ms
[0.373s][info][gc,phases   ] GC(0) Concurrent Select Relocation Set 5.587ms
[0.373s][info][gc,phases   ] GC(0) Pause Relocate Start 0.003ms
[0.375s][info][gc,phases   ] GC(0) Concurrent Relocate 2.239ms
[0.375s][info][gc,load     ] GC(0) Load: 0.65/0.79/0.63
[0.375s][info][gc,mmu      ] GC(0) MMU: 2ms/99.7%, 5ms/99.9%, 10ms/99.9%, 20ms/99.9%, 50ms/100.0%, 100ms/100.0%
[0.375s][info][gc,marking  ] GC(0) Mark: 1 stripe(s), 2 proactive flush(es), 1 terminate flush(es), 0 completion(s), 0 continuation(s) 
[0.375s][info][gc,marking  ] GC(0) Mark Stack Usage: 32M
[0.375s][info][gc,nmethod  ] GC(0) NMethods: 889 registered, 90 unregistered
[0.375s][info][gc,metaspace] GC(0) Metaspace: 8M used, 8M committed, 1088M reserved
[0.375s][info][gc,ref      ] GC(0) Soft: 142 encountered, 0 discovered, 0 enqueued
[0.375s][info][gc,ref      ] GC(0) Weak: 747 encountered, 602 discovered, 224 enqueued
[0.375s][info][gc,ref      ] GC(0) Final: 0 encountered, 0 discovered, 0 enqueued
[0.375s][info][gc,ref      ] GC(0) Phantom: 146 encountered, 144 discovered, 143 enqueued
[0.375s][info][gc,reloc    ] GC(0) Small Pages: 7 / 14M, Empty: 0M, Relocated: 3M, In-Place: 0
[0.375s][info][gc,reloc    ] GC(0) Large Pages: 1 / 2M, Empty: 0M, Relocated: 0M, In-Place: 0
[0.375s][info][gc,reloc    ] GC(0) Forwarding Usage: 1M
[0.375s][info][gc,heap     ] GC(0) Min Capacity: 8M(8%)
[0.375s][info][gc,heap     ] GC(0) Max Capacity: 100M(100%)
[0.375s][info][gc,heap     ] GC(0) Soft Max Capacity: 100M(100%)
[0.375s][info][gc,heap     ] GC(0)                Mark Start          Mark End        Relocate Start      Relocate End           High               Low         
[0.375s][info][gc,heap     ] GC(0)  Capacity:      100M (100%)        100M (100%)        100M (100%)        100M (100%)        100M (100%)        100M (100%)   
[0.375s][info][gc,heap     ] GC(0)      Free:       84M (84%)          82M (82%)          82M (82%)          88M (88%)          88M (88%)          78M (78%)    
[0.375s][info][gc,heap     ] GC(0)      Used:       16M (16%)          18M (18%)          18M (18%)          12M (12%)          22M (22%)          12M (12%)    
[0.375s][info][gc,heap     ] GC(0)      Live:         -                 6M (6%)            6M (6%)            6M (6%)             -                  -          
[0.375s][info][gc,heap     ] GC(0) Allocated:         -                 2M (2%)            2M (2%)            3M (4%)             -                  -          
[0.375s][info][gc,heap     ] GC(0)   Garbage:         -                 9M (10%)           9M (10%)           1M (2%)             -                  -          
[0.375s][info][gc,heap     ] GC(0) Reclaimed:         -                  -                 0M (0%)            7M (8%)             -                  -          
[0.375s][info][gc          ] GC(0) Garbage Collection (Warmup) 16M(16%)->12M(12%)
[0.403s][info][gc,start    ] GC(1) Garbage Collection (System.gc())
[0.403s][info][gc,task     ] GC(1) Using 1 workers
[0.403s][info][gc,phases   ] GC(1) Pause Mark Start 0.006ms
[0.410s][info][gc,phases   ] GC(1) Concurrent Mark 7.316ms
[0.410s][info][gc,phases   ] GC(1) Pause Mark End 0.006ms
[0.410s][info][gc,phases   ] GC(1) Concurrent Mark Free 0.001ms
[0.412s][info][gc,phases   ] GC(1) Concurrent Process Non-Strong References 1.621ms
[0.412s][info][gc,phases   ] GC(1) Concurrent Reset Relocation Set 0.001ms
[0.414s][info][gc,phases   ] GC(1) Concurrent Select Relocation Set 2.436ms
[0.414s][info][gc,phases   ] GC(1) Pause Relocate Start 0.003ms
[0.415s][info][gc,phases   ] GC(1) Concurrent Relocate 0.865ms
[0.415s][info][gc,load     ] GC(1) Load: 0.65/0.79/0.63
[0.415s][info][gc,mmu      ] GC(1) MMU: 2ms/99.7%, 5ms/99.8%, 10ms/99.9%, 20ms/99.9%, 50ms/100.0%, 100ms/100.0%
[0.415s][info][gc,marking  ] GC(1) Mark: 1 stripe(s), 2 proactive flush(es), 1 terminate flush(es), 0 completion(s), 0 continuation(s) 
[0.415s][info][gc,marking  ] GC(1) Mark Stack Usage: 32M
[0.415s][info][gc,nmethod  ] GC(1) NMethods: 983 registered, 129 unregistered
[0.415s][info][gc,metaspace] GC(1) Metaspace: 9M used, 9M committed, 1088M reserved
[0.415s][info][gc,ref      ] GC(1) Soft: 155 encountered, 0 discovered, 0 enqueued
[0.415s][info][gc,ref      ] GC(1) Weak: 729 encountered, 580 discovered, 58 enqueued
[0.415s][info][gc,ref      ] GC(1) Final: 0 encountered, 0 discovered, 0 enqueued
[0.415s][info][gc,ref      ] GC(1) Phantom: 49 encountered, 47 discovered, 46 enqueued
[0.415s][info][gc,reloc    ] GC(1) Small Pages: 6 / 12M, Empty: 0M, Relocated: 1M, In-Place: 0
[0.415s][info][gc,reloc    ] GC(1) Large Pages: 2 / 4M, Empty: 2M, Relocated: 0M, In-Place: 0
[0.415s][info][gc,reloc    ] GC(1) Forwarding Usage: 0M
[0.415s][info][gc,heap     ] GC(1) Min Capacity: 8M(8%)
[0.415s][info][gc,heap     ] GC(1) Max Capacity: 100M(100%)
[0.415s][info][gc,heap     ] GC(1) Soft Max Capacity: 100M(100%)
[0.415s][info][gc,heap     ] GC(1)                Mark Start          Mark End        Relocate Start      Relocate End           High               Low         
[0.415s][info][gc,heap     ] GC(1)  Capacity:      100M (100%)        100M (100%)        100M (100%)        100M (100%)        100M (100%)        100M (100%)   
[0.415s][info][gc,heap     ] GC(1)      Free:       84M (84%)          84M (84%)          84M (84%)          92M (92%)          92M (92%)          82M (82%)    
[0.415s][info][gc,heap     ] GC(1)      Used:       16M (16%)          16M (16%)          16M (16%)           8M (8%)           18M (18%)           8M (8%)     
[0.415s][info][gc,heap     ] GC(1)      Live:         -                 4M (5%)            4M (5%)            4M (5%)             -                  -          
[0.415s][info][gc,heap     ] GC(1) Allocated:         -                 0M (0%)            2M (2%)            2M (2%)             -                  -          
[0.415s][info][gc,heap     ] GC(1)   Garbage:         -                11M (11%)           9M (9%)            1M (1%)             -                  -          
[0.415s][info][gc,heap     ] GC(1) Reclaimed:         -                  -                 2M (2%)           10M (10%)            -                  -          
[0.415s][info][gc          ] GC(1) Garbage Collection (System.gc()) 16M(16%)->8M(8%)
[0.416s][info][gc,heap,exit] Heap
[0.416s][info][gc,heap,exit]  ZHeap           used 8M, capacity 100M, max capacity 100M
[0.416s][info][gc,heap,exit]  Metaspace       used 9379K, committed 9600K, reserved 1114112K
[0.416s][info][gc,heap,exit]   class space    used 1083K, committed 1216K, reserved 1048576K

从日志中可以看到 ZGC 的整个过程。默认情况下并没有开启分代式 ZGC,如果想开启分代式 ZGC,我们还需要加上 -XX:+ZGenerational 参数:

$ java -XX:+UseZGC -XX:+ZGenerational -Xmx100M -Xlog:gc* ZgcTest.java

这个输出比较多,此处就省略了,从输出中可以看到不同分代的回收情况。关于 ZGC,还有很多微调参数,详细内容可参考 ZGC 的官方文档

记录模式

记录模式(Record Patterns) 是对 记录类(Records) 这个特性的延伸,所以,我们先大致了解下什么是记录类,然后再来看看什么是记录模式。

什么是记录类(Records)?

记录类早在 Java 14 就已经引入了,它类似于 Tuple,提供了一种更简洁、更紧凑的方式来表示不可变数据,记录类经过三个版本的迭代(JEP 359JEP 384JEP 395),最终在 Java 16 中发布了正式版本。

记录类的概念在其他编程语言中其实早已有之,比如 Kotlin 的 Data class 或者 Scala 的 Case class。它本质上依然是一个类,只不过使用关键字 record 来定义:

record Point(int x, int y) { }

记录类的定义非常灵活,我们可以在单独文件中定义,也可以在类内部定义,甚至在函数内部定义。记录类的使用和普通类无异,使用 new 创建即可:

Point p1 = new Point(10, 20);
System.out.println("x = " + p1.x());
System.out.println("y = " + p1.y());
System.out.println("p1 is " + p1.toString());

记录类具备如下特点:

  • 它是一个 final 类;
  • 它不能继承其他类,也不能继承其他记录类;
  • 它的所有字段也是 final 的,所以一旦创建就不能修改;
  • 它内置实现了构造函数,函数参数就是所有的字段;
  • 它内置实现了所有字段的 getter 方法,没有 setter 方法;
  • 它内置实现了 equals()hashCode()toString() 函数;

所以上面的示例和下面的 Point 类是等价的:

public final class Point {
    final int x;
    final int y;

    public Point(int x, int y) {
        this.x = x;
        this.y = y;
    }

    public int x() {
        return x;
    }

    public int y() {
        return y;
    }

    @Override
    public boolean equals(Object o) {
        if (this == o) return true;
        if (o == null || getClass() != o.getClass()) return false;
        Point point = (Point) o;
        return x == point.x && y == point.y;
    }

    @Override
    public int hashCode() {
        return Objects.hash(x, y);
    }

    @Override
    public String toString() {
        return "Point{" +
                "x=" + x +
                ", y=" + y +
                '}';
    }
}

我们也可以在记录类中声明新的方法:

record Point(int x, int y) {
    boolean isOrigin() {
        return x == 0 && y == 0;
    }
}

记录类的很多特性和 Lombok 非常类似,比如下面通过 Lombok 的 @Value 注解创建一个不可变对象:

@Value
public class Point {
    int x;
    int y;
}

不过记录类和 Lombok 还是有一些区别的:

  • 根据 JEP 395 的描述,记录类是作为不可变数据的透明载体,也就是说记录类无法隐藏字段;然而,Lombok 允许我们修改字段名称和访问级别;
  • 记录类适合创建小型对象,当类中存在很多字段时,记录类会变得非常臃肿;使用 Lombok 的 @Builder 构建器模式可以写出更干净的代码;
  • 记录类只能创建不可变对象,而 Lombok 的 @Data 可以创建可变对象;
  • 记录类不支持继承,但是 Lombok 创建的类可以继承其他类或被其他类继承;

什么是记录模式(Record Patterns)?

相信很多人都写过类似下面这样的代码:

if (obj instanceof Integer) {
    int intValue = ((Integer) obj).intValue();
    System.out.println(intValue);
}

这段代码实际上做了三件事:

  • Test:测试 obj 的类型是否为 Integer
  • Conversion:将 obj 的类型转换为 Integer
  • Destructuring:从 Integer 类中提取出 int 值;

这三个步骤构成了一种通用的模式:测试并进行强制类型转换,这种模式被称为 模式匹配(Pattern Matching)。虽然简单,但是却很繁琐。Java 16 在 JEP 394 中正式发布了 instanceof 模式匹配 的特性,帮我们减少这种繁琐的条件状态提取:

if (obj instanceof Integer intValue) {
    System.out.println(intValue);
}

这里的 Integer intValue 被称为 类型模式(Type Patterns),其中 Integer 是匹配的断言,intValue 是匹配成功后的变量,这个变量可以直接使用,不需要再进行类型转换了。

匹配的断言也支持记录类:

if (obj instanceof Point p) {
    int x = p.x();
    int y = p.y();
    System.out.println(x + y);
}

不过,这里虽然测试和转换代码得到了简化,但是从记录类中提取值仍然不是很方便,我们还可以进一步简化这段代码:

if (obj instanceof Point(int x, int y)) {
    System.out.println(x + y);
}

这里的 Point(int x, int y) 就是 Java 21 中的 记录模式(Record Patterns),可以说它是 instanceof 模式匹配的一个特例,专门用于从记录类中提取数据;记录模式也经过了三个版本的迭代:JEP 405JEP 432JEP 440,现在终于在 Java 21 中发布了正式版本。

此外,记录模式还支持嵌套,我们可以在记录模式中嵌套另一个模式,假设有下面两个记录类:

record Address(String province, String city) {}
record Person(String name, Integer age, Address address) {}

我们可以一次性提取出外部记录和内部记录的值:

if (obj instanceof Person(String name, Integer age, Address(String province, String city))) {
    System.out.println("Name: " + name);
    System.out.println("Age: " + age);
    System.out.println("Address: " + province + " " + city);
}

仔细体会上面的代码,是不是非常优雅?

switch 模式匹配

上面学习了 instanceof 模式匹配,其实还有另一种模式匹配叫做 switch 模式匹配,这个特性经历了 JEP 406JEP 420JEP 427JEP 433JEP 441 五个版本的迭代,从 Java 17 开始首个预览版本到 Java 21 正式发布足足开发了 2 年时间。

在介绍这个功能之前,有一个前置知识点需要复习一下:在 Java 14 中发布了一个特性叫做 Switch Expressions,这个特性允许我们在 case 中使用 Lambda 表达式来简化 switch 语句的写法:

int result = switch (type) {
    case "child" -> 0;
    case "adult" -> 1;
    default -> -1;
};
System.out.println(result);

这种写法不仅省去了繁琐的 break 关键词,而且 switch 作为表达式可以直接赋值给一个变量。switch 模式匹配 则更进一步,允许我们在 case 语句中进行类型的测试和转换,下面是 switch 模式匹配的一个示例:

String formatted = switch (obj) {
    case Integer i -> String.format("int %d", i);
    case Long l    -> String.format("long %d", l);
    case Double d  -> String.format("double %f", d);
    case String s  -> String.format("string %s", s);
    default        -> "unknown";
};
System.out.println(formatted);

作为对比,如果不使用 switch 模式匹配,我们只能写出下面这样的面条式代码:

String formatted;
if (obj instanceof Integer i) {
    formatted = String.format("int %d", i);
} else if (obj instanceof Long l) {
    formatted = String.format("long %d", l);
} else if (obj instanceof Double d) {
    formatted = String.format("double %f", d);
} else if (obj instanceof String s) {
    formatted = String.format("string %s", s);
} else {
    formatted = "unknown";
}
System.out.println(formatted);

参考

更多

垃圾回收

ZGC

G1

CMS

扫描二维码,在手机上阅读!

读源码剖析 Spring Security 的实现原理

Spring Security 是一个轻量级的安全框架,可以和 Spring 项目很好地集成,提供了丰富的身份认证和授权相关的功能,而且还能防止一些常见的网络攻击。我在工作中有很多项目都使用了 Spring Security 框架,但基本上都是浅尝辄止,按照说明文档配置好就完事了,一直没有时间深入地研究过。最近在 Reflectoring 上看到了一篇文章 Getting started with Spring Security and Spring Boot,写得非常全面仔细,感觉是一篇不错的 Spring Security 入门文章,于是花了一点时间拜读了一番,结合着 官方文档源码 系统地学习一下 Spring Security 的实现原理。

入门示例

我们先从一个简单的例子开始,这里我直接使用了 使用 Spring 项目脚手架 中的 Hello World 示例。为了让这个示例程序开启 Spring Security 功能,我们在 pom.xml 文件中引入 spring-boot-starter-security 依赖即可:

<dependency>
    <groupId>org.springframework.boot</groupId>
    <artifactId>spring-boot-starter-security</artifactId>
</dependency>

启动程序,会在控制台日志中看到类似下面这样的信息:

2023-05-15 06:52:52.418  INFO 8596 --- [           main] .s.s.UserDetailsServiceAutoConfiguration : 

Using generated security password: eeb386a9-e16a-4b9b-bbc6-c054c8d263b0

这个是由 Spring Security 随机生成的密码。访问 /hello 页面,可以看到出现了一个登录页面:

login.png

输入用户名(默认为 user)和密码(控制台日志)登录成功后我们才能正常访问页面。默认的用户名和密码可以使用下面的配置进行修改:

spring.security.user.name=admin
spring.security.user.password=123456

为了后续更好地对 Spring Security 进行配置,理解 Spring Security 的实现原理,我们需要进一步学习 Spring Security 的三大核心组件:

  • 过滤器(Servlet Filters)
  • 认证(Authentication)
  • 授权(Authorization)

Servlet Filters:Spring Security 的基础

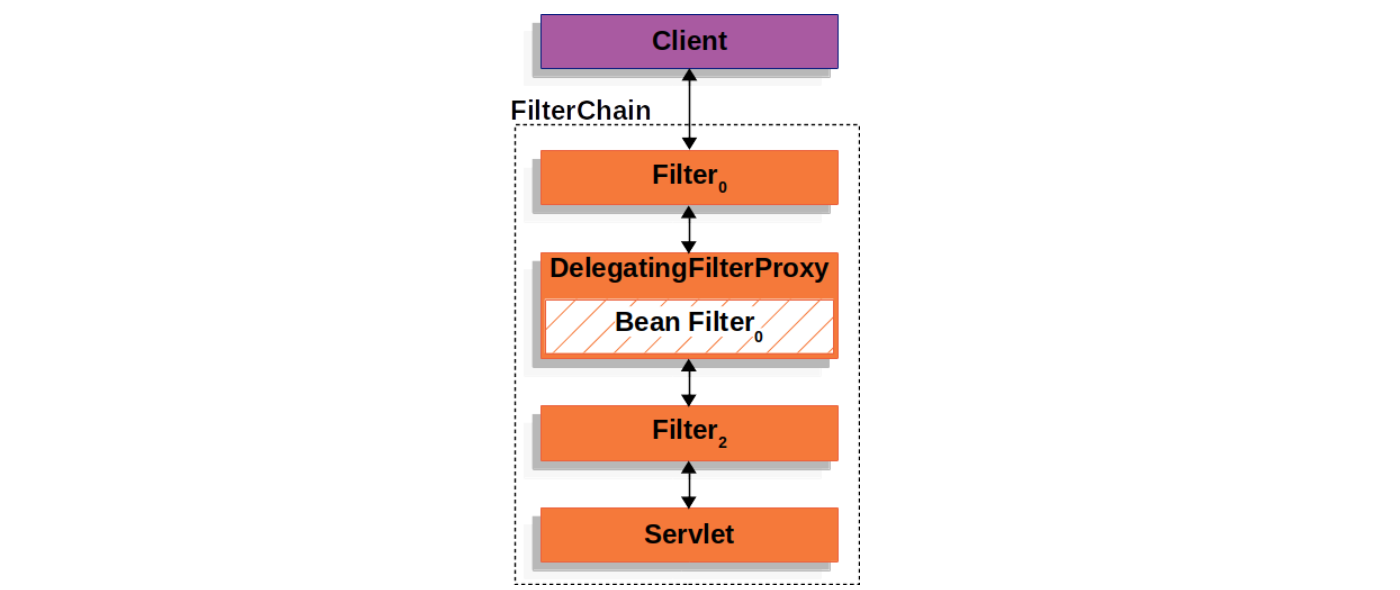
我们知道,在 Spring MVC 框架中,DispatcherServlet 负责对用户的 Web 请求进行分发和处理,在请求到达 DispatcherServlet 之前,会经过一系列的 Servlet Filters,这被称之为过滤器,主要作用是拦截请求并对请求做一些前置或后置处理。这些过滤器串在一起,形成一个过滤器链(FilterChain):

filterchain.png

我们可以在配置文件中加上下面的日志配置:

logging.level.org.springframework.boot.web.servlet.ServletContextInitializerBeans=TRACE

然后重新启动服务,会在控制台输出类似下面这样的日志(为了方便查看,我做了一点格式化):

2023-05-18 07:08:14.805 TRACE 10020 --- [           main] o.s.b.w.s.ServletContextInitializerBeans : 
    Added existing Filter initializer bean 'webMvcMetricsFilter'; order=-2147483647, 
    resource=class path resource [org/springframework/boot/actuate/autoconfigure/metrics/web/servlet/WebMvcMetricsAutoConfiguration.class]
2023-05-18 07:08:14.806 TRACE 10020 --- [           main] o.s.b.w.s.ServletContextInitializerBeans : 
    Added existing Filter initializer bean 'securityFilterChainRegistration'; order=-100, 
    resource=class path resource [org/springframework/boot/autoconfigure/security/servlet/SecurityFilterAutoConfiguration.class]
2023-05-18 07:08:14.808 TRACE 10020 --- [           main] o.s.b.w.s.ServletContextInitializerBeans : 
    Added existing Servlet initializer bean 'dispatcherServletRegistration'; order=2147483647, 
    resource=class path resource [org/springframework/boot/autoconfigure/web/servlet/DispatcherServletAutoConfiguration$DispatcherServletRegistrationConfiguration.class]
2023-05-18 07:08:14.810 TRACE 10020 --- [           main] o.s.b.w.s.ServletContextInitializerBeans : 
    Added existing Filter initializer bean 'errorPageSecurityFilter'; order=2147483647, 
    resource=class path resource [org/springframework/boot/autoconfigure/security/servlet/SpringBootWebSecurityConfiguration$ErrorPageSecurityFilterConfiguration.class]
2023-05-18 07:08:14.813 TRACE 10020 --- [           main] o.s.b.w.s.ServletContextInitializerBeans : 
    Added existing ServletContextInitializer initializer bean 'servletEndpointRegistrar'; order=2147483647, 
    resource=class path resource [org/springframework/boot/actuate/autoconfigure/endpoint/web/ServletEndpointManagementContextConfiguration$WebMvcServletEndpointManagementContextConfiguration.class]
2023-05-18 07:08:14.828 TRACE 10020 --- [           main] o.s.b.w.s.ServletContextInitializerBeans : 
    Created Filter initializer for bean 'characterEncodingFilter'; order=-2147483648, 
    resource=class path resource [org/springframework/boot/autoconfigure/web/servlet/HttpEncodingAutoConfiguration.class]    
2023-05-18 07:08:14.831 TRACE 10020 --- [           main] o.s.b.w.s.ServletContextInitializerBeans : 
    Created Filter initializer for bean 'formContentFilter'; order=-9900, 
    resource=class path resource [org/springframework/boot/autoconfigure/web/servlet/WebMvcAutoConfiguration.class]
2023-05-18 07:08:14.834 TRACE 10020 --- [           main] o.s.b.w.s.ServletContextInitializerBeans : 
    Created Filter initializer for bean 'requestContextFilter'; order=-105, 
    resource=class path resource [org/springframework/boot/autoconfigure/web/servlet/WebMvcAutoConfiguration$WebMvcAutoConfigurationAdapter.class]
2023-05-18 07:08:14.842 DEBUG 10020 --- [           main] o.s.b.w.s.ServletContextInitializerBeans : 
    Mapping filters: 
        filterRegistrationBean urls=[/*] order=-2147483647, 
        springSecurityFilterChain urls=[/*] order=-100, 
        filterRegistrationBean urls=[/*] order=2147483647, 
        characterEncodingFilter urls=[/*] order=-2147483648, 
        formContentFilter urls=[/*] order=-9900, 
        requestContextFilter urls=[/*] order=-105
2023-05-18 07:08:14.844 DEBUG 10020 --- [           main] o.s.b.w.s.ServletContextInitializerBeans : 
    Mapping servlets: dispatcherServlet urls=[/] 

这里显示了应用开启的所有 Filter 以及对应的自动配置类,可以看到 Spring Security 自动注入了两个 FilterRegistrationBean

  • 来自配置类 SecurityFilterAutoConfigurationsecurityFilterChainRegistration
  • 来自配置类 ErrorPageSecurityFilterConfigurationerrorPageSecurityFilter

DelegatingFilterProxy:Servlet Filter 与 Spring Bean 的桥梁

注意上面显示的并非 Filter 的名字,而是 FilterRegistrationBean 的名字,这是一种 RegistrationBean,它实现了 ServletContextInitializer 接口,用于在程序启动时,将 FilterServlet 注入到 ServletContext 中:

public abstract class RegistrationBean implements ServletContextInitializer, Ordered {

    @Override
    public final void onStartup(ServletContext servletContext) throws ServletException {
        ...
        register(description, servletContext);
    }

}

其中 securityFilterChainRegistration 的定义如下:

@Bean
@ConditionalOnBean(name = DEFAULT_FILTER_NAME)
public DelegatingFilterProxyRegistrationBean securityFilterChainRegistration(
        SecurityProperties securityProperties) {
    DelegatingFilterProxyRegistrationBean registration = new DelegatingFilterProxyRegistrationBean(
            DEFAULT_FILTER_NAME);
    registration.setOrder(securityProperties.getFilter().getOrder());
    registration.setDispatcherTypes(getDispatcherTypes(securityProperties));
    return registration;
}

这个 RegistrationBean 的类型为 DelegatingFilterProxyRegistrationBean,由它注入的 FilterDelegatingFilterProxy

public class DelegatingFilterProxyRegistrationBean extends AbstractFilterRegistrationBean<DelegatingFilterProxy> {
    ...
}

这是一个非常重要的 Servlet Filter,它充当着 Servlet 容器和 Spring 上下文之间的桥梁,由于 Servlet 容器有着它自己的标准,在注入 Filter 时并不知道 Spring Bean 的存在,所以我们可以通过 DelegatingFilterProxy 来实现 Bean Filter 的延迟加载:

delegatingfilterproxy.png

看一下 DelegatingFilterProxy 的实现:

public class DelegatingFilterProxy extends GenericFilterBean {

    @Override
    public void doFilter(ServletRequest request, ServletResponse response, FilterChain filterChain)
            throws ServletException, IOException {

        // Lazily initialize the delegate if necessary.
        Filter delegateToUse = this.delegate;
        if (delegateToUse == null) {
            synchronized (this.delegateMonitor) {
                delegateToUse = this.delegate;
                if (delegateToUse == null) {
                    WebApplicationContext wac = findWebApplicationContext();
                    if (wac == null) {
                        throw new IllegalStateException("No WebApplicationContext found: " +
                                "no ContextLoaderListener or DispatcherServlet registered?");
                    }
                    delegateToUse = initDelegate(wac);
                }
                this.delegate = delegateToUse;
            }
        }

        // Let the delegate perform the actual doFilter operation.
        invokeDelegate(delegateToUse, request, response, filterChain);
    }
}

这段代码很容易理解,首先判断代理的 Bean Filter 是否存在,如果不存在则根据 findWebApplicationContext() 找到 Web 应用上下文,然后从上下文中获取 Bean Filter 并初始化,最后再调用该 Bean Filter

FilterChainProxy:Spring Security 的统一入口

那么接下来的问题是,这个 DelegatingFilterProxy 代理的 Bean Filter 是什么呢?我们从上面定义 DelegatingFilterProxyRegistrationBean 的地方可以看出,代理的 Bean Filter 叫做 DEFAULT_FILTER_NAME,查看它的定义就知道,实际上就是 springSecurityFilterChain

public static final String DEFAULT_FILTER_NAME = "springSecurityFilterChain";

那么这个 springSecurityFilterChain 是在哪定义的呢?我们可以在 WebSecurityConfiguration 配置类中找到答案:

public class WebSecurityConfiguration {

    @Bean(name = AbstractSecurityWebApplicationInitializer.DEFAULT_FILTER_NAME)
    public Filter springSecurityFilterChain() throws Exception {
        boolean hasConfigurers = this.webSecurityConfigurers != null && !this.webSecurityConfigurers.isEmpty();
        boolean hasFilterChain = !this.securityFilterChains.isEmpty();
        if (!hasConfigurers && !hasFilterChain) {
            WebSecurityConfigurerAdapter adapter = this.objectObjectPostProcessor
                    .postProcess(new WebSecurityConfigurerAdapter() {
                    });
            this.webSecurity.apply(adapter);
        }
        for (SecurityFilterChain securityFilterChain : this.securityFilterChains) {
            this.webSecurity.addSecurityFilterChainBuilder(() -> securityFilterChain);
            for (Filter filter : securityFilterChain.getFilters()) {
                if (filter instanceof FilterSecurityInterceptor) {
                    this.webSecurity.securityInterceptor((FilterSecurityInterceptor) filter);
                    break;
                }
            }
        }
        for (WebSecurityCustomizer customizer : this.webSecurityCustomizers) {
            customizer.customize(this.webSecurity);
        }
        return this.webSecurity.build();
    }
}

很显然,springSecurityFilterChain 经过一系列的安全配置,最后通过 this.webSecurity.build() 构建出来的,进一步深入到 webSecurity 的源码我们就可以发现它的类型是 FilterChainProxy

public final class WebSecurity extends AbstractConfiguredSecurityBuilder<Filter, WebSecurity>
        implements SecurityBuilder<Filter>, ApplicationContextAware, ServletContextAware {

    @Override
    protected Filter performBuild() throws Exception {

        int chainSize = this.ignoredRequests.size() + this.securityFilterChainBuilders.size();
        List<SecurityFilterChain> securityFilterChains = new ArrayList<>(chainSize);
        List<RequestMatcherEntry<List<WebInvocationPrivilegeEvaluator>>> requestMatcherPrivilegeEvaluatorsEntries = new ArrayList<>();
        for (RequestMatcher ignoredRequest : this.ignoredRequests) {
            SecurityFilterChain securityFilterChain = new DefaultSecurityFilterChain(ignoredRequest);
            securityFilterChains.add(securityFilterChain);
            requestMatcherPrivilegeEvaluatorsEntries
                    .add(getRequestMatcherPrivilegeEvaluatorsEntry(securityFilterChain));
        }
        for (SecurityBuilder<? extends SecurityFilterChain> securityFilterChainBuilder : this.securityFilterChainBuilders) {
            SecurityFilterChain securityFilterChain = securityFilterChainBuilder.build();
            securityFilterChains.add(securityFilterChain);
            requestMatcherPrivilegeEvaluatorsEntries
                    .add(getRequestMatcherPrivilegeEvaluatorsEntry(securityFilterChain));
        }

        FilterChainProxy filterChainProxy = new FilterChainProxy(securityFilterChains);
        if (this.httpFirewall != null) {
            filterChainProxy.setFirewall(this.httpFirewall);
        }
        if (this.requestRejectedHandler != null) {
            filterChainProxy.setRequestRejectedHandler(this.requestRejectedHandler);
        }
        filterChainProxy.afterPropertiesSet();

        Filter result = filterChainProxy;

        this.postBuildAction.run();
        return result;
    }
}

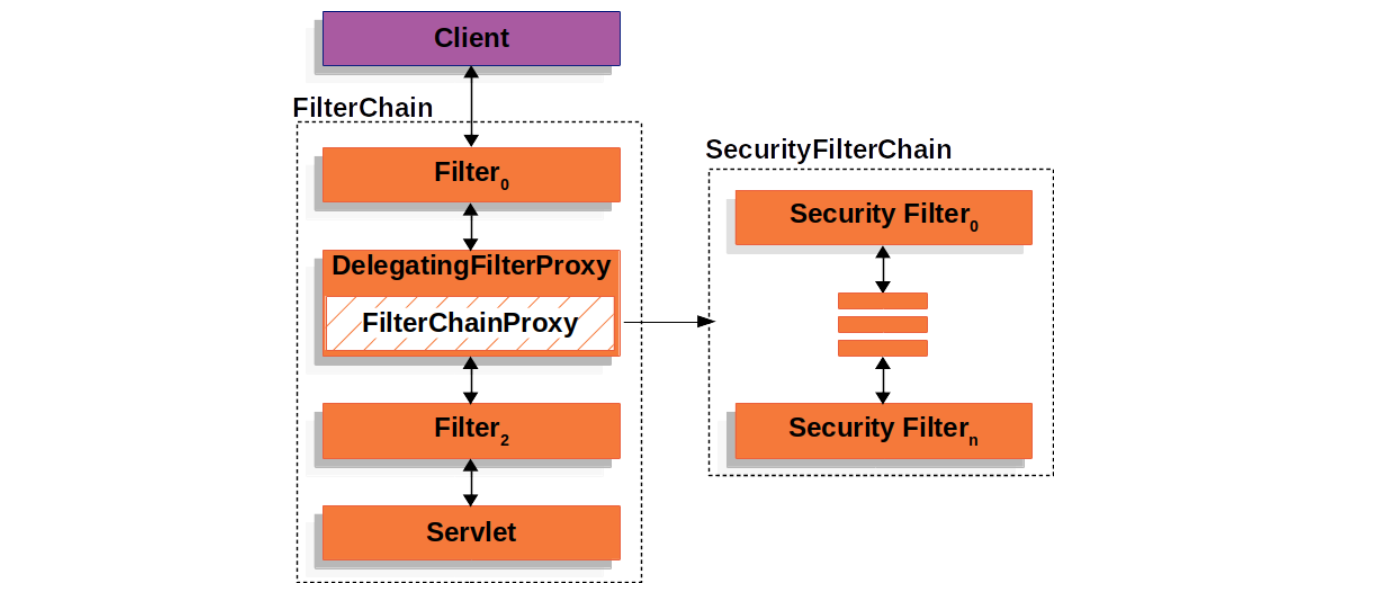
FilterChainProxy 的名字可以看出来,它也是一个代理类,它代理的类叫做 SecurityFilterChain,它包含了多个 Security Filters 形成一个过滤器链,这和 Servlet Filters 有点类似,只不过这些 Security Filters 都是普通的 Spring Bean:

securityfilterchain.png

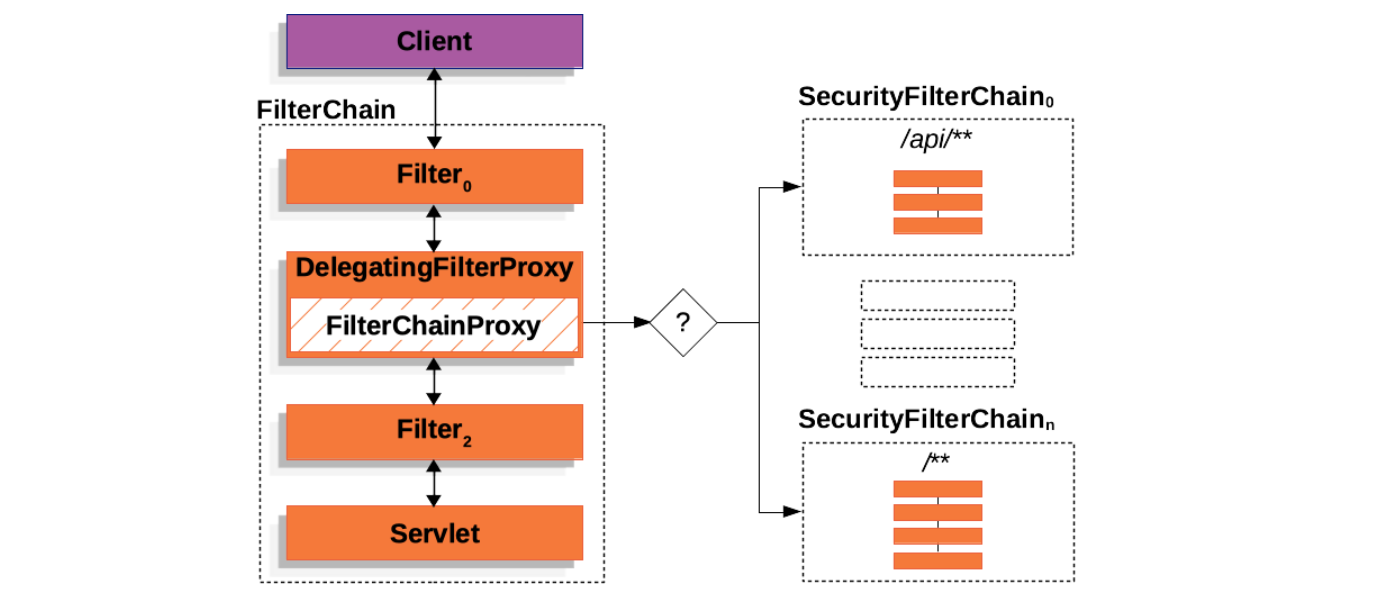
使用 FilterChainProxy 来代理 Security Filters 相比于直接使用 Servlet Filters 或使用 DelegatingFilterProxy 来代理有几个明显的好处:

  1. FilterChainProxy 作为 Spring Security 对 Servlet 的支持入口,方便理解和调试;
  2. FilterChainProxy 可以对 Spring Security 做一些集中处理,比如统一清除 SecurityContext 防止内存泄漏,以及统一使用 HttpFirewall 对应用进行保护等;
  3. 支持多个 SecurityFilterChain,传统的 Servlet Filters 只能通过 URL 来匹配,使用 FilterChainProxy 可以配合 RequestMatcher 更灵活地控制调用哪个 SecurityFilterChain

securityfilterchains.png

构建 SecurityFilterChain

上面讲到,FilterChainProxy 是通过 webSecurity 构建的,一个 FilterChainProxy 里包含一个或多个 SecurityFilterChain,那么 SecurityFilterChain 是由谁构建的呢?答案是 httpSecurity。我们可以在 SecurityFilterChainConfiguration 配置类中看到 SecurityFilterChain 的构建过程:

@Configuration(proxyBeanMethods = false)
@ConditionalOnDefaultWebSecurity
static class SecurityFilterChainConfiguration {

    @Bean
    @Order(SecurityProperties.BASIC_AUTH_ORDER)
    SecurityFilterChain defaultSecurityFilterChain(HttpSecurity http) throws Exception {
        http.authorizeRequests().anyRequest().authenticated();
        http.formLogin();
        http.httpBasic();
        return http.build();
    }
}

深入到 http.build() 的源码,可以看到过滤器链的默认实现为 DefaultSecurityFilterChain

public final class HttpSecurity extends AbstractConfiguredSecurityBuilder<DefaultSecurityFilterChain, HttpSecurity>
        implements SecurityBuilder<DefaultSecurityFilterChain>, HttpSecurityBuilder<HttpSecurity> {

    @SuppressWarnings("unchecked")
    @Override
    protected DefaultSecurityFilterChain performBuild() {

        this.filters.sort(OrderComparator.INSTANCE);
        List<Filter> sortedFilters = new ArrayList<>(this.filters.size());
        for (Filter filter : this.filters) {
            sortedFilters.add(((OrderedFilter) filter).filter);
        }
        return new DefaultSecurityFilterChain(this.requestMatcher, sortedFilters);
    }
}

构建 Security Filters

通过上面的梳理,我们大概清楚了 SecurityFilterChain 的构建过程,接下来,我们继续看 Security Filters 的构建过程。我们知道,一个SecurityFilterChain 中包含了多个 Security Filters,那么这些 Security Filters 是从哪里来的呢?

HttpSecurity 的代码里可以找到这么几个方法:

  • public HttpSecurity addFilter(Filter filter)
  • public HttpSecurity addFilterBefore(Filter filter, Class<? extends Filter> beforeFilter)
  • public HttpSecurity addFilterAfter(Filter filter, Class<? extends Filter> afterFilter)
  • public HttpSecurity addFilterAt(Filter filter, Class<? extends Filter> atFilter)

我们不妨在 addFilter 方法内下个断点,然后以调试模式启动程序,每次触发断点时,我们将对应的 Filter 记录下来,并通过堆栈找到该 Filter 是从何处添加的:

序号Filter来源
1WebAsyncManagerIntegrationFilterHttpSecurityConfiguration.httpSecurity()
2CsrfFilterCsrfConfigurer.configure()
3ExceptionTranslationFilterExceptionHandlingConfigurer.configure()
4HeaderWriterFilterHeadersConfigurer.configure()
5SessionManagementFilterSessionManagementConfigurer.configure()
6DisableEncodeUrlFilterSessionManagementConfigurer.configure()
7SecurityContextPersistenceFilterSecurityContextConfigurer.configure()
8RequestCacheAwareFilterRequestCacheConfigurer.configure()
9AnonymousAuthenticationFilterAnonymousConfigurer.configure()
10SecurityContextHolderAwareRequestFilterServletApiConfigurer.configure()
11DefaultLoginPageGeneratingFilterDefaultLoginPageConfigurer.configure()
12DefaultLogoutPageGeneratingFilterDefaultLoginPageConfigurer.configure()
13LogoutFilterLogoutConfigurer.configure()
14FilterSecurityInterceptorAbstractInterceptUrlConfigurer.configure()
15UsernamePasswordAuthenticationFilterAbstractAuthenticationFilterConfigurer.configure()
16BasicAuthenticationFilterHttpBasicConfigurer.configure()

除了第一个 WebAsyncManagerIntegrationFilter 是在创建 HttpSecurity 的时候直接添加的,其他的 Filter 都是通过 XXXConfigurer 这样的配置器添加的。我们继续深挖下去可以发现,生成这些配置器的地方有两个,第一个地方是在 HttpSecurityConfiguration 配置类中创建 HttpSecurity 时,如下所示:

class HttpSecurityConfiguration {

    @Bean(HTTPSECURITY_BEAN_NAME)
    @Scope("prototype")
    HttpSecurity httpSecurity() throws Exception {
        WebSecurityConfigurerAdapter.LazyPasswordEncoder passwordEncoder = new WebSecurityConfigurerAdapter.LazyPasswordEncoder(
                this.context);
        AuthenticationManagerBuilder authenticationBuilder = new WebSecurityConfigurerAdapter.DefaultPasswordEncoderAuthenticationManagerBuilder(
                this.objectPostProcessor, passwordEncoder);
        authenticationBuilder.parentAuthenticationManager(authenticationManager());
        authenticationBuilder.authenticationEventPublisher(getAuthenticationEventPublisher());
        HttpSecurity http = new HttpSecurity(this.objectPostProcessor, authenticationBuilder, createSharedObjects());
        // @formatter:off
        http
            .csrf(withDefaults())
            .addFilter(new WebAsyncManagerIntegrationFilter())
            .exceptionHandling(withDefaults())
            .headers(withDefaults())
            .sessionManagement(withDefaults())
            .securityContext(withDefaults())
            .requestCache(withDefaults())
            .anonymous(withDefaults())
            .servletApi(withDefaults())
            .apply(new DefaultLoginPageConfigurer<>());
        http.logout(withDefaults());
        // @formatter:on
        applyDefaultConfigurers(http);
        return http;
    }
}

另外一个地方则是在上面的 SecurityFilterChainConfiguration 配置类中使用 http.build() 构建 SecurityFilterChain 之前(参见上面 defaultSecurityFilterChain 的代码),至此,我们大概理清了所有的 Security Filters 是如何创建的,下面再以表格的形式重新整理下:

序号FilterhttpSecurity 配置
1WebAsyncManagerIntegrationFilterhttp.addFilter(new WebAsyncManagerIntegrationFilter())
2CsrfFilterhttp.csrf(withDefaults())
3ExceptionTranslationFilterhttp.exceptionHandling(withDefaults())
4HeaderWriterFilterhttp.headers(withDefaults())
5SessionManagementFilterhttp.sessionManagement(withDefaults())
6DisableEncodeUrlFilterhttp.sessionManagement(withDefaults())
7SecurityContextPersistenceFilterhttp.securityContext(withDefaults())
8RequestCacheAwareFilterhttp.requestCache(withDefaults())
9AnonymousAuthenticationFilterhttp.anonymous(withDefaults())
10SecurityContextHolderAwareRequestFilterhttp.servletApi(withDefaults())
11DefaultLoginPageGeneratingFilterhttp.apply(new DefaultLoginPageConfigurer<>())
12DefaultLogoutPageGeneratingFilterhttp.apply(new DefaultLoginPageConfigurer<>())
13LogoutFilterhttp.logout(withDefaults())
14FilterSecurityInterceptorhttp.authorizeRequests().anyRequest().authenticated()
15UsernamePasswordAuthenticationFilterhttp.formLogin()
16BasicAuthenticationFilterhttp.httpBasic()

其实,如果仔细观察我们的程序输出的日志,也可以看到 Spring Security 默认的过滤器链为 DefaultSecurityFilterChain,以及它注入的所有 Security Filters

2023-05-17 08:16:18.173  INFO 3936 --- [           main] o.s.s.web.DefaultSecurityFilterChain     : Will secure any request with [
        org.springframework.security.web.session.DisableEncodeUrlFilter@1d6751e3, 
        org.springframework.security.web.context.request.async.WebAsyncManagerIntegrationFilter@2d258eff, 
        org.springframework.security.web.context.SecurityContextPersistenceFilter@202898d7, 
        org.springframework.security.web.header.HeaderWriterFilter@2c26ba07, 
        org.springframework.security.web.csrf.CsrfFilter@52d3fafd, 
        org.springframework.security.web.authentication.logout.LogoutFilter@235c997d, 
        org.springframework.security.web.authentication.UsernamePasswordAuthenticationFilter@5d5c41e5, 
        org.springframework.security.web.authentication.ui.DefaultLoginPageGeneratingFilter@50b93353, 
        org.springframework.security.web.authentication.ui.DefaultLogoutPageGeneratingFilter@6dca31eb, 
        org.springframework.security.web.authentication.www.BasicAuthenticationFilter@22825e1e, 
        org.springframework.security.web.savedrequest.RequestCacheAwareFilter@2c719bd4, 
        org.springframework.security.web.servletapi.SecurityContextHolderAwareRequestFilter@53aa38be, 
        org.springframework.security.web.authentication.AnonymousAuthenticationFilter@4a058df8, 
        org.springframework.security.web.session.SessionManagementFilter@42ea7565, 
        org.springframework.security.web.access.ExceptionTranslationFilter@77cb452c, 
        org.springframework.security.web.access.intercept.FilterSecurityInterceptor@8054fe2]

在某些低版本中,可能会显示 DefaultSecurityFilterChain: Will not secure any request 这样的日志,这可能是 Spring Security 的 BUG,升级到最新版本即可。

其中有几个 Security Filters 比较重要,是实现认证和授权的基础:

  • CsrfFilter:默认开启对所有接口的 CSRF 防护,关于 CSRF 的详细信息,可以参考 Configuring CSRF/XSRF with Spring Security
  • DefaultLoginPageGeneratingFilter:用于生成 /login 登录页面;
  • DefaultLogoutPageGeneratingFilter:用于生成 /login?logout 登出页面;
  • LogoutFilter:当用户退出应用时被调用,它通过注册的 LogoutHandler 删除会话并清理 SecurityContext,然后通过 LogoutSuccessHandler 将页面重定向到 /login?logout
  • UsernamePasswordAuthenticationFilter:实现基于用户名和密码的安全认证,当认证失败,抛出 AuthenticationException 异常;
  • BasicAuthenticationFilter:实现 Basic 安全认证,当认证失败,抛出 AuthenticationException 异常;
  • AnonymousAuthenticationFilter:如果 SecurityContext 中没有 Authentication 对象时,它自动创建一个匿名用户 anonymousUser,角色为 ROLE_ANONYMOUS
  • FilterSecurityInterceptor:这是 Spring Security 的最后一个 Security Filters,它从 SecurityContext 中获取 Authentication 对象,然后对请求的资源做权限判断,当授权失败,抛出 AccessDeniedException 异常;
  • ExceptionTranslationFilter:用于处理过滤器链中抛出的 AuthenticationExceptionAccessDeniedException 异常,AuthenticationException 异常由 AuthenticationEntryPoint 来处理,AccessDeniedException 异常由 AccessDeniedHandler 来处理;

认证和授权

有了 Security Filters,我们就可以实现各种 Spring Security 的相关功能了。应用程序的安全性归根结底包括了两个主要问题:认证(Authentication)授权(Authorization)。认证解决的是 你是谁? 的问题,而授权负责解决 你被允许做什么?,授权也被称为 访问控制(Access Control)。这一节将深入学习 Spring Security 是如何实现认证和授权的。

跳转到 /login 页面

让我们回到第一节的例子,当访问 /hello 时,可以看到浏览器自动跳转到了 /login 登录页面,那么 Spring Security 是如何实现的呢?为了一探究竟,我们可以将 Spring Security 的日志级别调到 TRACE

logging.level.org.springframework.security=TRACE

这样我们就能完整地看到这个请求经过 Security Filters 的处理过程:

2023-05-20 09:37:38.558 DEBUG 6632 --- [nio-8080-exec-9] o.s.security.web.FilterChainProxy        : Securing GET /hello
2023-05-20 09:37:38.559 TRACE 6632 --- [nio-8080-exec-9] o.s.security.web.FilterChainProxy        : Invoking DisableEncodeUrlFilter (1/17)
2023-05-20 09:37:38.559 TRACE 6632 --- [nio-8080-exec-9] o.s.security.web.FilterChainProxy        : Invoking WebAsyncManagerIntegrationFilter (2/17)
2023-05-20 09:37:38.560 TRACE 6632 --- [nio-8080-exec-9] o.s.security.web.FilterChainProxy        : Invoking SecurityContextPersistenceFilter (3/17)
2023-05-20 09:37:38.561 TRACE 6632 --- [nio-8080-exec-9] w.c.HttpSessionSecurityContextRepository : No HttpSession currently exists
2023-05-20 09:37:38.561 TRACE 6632 --- [nio-8080-exec-9] w.c.HttpSessionSecurityContextRepository : Created SecurityContextImpl [Null authentication]
2023-05-20 09:37:38.562 DEBUG 6632 --- [nio-8080-exec-9] s.s.w.c.SecurityContextPersistenceFilter : Set SecurityContextHolder to empty SecurityContext
2023-05-20 09:37:38.562 TRACE 6632 --- [nio-8080-exec-9] o.s.security.web.FilterChainProxy        : Invoking HeaderWriterFilter (4/17)
2023-05-20 09:37:38.562 TRACE 6632 --- [nio-8080-exec-9] o.s.security.web.FilterChainProxy        : Invoking CorsFilter (5/17)
2023-05-20 09:37:38.566 TRACE 6632 --- [nio-8080-exec-9] o.s.security.web.FilterChainProxy        : Invoking CsrfFilter (6/17)
2023-05-20 09:37:38.567 TRACE 6632 --- [nio-8080-exec-9] o.s.security.web.csrf.CsrfFilter         : Did not protect against CSRF since request did not match CsrfNotRequired [TRACE, HEAD, GET, OPTIONS]
2023-05-20 09:37:38.568 TRACE 6632 --- [nio-8080-exec-9] o.s.security.web.FilterChainProxy        : Invoking LogoutFilter (7/17)
2023-05-20 09:37:38.571 TRACE 6632 --- [nio-8080-exec-9] o.s.s.w.a.logout.LogoutFilter            : Did not match request to Ant [pattern='/logout', POST]        
2023-05-20 09:37:38.573 TRACE 6632 --- [nio-8080-exec-9] o.s.security.web.FilterChainProxy        : Invoking UsernamePasswordAuthenticationFilter (8/17)
2023-05-20 09:37:38.574 TRACE 6632 --- [nio-8080-exec-9] w.a.UsernamePasswordAuthenticationFilter : Did not match request to Ant [pattern='/login', POST]
2023-05-20 09:37:38.576 TRACE 6632 --- [nio-8080-exec-9] o.s.security.web.FilterChainProxy        : Invoking DefaultLoginPageGeneratingFilter (9/17)
2023-05-20 09:37:38.578 TRACE 6632 --- [nio-8080-exec-9] o.s.security.web.FilterChainProxy        : Invoking DefaultLogoutPageGeneratingFilter (10/17)
2023-05-20 09:37:38.582 TRACE 6632 --- [nio-8080-exec-9] .w.a.u.DefaultLogoutPageGeneratingFilter : Did not render default logout page since request did not match [Ant [pattern='/logout', GET]]
2023-05-20 09:37:38.583 TRACE 6632 --- [nio-8080-exec-9] o.s.security.web.FilterChainProxy        : Invoking BasicAuthenticationFilter (11/17)
2023-05-20 09:37:38.584 TRACE 6632 --- [nio-8080-exec-9] o.s.s.w.a.www.BasicAuthenticationFilter  : Did not process authentication request since failed to find username and password in Basic Authorization header
2023-05-20 09:37:38.587 TRACE 6632 --- [nio-8080-exec-9] o.s.security.web.FilterChainProxy        : Invoking RequestCacheAwareFilter (12/17)
2023-05-20 09:37:38.588 TRACE 6632 --- [nio-8080-exec-9] o.s.s.w.s.HttpSessionRequestCache        : No saved request
2023-05-20 09:37:38.590 TRACE 6632 --- [nio-8080-exec-9] o.s.security.web.FilterChainProxy        : Invoking SecurityContextHolderAwareRequestFilter (13/17)      
2023-05-20 09:37:38.591 TRACE 6632 --- [nio-8080-exec-9] o.s.security.web.FilterChainProxy        : Invoking AnonymousAuthenticationFilter (14/17)
2023-05-20 09:37:38.592 TRACE 6632 --- [nio-8080-exec-9] o.s.s.w.a.AnonymousAuthenticationFilter  : Set SecurityContextHolder to AnonymousAuthenticationToken [Principal=anonymousUser, Credentials=[PROTECTED], Authenticated=true, Details=WebAuthenticationDetails [RemoteIpAddress=127.0.0.1, SessionId=null], Granted Authorities=[ROLE_ANONYMOUS]]
2023-05-20 09:37:38.593 TRACE 6632 --- [nio-8080-exec-9] o.s.security.web.FilterChainProxy        : Invoking SessionManagementFilter (15/17)
2023-05-20 09:37:38.593 TRACE 6632 --- [nio-8080-exec-9] o.s.security.web.FilterChainProxy        : Invoking ExceptionTranslationFilter (16/17)
2023-05-20 09:37:38.594 TRACE 6632 --- [nio-8080-exec-9] o.s.security.web.FilterChainProxy        : Invoking FilterSecurityInterceptor (17/17)
2023-05-20 09:37:38.596 TRACE 6632 --- [nio-8080-exec-9] edFilterInvocationSecurityMetadataSource : Did not match request to EndpointRequestMatcher includes=[health], excludes=[], includeLinks=false - [permitAll] (1/2)
2023-05-20 09:37:38.610 TRACE 6632 --- [nio-8080-exec-9] o.s.s.w.a.i.FilterSecurityInterceptor    : Did not re-authenticate AnonymousAuthenticationToken [Principal=anonymousUser, Credentials=[PROTECTED], Authenticated=true, Details=WebAuthenticationDetails [RemoteIpAddress=127.0.0.1, SessionId=null], Granted Authorities=[ROLE_ANONYMOUS]] before authorizing
2023-05-20 09:37:38.619 TRACE 6632 --- [nio-8080-exec-9] o.s.s.w.a.i.FilterSecurityInterceptor    : Authorizing filter invocation [GET /hello] with attributes [authenticated]
2023-05-20 09:37:38.626 TRACE 6632 --- [nio-8080-exec-9] o.s.s.w.a.expression.WebExpressionVoter  : Voted to deny authorization
2023-05-20 09:37:38.632 TRACE 6632 --- [nio-8080-exec-9] o.s.s.w.a.i.FilterSecurityInterceptor    : Failed to authorize filter invocation [GET /hello] with attributes [authenticated] using AffirmativeBased [DecisionVoters=[org.springframework.security.web.access.expression.WebExpressionVoter@f613067], AllowIfAllAbstainDecisions=false]
2023-05-20 09:37:38.640 TRACE 6632 --- [nio-8080-exec-9] o.s.s.w.a.ExceptionTranslationFilter     : Sending AnonymousAuthenticationToken [Principal=anonymousUser, Credentials=[PROTECTED], Authenticated=true, Details=WebAuthenticationDetails [RemoteIpAddress=127.0.0.1, SessionId=null], Granted Authorities=[ROLE_ANONYMOUS]] 
to authentication entry point since access is denied

org.springframework.security.access.AccessDeniedException: Access is denied
        at org.springframework.security.access.vote.AffirmativeBased.decide(AffirmativeBased.java:73) ~[spring-security-core-5.7.8.jar:5.7.8]

2023-05-20 09:37:38.691 DEBUG 6632 --- [nio-8080-exec-9] o.s.s.w.s.HttpSessionRequestCache        : Saved request http://localhost:8080/hello to session
2023-05-20 09:37:38.693 DEBUG 6632 --- [nio-8080-exec-9] s.w.a.DelegatingAuthenticationEntryPoint : Trying to match using And [Not [RequestHeaderRequestMatcher [expectedHeaderName=X-Requested-With, expectedHeaderValue=XMLHttpRequest]], MediaTypeRequestMatcher [contentNegotiationStrategy=org.springframework.web.accept.HeaderContentNegotiationStrategy@4b95451, matchingMediaTypes=[application/xhtml+xml, image/*, text/html, text/plain], useEquals=false, ignoredMediaTypes=[*/*]]]       
2023-05-20 09:37:38.701 DEBUG 6632 --- [nio-8080-exec-9] s.w.a.DelegatingAuthenticationEntryPoint : Match found! Executing org.springframework.security.web.authentication.LoginUrlAuthenticationEntryPoint@168ad26f
2023-05-20 09:37:38.709 DEBUG 6632 --- [nio-8080-exec-9] o.s.s.web.DefaultRedirectStrategy        : Redirecting to http://localhost:8080/login
2023-05-20 09:37:38.712 TRACE 6632 --- [nio-8080-exec-9] o.s.s.w.header.writers.HstsHeaderWriter  : Not injecting HSTS header since it did not match request to [Is Secure]
2023-05-20 09:37:38.720 DEBUG 6632 --- [nio-8080-exec-9] w.c.HttpSessionSecurityContextRepository : Did not store empty SecurityContext
2023-05-20 09:37:38.730 DEBUG 6632 --- [nio-8080-exec-9] w.c.HttpSessionSecurityContextRepository : Did not store empty SecurityContext
2023-05-20 09:37:38.731 DEBUG 6632 --- [nio-8080-exec-9] s.s.w.c.SecurityContextPersistenceFilter : Cleared SecurityContextHolder to complete request

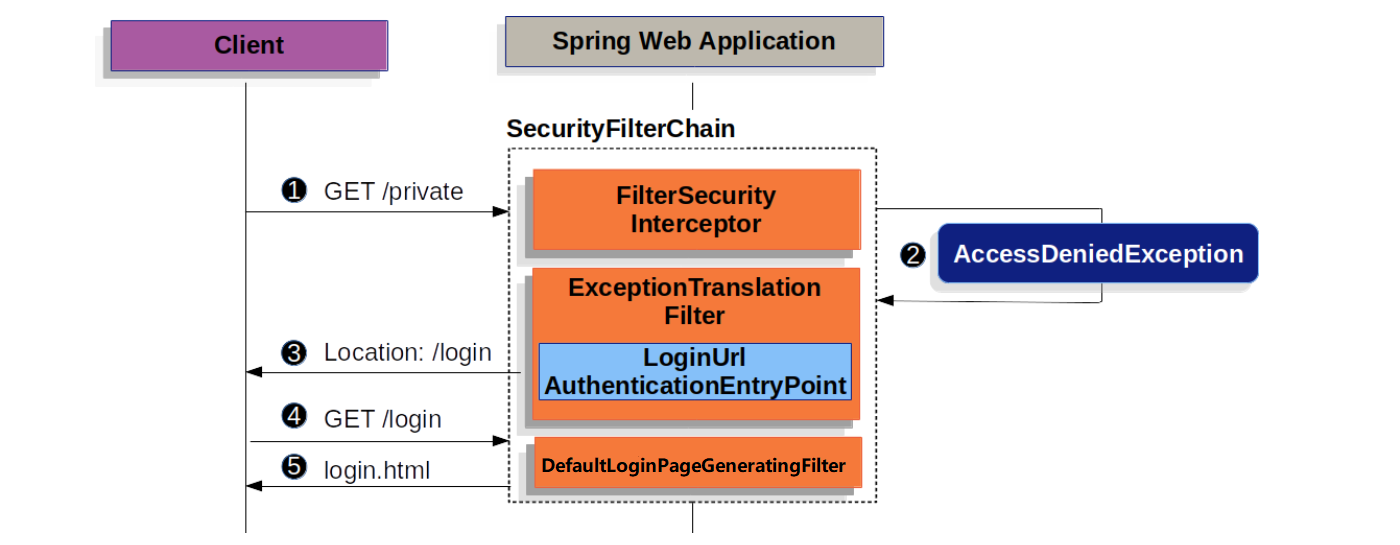
这个过程中有两点比较重要:第一点是经过 AnonymousAuthenticationFilter 时,将当前用户设置为 anonymousUser,角色为 ROLE_ANONYMOUS;第二点是经过 FilterSecurityInterceptor 时,校验当前用户是否有访问 /hello 页面的权限,在上面的 defaultSecurityFilterChain 中,可以看到 http.authorizeRequests().anyRequest().authenticated() 这样的代码,这说明 Spring Security 默认对所有的页面都开启了鉴权,所以会抛出 AccessDeniedException 异常,而这个异常被 ExceptionTranslationFilter 拦截,并将这个异常交给 LoginUrlAuthenticationEntryPoint 处理,从而重定向到 /login 页面,整个过程的示意图如下:

redirect-login.png

接下来,浏览器开始访问重定向后的 /login 页面,这时请求又会再一次经历一系列的 Security Filters,和上面的 /hello 请求不一样的是,/login 请求经过 DefaultLoginPageGeneratingFilter 时,会生成上面我们看到的登录页面并结束整个调用链:

public class DefaultLoginPageGeneratingFilter extends GenericFilterBean {

    private void doFilter(HttpServletRequest request, HttpServletResponse response, FilterChain chain)
            throws IOException, ServletException {
        boolean loginError = isErrorPage(request);
        boolean logoutSuccess = isLogoutSuccess(request);
        if (isLoginUrlRequest(request) || loginError || logoutSuccess) {
            String loginPageHtml = generateLoginPageHtml(request, loginError, logoutSuccess);
            response.setContentType("text/html;charset=UTF-8");
            response.setContentLength(loginPageHtml.getBytes(StandardCharsets.UTF_8).length);
            response.getWriter().write(loginPageHtml);
            return;
        }
        chain.doFilter(request, response);
    }
}

AuthenticationManager:剖析认证流程

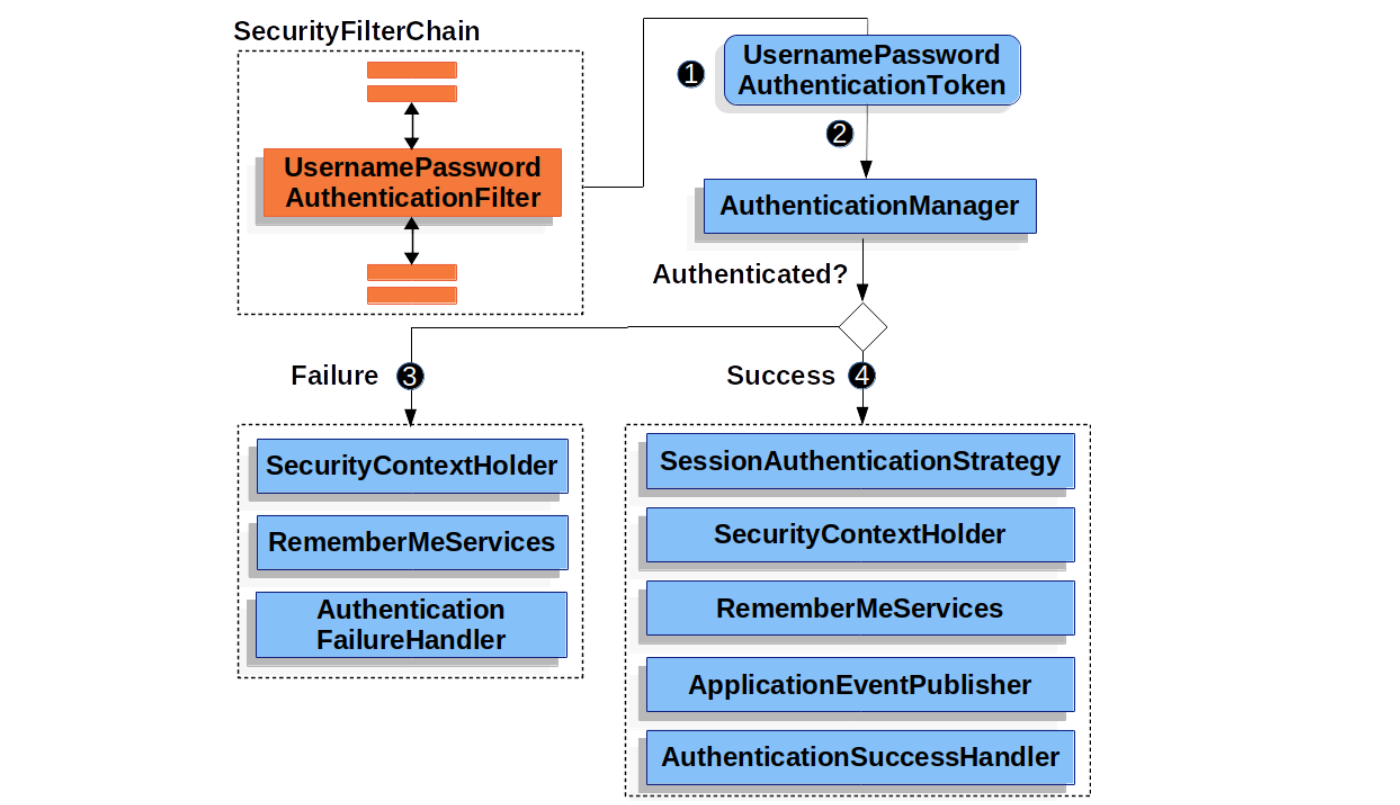
接下来,输入用户名和密码并提交,请求会再一次经历 Security Filters,这一次,请求在 UsernamePasswordAuthenticationFilter 这里被拦截下来,并开始了用户名和密码的认证过程:

public class UsernamePasswordAuthenticationFilter extends AbstractAuthenticationProcessingFilter {

    @Override
    public Authentication attemptAuthentication(HttpServletRequest request, HttpServletResponse response)
            throws AuthenticationException {
        if (this.postOnly && !request.getMethod().equals("POST")) {
            throw new AuthenticationServiceException("Authentication method not supported: " + request.getMethod());
        }
        String username = obtainUsername(request);
        username = (username != null) ? username.trim() : "";
        String password = obtainPassword(request);
        password = (password != null) ? password : "";
        UsernamePasswordAuthenticationToken authRequest = UsernamePasswordAuthenticationToken.unauthenticated(username,
                password);
        // Allow subclasses to set the "details" property
        setDetails(request, authRequest);
        return this.getAuthenticationManager().authenticate(authRequest);
    }
}

这里将遇到 Spring Security 中处理认证的核心接口:AuthenticationManager

public interface AuthenticationManager {

    Authentication authenticate(Authentication authentication) throws AuthenticationException;
}

这个接口只有一个 authenticate() 方法,它的入参是一个未认证的 Authentication,从 UsernamePasswordAuthenticationFilter 的代码中可以看到使用了 UsernamePasswordAuthenticationToken,它的返回有三种情况:

  • 如果认证成功,则返回认证成功后的 Authentication(通常带有 authenticated=true);
  • 如果认证失败,则抛出 AuthenticationException 异常;
  • 如果无法判断,则返回 null

AuthenticationManager 接口最常用的一个实现是 ProviderManager 类,它包含了一个或多个 AuthenticationProvider 实例:

public class ProviderManager implements AuthenticationManager {

    private List<AuthenticationProvider> providers;
}

AuthenticationProvider 有点像 AuthenticationManager,但它有一个额外的方法 boolean supports(Class<?> authentication)

public interface AuthenticationProvider {

    Authentication authenticate(Authentication authentication) throws AuthenticationException;

    boolean supports(Class<?> authentication);
}

Spring Security 会遍历列表中所有的 AuthenticationProvider,并通过 supports() 方法来选取合适的 AuthenticationProvider 实例来实现认证,从上文中我们知道,UsernamePasswordAuthenticationFilter 在认证时使用的 Authentication 类型为 UsernamePasswordAuthenticationToken,对于这个 Authentication,默认使用的 AuthenticationProviderDaoAuthenticationProvider,它继承自抽象类 AbstractUserDetailsAuthenticationProvider

public abstract class AbstractUserDetailsAuthenticationProvider
        implements AuthenticationProvider, InitializingBean, MessageSourceAware {

    @Override
    public Authentication authenticate(Authentication authentication) throws AuthenticationException {

        String username = determineUsername(authentication);
        UserDetails user = retrieveUser(username, (UsernamePasswordAuthenticationToken) authentication);
        
        this.preAuthenticationChecks.check(user);
        additionalAuthenticationChecks(user, (UsernamePasswordAuthenticationToken) authentication);
        this.postAuthenticationChecks.check(user);
        
        Object principalToReturn = user;
        if (this.forcePrincipalAsString) {
            principalToReturn = user.getUsername();
        }
        return createSuccessAuthentication(principalToReturn, authentication, user);
    }
}

其中,最关键的代码有两行,第一行是通过 retrieveUser() 方法获取 UserDetails

public class DaoAuthenticationProvider extends AbstractUserDetailsAuthenticationProvider {

    @Override
    protected final UserDetails retrieveUser(String username, UsernamePasswordAuthenticationToken authentication)
            throws AuthenticationException {
        
        UserDetails loadedUser = this.getUserDetailsService().loadUserByUsername(username);
        return loadedUser;
    }
}

进入 retrieveUser() 方法内部,可以看到它是通过 UserDetailsServiceloadUserByUsername() 方法来获取 UserDetails 的,而这个 UserDetailsService 默认实现是 InMemoryUserDetailsManager

public class InMemoryUserDetailsManager implements UserDetailsManager, UserDetailsPasswordService {

    @Override
    public UserDetails loadUserByUsername(String username) throws UsernameNotFoundException {
        UserDetails user = this.users.get(username.toLowerCase());
        if (user == null) {
            throw new UsernameNotFoundException(username);
        }
        return new User(user.getUsername(), user.getPassword(), user.isEnabled(), user.isAccountNonExpired(),
                user.isCredentialsNonExpired(), user.isAccountNonLocked(), user.getAuthorities());
    }
}

它的实现非常简单,就是从 users 这个 Map 中直接获取 UserDetails,那么 users 这个 Map 又是从哪来的呢? 答案就是我们在配置文件中配置的 spring.security.user,我们可以从自动配置类 UserDetailsServiceAutoConfiguration 中找到 InMemoryUserDetailsManager 的初始化代码:

public class UserDetailsServiceAutoConfiguration {

    @Bean
    @Lazy
    public InMemoryUserDetailsManager inMemoryUserDetailsManager(SecurityProperties properties,
            ObjectProvider<PasswordEncoder> passwordEncoder) {
        SecurityProperties.User user = properties.getUser();
        List<String> roles = user.getRoles();
        return new InMemoryUserDetailsManager(User.withUsername(user.getName())
            .password(getOrDeducePassword(user, passwordEncoder.getIfAvailable()))
            .roles(StringUtils.toStringArray(roles))
            .build());
    }
}

另一行关键代码是通过 additionalAuthenticationChecks() 方法对 UserDetailsUsernamePasswordAuthenticationToken 进行校验,一般来说,就是验证密码是否正确:

public class DaoAuthenticationProvider extends AbstractUserDetailsAuthenticationProvider {

    @Override
    protected void additionalAuthenticationChecks(UserDetails userDetails,
            UsernamePasswordAuthenticationToken authentication) throws AuthenticationException {
        
        String presentedPassword = authentication.getCredentials().toString();
        if (!this.passwordEncoder.matches(presentedPassword, userDetails.getPassword())) {
            this.logger.debug("Failed to authenticate since password does not match stored value");
            throw new BadCredentialsException(this.messages
                    .getMessage("AbstractUserDetailsAuthenticationProvider.badCredentials", "Bad credentials"));
        }
    }
}

一旦用户名和密码都验证通过,就调用 createSuccessAuthentication() 方法创建并返回一个认证成功后的 Authentication,然后经过一系列的后处理,整个认证的流程如下所示:

usernamepasswordauthenticationfilter.png

其中,SecurityContextHolder 将认证成功后的 Authentication 保存到安全上下文中供后续 Filter 使用;AuthenticationSuccessHandler 用于定义一些认证成功后的自定义逻辑,默认实现为 SimpleUrlAuthenticationSuccessHandler,它返回一个重定向,将浏览器转到登录之前用户访问的页面。

在我的测试中,SimpleUrlAuthenticationSuccessHandler 貌似并没有触发,新版本的逻辑有变动?

AccessDecisionManager:剖析授权流程

其实,在上面分析重定向 /login 页面的流程时已经大致了解了实现授权的逻辑,请求经过 FilterSecurityInterceptor 时,校验当前用户是否有访问页面的权限,如果没有,则会抛出 AccessDeniedException 异常。FilterSecurityInterceptor 的核心代码如下:

public class FilterSecurityInterceptor extends AbstractSecurityInterceptor implements Filter {
    
    public void invoke(FilterInvocation filterInvocation) throws IOException, ServletException {

        InterceptorStatusToken token = super.beforeInvocation(filterInvocation);
        try {
            filterInvocation.getChain().doFilter(filterInvocation.getRequest(), filterInvocation.getResponse());
        }
        finally {
            super.finallyInvocation(token);
        }
        super.afterInvocation(token, null);
    }
}

可以看到,主要逻辑就包含在 beforeInvocation()finallyInvocation()afterInvocation() 这三个方法中,而对授权相关的部分则位于 beforeInvocation() 方法中:

public abstract class AbstractSecurityInterceptor
        implements InitializingBean, ApplicationEventPublisherAware, MessageSourceAware {

    protected InterceptorStatusToken beforeInvocation(Object object) {
        
        Collection<ConfigAttribute> attributes = this.obtainSecurityMetadataSource().getAttributes(object);
        
        Authentication authenticated = authenticateIfRequired();
        
        // Attempt authorization
        attemptAuthorization(object, attributes, authenticated);
        
        if (this.publishAuthorizationSuccess) {
            publishEvent(new AuthorizedEvent(object, attributes, authenticated));
        }

        return new InterceptorStatusToken(SecurityContextHolder.getContext(), false, attributes, object);
    }

    private void attemptAuthorization(Object object, Collection<ConfigAttribute> attributes,
            Authentication authenticated) {
        try {
            this.accessDecisionManager.decide(authenticated, object, attributes);
        }
        catch (AccessDeniedException ex) {
            publishEvent(new AuthorizationFailureEvent(object, attributes, authenticated, ex));
            throw ex;
        }
    }
}

在这里,我们遇到了 Spring Security 实现授权的核心接口:AccessDecisionManager,Spring Security 就是通过该接口的 decide() 方法来决定用户是否有访问某个资源的权限。AccessDecisionManager 接口的默认实现为 AffirmativeBased,可以从 AbstractInterceptUrlConfigurer 中找到它的踪影:

public abstract class AbstractInterceptUrlConfigurer<C extends AbstractInterceptUrlConfigurer<C, H>, H extends HttpSecurityBuilder<H>>
        extends AbstractHttpConfigurer<C, H> {
    
    private AccessDecisionManager createDefaultAccessDecisionManager(H http) {
        AffirmativeBased result = new AffirmativeBased(getDecisionVoters(http));
        return postProcess(result);
    }
}

AffirmativeBased 实例中包含一个或多个 AccessDecisionVoter,它通过遍历所有的 AccessDecisionVoter 依次投票决定授权是否允许,只要有一个 AccessDecisionVoter 拒绝,则抛出 AccessDeniedException 异常:

public class AffirmativeBased extends AbstractAccessDecisionManager {

    @Override
    @SuppressWarnings({ "rawtypes", "unchecked" })
    public void decide(Authentication authentication, Object object, Collection<ConfigAttribute> configAttributes)
            throws AccessDeniedException {
        int deny = 0;
        for (AccessDecisionVoter voter : getDecisionVoters()) {
            int result = voter.vote(authentication, object, configAttributes);
            switch (result) {
            case AccessDecisionVoter.ACCESS_GRANTED:
                return;
            case AccessDecisionVoter.ACCESS_DENIED:
                deny++;
                break;
            default:
                break;
            }
        }
        if (deny > 0) {
            throw new AccessDeniedException(
                    this.messages.getMessage("AbstractAccessDecisionManager.accessDenied", "Access is denied"));
        }
        // To get this far, every AccessDecisionVoter abstained
        checkAllowIfAllAbstainDecisions();
    }
}

默认情况下,AffirmativeBased 实例中只有一个 AccessDecisionVoter,那就是 WebExpressionVoter

public class WebExpressionVoter implements AccessDecisionVoter<FilterInvocation> {

    @Override
    public int vote(Authentication authentication, FilterInvocation filterInvocation,
            Collection<ConfigAttribute> attributes) {
        
        WebExpressionConfigAttribute webExpressionConfigAttribute = findConfigAttribute(attributes);
        
        EvaluationContext ctx = webExpressionConfigAttribute.postProcess(
                this.expressionHandler.createEvaluationContext(authentication, filterInvocation), filterInvocation);

        boolean granted = ExpressionUtils.evaluateAsBoolean(webExpressionConfigAttribute.getAuthorizeExpression(), ctx);
        if (granted) {
            return ACCESS_GRANTED;
        }
        return ACCESS_DENIED;
    }
}

WebExpressionVoter 将授权转换为 SpEL 表达式,检查授权是否通过,就是看执行 SpEL 表达式的结果是否为 true,这里的细节还有很多,详细内容还是参考 官方文档 吧。

参考

更多

Spring Security 的安全防护

Spring Security 自定义配置

Spring Security 单元测试

扫描二维码,在手机上阅读!

gRPC 快速入门

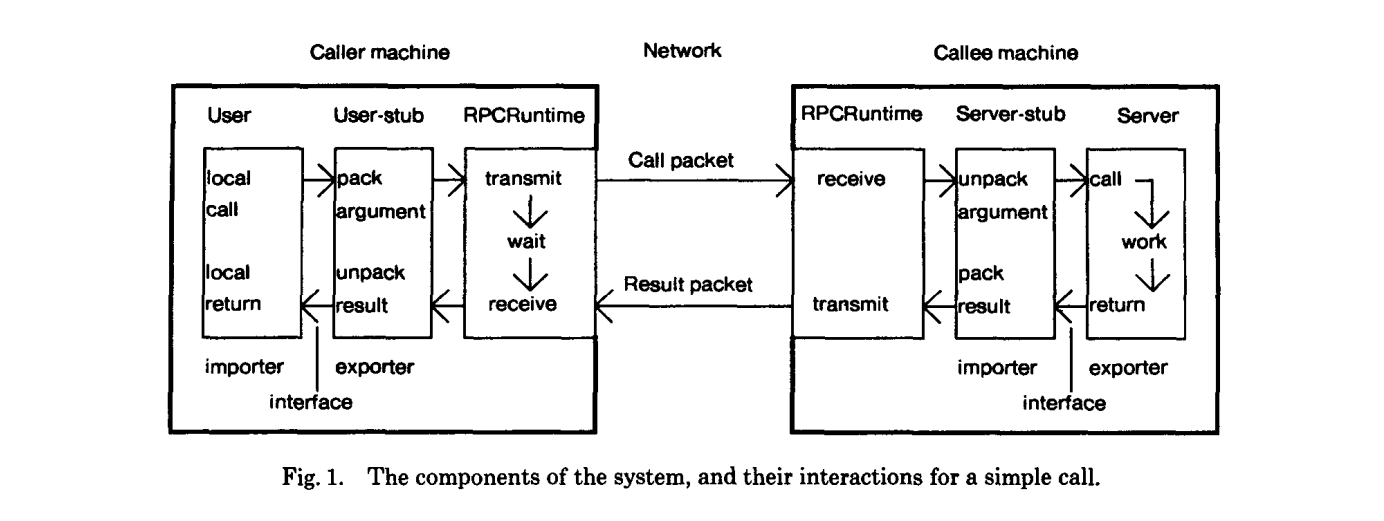
RPC 又被称为 远程过程调用,英文全称为 Remote Procedure Call,是一种服务间的通信规范,它可以让你像调用本地方法一样调用远程服务提供的方法,而不需要关心底层的通信细节。RPC 的概念早在上个世纪七八十年代就已经被提出,1984 年,Birrell 和 Nelson 在 ACM Transactions on Computer Systems 期刊上发表了一篇关于 RPC 的经典论文 Implementing remote procedure calls,论文中首次给出了实现 RPC 的基本框架:

rpc.png

从这个框架中可以看到很多现代 RPC 框架的影子,比如客户端和服务端的 Stub、序列化和反序列化等,事实上,所有后来的 RPC 框架几乎都是源自于这个原型。

不过在那个年代,RPC 的争议是非常大的,由于网络环境的不可靠性,RPC 永远都不可能做到像调用本地方法一样。大家提出了一堆问题,比如:故障恢复、请求重试、异步请求、服务寻址等,在那个互联网都还没有出现的年代,一堆大神们就已经在讨论分布式系统间的调用问题了,而他们讨论的问题焦点,基本上都演变成了 RPC 历史中永恒的话题。

为了解决这些问题,软件架构经历了一代又一代的发展和演进。1988 年,Sun 公司推出了第一个商业化的 RPC 库 Sun RPC ,并被定义为标准的 RPC 规范;1991 年,非营利性组织 OMG 发布 CORBA,它通过接口定义语言 IDL 中的抽象类型映射让异构环境之间的互操作成为了可能;不过由于其复杂性,很快就被微软推出的基于 XML 的 SOAP 技术所打败,随后 SOAP 作为 W3C 标准大大推动了 Web Service 概念的发展;像 SOAP 这种基于 XML 的 RPC 技术被称为 XML-RPC,它最大的问题是 XML 报文内容过于冗余,对 XML 的解析效率也很低,于是 JSON 应运而生,进而导致 RESTful 的盛行;不过无论是 XML 还是 JSON,都是基于文本传输,性能都无法让人满意,直到 2008 年,Google 开源 Protocol Buffers,这是一种高效的结构化数据存储格式,可以用于结构化数据的序列化,非常适合做数据存储或 RPC 数据交换格式;可能是由于微服务的流行,之后的 RPC 框架如雨后春笋般蓬勃发展,同年,Facebook 向 Apache 贡献了开源项目 Thrift,2009 年,Hadoop 之父 Doug Cutting 开发出 Avro,成为 Hadoop 的一个子项目,随后又脱离 Hadoop 成为 Apache 顶级项目;2011 年,阿里也开源了它自研的 RPC 框架 Dubbo,和前两个一样,最后也贡献给了 Apache;2015 年,Google 开源 gRPC 框架,开创性地使用 HTTP/2 作为传输协议,基于 HTTP/2 的多路复用和服务端推送技术,gRPC 支持双向流式通信,这使得 RPC 框架终于不再拘泥于万年不变的 C/S 模型了。

2017 年,gRPC 作为孵化项目成为 CNCF 的一员,不论是 Envoy 还是 Istio 等 Service Mesh 方案,都将 gRPC 作为一等公民,可以预见的是,谷歌正在将 gRPC 打造成云原生时代通信层事实上的标准。

Hello World 开始

这一节我们使用 Go 语言实现一个简单的 Hello World 服务,学习 gRPC 的基本概念。首先,我们通过 go mod init 初始化示例项目:

$ mkdir demo && cd demo
$ go mod init example.com/demo
go: creating new go.mod: module example.com/demo
go: to add module requirements and sums:
        go mod tidy

然后获取 grpc 依赖:

$ go get google.golang.org/grpc@latest
go: downloading golang.org/x/net v0.5.0
go: downloading golang.org/x/sys v0.4.0
go: downloading google.golang.org/genproto v0.0.0-20230110181048-76db0878b65f
go: downloading golang.org/x/text v0.6.0
go: added github.com/golang/protobuf v1.5.2
go: added golang.org/x/net v0.5.0
go: added golang.org/x/sys v0.4.0
go: added golang.org/x/text v0.6.0
go: added google.golang.org/genproto v0.0.0-20230110181048-76db0878b65f
go: added google.golang.org/grpc v1.53.0
go: added google.golang.org/protobuf v1.28.1

编写 .proto 文件

正如前文所述,Google 在 2009 年开源了一种高效的结构化数据存储格式 Protocol Buffers,这种格式非常适合用于 RPC 的数据交换,所以顺理成章的,Google 在开发 gRPC 时就采用了 Protocol Buffers 作为默认的数据格式。不过要注意的是 Protocol Buffers 不仅仅是一种数据格式,而且也是一种 IDL(Interface Description Language,接口描述语言),它通过一种中立的方式来描述接口和数据类型,从而实现跨语言和跨平台开发。

一般使用 .proto 后缀的文件来定义接口和数据类型,所以接下来,我们要创建一个 hello.proto 文件,我们将其放在 proto 目录下:

$ mkdir proto && cd proto
$ vim hello.proto

文件内容如下:

syntax = "proto3";

option go_package = "example.com/demo/proto";

service HelloService {
  rpc SayHello (HelloRequest) returns (HelloResponse) {}
}

message HelloRequest {
  string name = 1;
}

message HelloResponse {
  string message = 1;
}

我们在第一行指定使用 proto3 语法,这是目前推荐的版本,如果不指定,默认将使用 proto2,可能会导致一些版本兼容性的问题。随后我们用关键字 service 定义了一个 HelloService 服务,该服务包含一个 SayHello 方法,方法的入参为 HelloRequest,出参为 HelloResponse,这两个消息类型都在后面通过关键字 message 所定义。Protocol Buffers 的语法非常直观,也比较容易理解,这里只是使用了一些简单的语法,其他更复杂的语法可以参考 Protocol Buffers 的官方文档,另外这里有一份 中文语法指南 也可供参考。

编写好 hello.proto 文件之后,我们还需要一些工具将其转换为 Go 语言。这些工具包括:

  • protoc
  • protoc-gen-go
  • protoc-gen-go-grpc

protoc 是 Protocol Buffers 编译器,用于将 .proto 文件转换为其他编程语言,而不同语言的转换工作由不同语言的插件来实现。Go 语言的插件有两个:protoc-gen-goprotoc-gen-go-grpc,插件 protoc-gen-go 会生成一个后缀为 .pb.go 的文件,其中包含 .proto 文件中定义数据类型和其序列化方法;插件 protoc-gen-go-grpc 会生成一个后缀为 _grpc.pb.go 的文件,其中包含供客户端调用的服务方法和服务端要实现的接口类型。

protoc 可以从 Protocol Buffers 的 Release 页面 下载,下载后将 bin 目录添加到 PATH 环境变量即可:

$ curl -LO https://github.com/protocolbuffers/protobuf/releases/download/v22.0/protoc-22.0-linux-x86_64.zip

protoc-gen-goprotoc-gen-go-grpc 两个插件可以通过 go install 命令直接安装:

$ go install google.golang.org/protobuf/cmd/protoc-gen-go@v1.28.1
$ go install google.golang.org/grpc/cmd/protoc-gen-go-grpc@v1.2.0

安装完成后使用 --version 参数检测各个命令是否正常:

$ protoc --version
libprotoc 22.0

$ protoc-gen-go --version
protoc-gen-go v1.28.1

$ protoc-gen-go-grpc --version
protoc-gen-go-grpc 1.2.0

一切就绪后,就可以使用下面这行命令生成相应的 Go 代码了:

$ cd proto
$ protoc --go_out=. --go_opt=paths=source_relative \
    --go-grpc_out=. --go-grpc_opt=paths=source_relative \
    hello.proto

这个命令在当前目录下生成了 hello.pb.gohello_grpc.pb.go 两个文件。

实现服务端

在生成的 hello_grpc.pb.go 文件中,定义了一个 HelloServiceServer 接口:

// HelloServiceServer is the server API for HelloService service.
// All implementations must embed UnimplementedHelloServiceServer
// for forward compatibility
type HelloServiceServer interface {
    SayHello(context.Context, *HelloRequest) (*HelloResponse, error)
    mustEmbedUnimplementedHelloServiceServer()
}

并且在接口的下面提供了一个默认实现:

type UnimplementedHelloServiceServer struct {
}

func (UnimplementedHelloServiceServer) SayHello(context.Context, *HelloRequest) (*HelloResponse, error) {
    return nil, status.Errorf(codes.Unimplemented, "method SayHello not implemented")
}
func (UnimplementedHelloServiceServer) mustEmbedUnimplementedHelloServiceServer() {}

注意看 HelloServiceServer 的上面有一行注释:All implementations must embed UnimplementedHelloServiceServer for forward compatibility,为了保证向前兼容性,我们自己在实现这个接口时必须要嵌入 UnimplementedHelloServiceServer 这个默认实现,这篇文章 对此有一个简单的说明。

接下来我们创建一个 server 目录,并创建一个 main.go 文件:

$ mkdir server && cd server
$ vim main.go

定义 server 结构体,继承 UnimplementedHelloServiceServer 并重写 SayHello 方法:

type server struct {
    proto.UnimplementedHelloServiceServer
}

func (s *server) SayHello(ctx context.Context, request *proto.HelloRequest) (*proto.HelloResponse, error) {
    log.Printf("Request recieved: %v\n", request.GetName())
    return &proto.HelloResponse{
        Message: "Hello " + request.GetName(),
    }, nil
}

然后在入口方法中,通过 proto.RegisterHelloServiceServer(s, &server{}) 将我们的实现注册到 grpc Server 中:

func main() {

    lis, err := net.Listen("tcp", ":8080")
    if err != nil {
        log.Fatalf("Server listen failed!")
    }
    log.Printf("Server listening at: %s", lis.Addr())

    s := grpc.NewServer()
    proto.RegisterHelloServiceServer(s, &server{})
    if err := s.Serve(lis); err != nil {
        log.Fatalf("Server serve failed!")
    }
}

使用 go run 运行该代码:

$ go run ./server/main.go
2023/03/02 07:40:50 Server listening at: [::]:8080

一个 gRPC 的服务端就启动成功了!

实现客户端

接下来,我们来实现客户端。其实,在 hello_grpc.pb.go 文件中,protoc 也为我们定义了一个 HelloServiceClient 接口:

type HelloServiceClient interface {
    SayHello(ctx context.Context, in *HelloRequest, opts ...grpc.CallOption) (*HelloResponse, error)
}

并提供了该接口的默认实现:

type helloServiceClient struct {
    cc grpc.ClientConnInterface
}

func NewHelloServiceClient(cc grpc.ClientConnInterface) HelloServiceClient {
    return &helloServiceClient{cc}
}

func (c *helloServiceClient) SayHello(ctx context.Context, in *HelloRequest, opts ...grpc.CallOption) (*HelloResponse, error) {
    out := new(HelloResponse)
    err := c.cc.Invoke(ctx, "/HelloService/SayHello", in, out, opts...)
    if err != nil {
        return nil, err
    }
    return out, nil
}

HelloServiceServer 不同的是,这个客户端实现我们无需修改,可以直接使用。首先我们创建一个 client 目录,并创建一个 main.go 文件:

$ mkdir client && cd client
$ vim main.go

然后在入口方法中,通过 grpc.Dial 创建一个和服务端的连接:

conn, err := grpc.Dial("localhost:8080", grpc.WithTransportCredentials(insecure.NewCredentials()))
if err != nil {
    log.Fatalf("Connect grpc server failed: %v", err)
}
defer conn.Close()

注意我们的服务端没有开启 TLS,连接是不安全的,所以我们需要加一个不安全证书的连接选项,否则连接的时候会报错:

Connect grpc server failed: grpc: no transport security set (use grpc.WithTransportCredentials(insecure.NewCredentials()) explicitly or set credentials)

然后使用 hello_grpc.pb.go 文件中提供的 NewHelloServiceClient 方法创建一个客户端实例:

c := proto.NewHelloServiceClient(conn)

同时使用 context 创建一个带超时的上下文:

ctx, cancel := context.WithTimeout(context.Background(), time.Second)
defer cancel()

使用创建的客户端调用 SayHello 方法:

r, err := c.SayHello(ctx, &proto.HelloRequest{Name: "zhangsan"})
if err != nil {
    log.Fatalf("Call SayHello failed: %v", err)
}
log.Printf("SayHello response: %s", r.GetMessage())

从调用的代码上看起来,确实和调用本地方法一样,传入 HelloRequest 请求,得到 HelloResponse 响应。至此,一个简单的客户端就编写完成了,使用 go run 运行该代码:

$ go run ./client/main.go
2023/03/03 07:03:34 SayHello response: Hello zhangsan

测试服务端

除了编写客户端,我们也可以使用其他的工具来测试服务端,对于 HTTP 服务,我们一般使用 curlPostman 之类的工具;而对于 gRPC 服务,也有类似的工具,比如 grpcurlgrpcui 等,这里整理了一份 关于 gRPC 工具的清单

这里使用 grpcurl 来对我们的服务端进行简单的测试。首先从它的 Release 页面 下载并安装 grpcurl

$ curl -LO https://github.com/fullstorydev/grpcurl/releases/download/v1.8.7/grpcurl_1.8.7_linux_x86_64.tar.gz

grpcurl 中最常使用的是 list 子命令,它可以列出服务端支持的所有服务:

$ grpcurl -plaintext localhost:8080 list
Failed to list services: server does not support the reflection API

不过这要求我们的服务端必须开启 反射 API,打开 server/main.go 文件,在其中加上下面这行代码:

reflection.Register(s)

这样我们就通过 Go 语言中提供的 reflection 包开启了反射 API,然后使用 grpcurllist 命令重新列出服务端的所有服务:

$ grpcurl -plaintext localhost:8080 list
HelloService
grpc.reflection.v1alpha.ServerReflection

如果服务端没有开启反射 API,grpc 也支持直接使用 Proto 文件Protoset 文件

我们还可以使用 list 命令继续列出 HelloService 服务的所有方法:

$ grpcurl -plaintext localhost:8080 list HelloService
HelloService.SayHello

如果要查看某个方法的详细信息,可以使用 describe 命令:

$ grpcurl -plaintext localhost:8080 describe HelloService.SayHello
HelloService.SayHello is a method:
rpc SayHello ( .HelloRequest ) returns ( .HelloResponse );

可以看出,这和我们在 proto 文件中的定义是一致的。最后,使用 grpcurl 来调用这个方法:

$ grpcurl -plaintext -d '{"name": "zhangsan"}' localhost:8080 HelloService.SayHello
{
  "message": "Hello zhangsan"
}

如果入参比较大,可以将其保存在一个文件中,使用下面的方法来调用:

$ cat input.json | grpcurl -plaintext -d @ localhost:8080 HelloService.SayHello
{
  "message": "Hello zhangsan"
}

gRPC 的四种形式

gRPC 支持四种不同的通信方式:

  • 简单 RPC(Simple RPC
  • 服务端流 RPC(Server-side streaming RPC
  • 客户端流 RPC(Client-side streaming RPC
  • 双向流 RPC(Bidirectional streaming RPC

上一节中的 SayHello 就是一个简单 RPC 的例子:

rpc SayHello (HelloRequest) returns (HelloResponse) {}

这种 RPC 有时候也被称为 Unary RPC,除此之外,gRPC 还支持三种流式通信方法,也即 Streaming RPC

服务端流 RPC(Server-side streaming RPC

第一种叫服务端流 RPC,它接受一个正常的请求,并以流的形式向客户端发送多个响应。在下面的例子中,客户端向服务端发送一个字符串,服务端对字符串进行分词,并将分词结果以流式返回给客户端。首先,我们在 .proto 文件中定义 Split 方法和相应的消息体:

rpc Split (SplitRequest) returns (stream SplitResponse) {}

然后,使用 protoc 生成服务端和客户端的代码,接着在 server/main.go 文件中添加服务端实现:

func (s *server) Split(request *proto.SplitRequest, stream proto.HelloService_SplitServer) error {
    log.Printf("Request recieved: %v\n", request.GetSentence())
    words := strings.Split(request.GetSentence(), " ")
    for _, word := range words {
        if err := stream.Send(&proto.SplitResponse{Word: word}); err != nil {
            return err
        }
    }
    return nil
}

和简单 RPC 的 SayHello 方法相比,服务端流 RPC 的 Split 方法在参数上有一些细微的差别,少了一个 ctx context.Context 参数,而多了一个 stream proto.HelloService_SplitServer 参数,这是 protoc 自动生成的一个接口:

type HelloService_SplitServer interface {
    Send(*SplitResponse) error
    grpc.ServerStream
}

这个接口继承自 grpc.ServerStream 接口,并具有一个 Send 方法,用来向客户端发送响应。

client/main.go 文件中添加客户端实现:

stream, err := c.Split(ctx, &proto.SplitRequest{Sentence: "Hello World"})
if err != nil {
    log.Fatalf("Call Split failed: %v", err)
}
for {
    r, err := stream.Recv()
    if err == io.EOF {
        break
    }
    if err != nil {
        log.Fatalf("%v.Split(_) = _, %v", c, err)
    }
    log.Printf("Split response: %s", r.GetWord())
}

和简单 RPC 的客户端代码相比,Split 方法不是直接返回 SplitResponse,而是返回一个 stream 流,它的类型为 HelloService_SplitClient 接口:

type HelloService_SplitClient interface {
    Recv() (*SplitResponse, error)
    grpc.ClientStream
}

这个接口继承自 grpc.ClientStream 接口,并具有一个 Recv 方法,用来接受服务端发送的响应,当服务端发送结束后,Recv 方法将返回 io.EOF 错误。

客户端流 RPC(Client-side streaming RPC

第二种叫客户端流 RPC,它以流的形式接受客户端发送来的多个请求,服务端处理之后返回一个正常的响应。在下面的例子中,客户端向服务端发送多个数字,服务端收集之后进行求和,并将求和结果返回给客户端。首先,我们在 .proto 文件中定义 Sum 方法和相应的消息体:

rpc Sum (stream SumRequest) returns (SumResponse) {}

然后,使用 protoc 生成服务端和客户端的代码,接着在 server/main.go 文件中添加服务端实现:

func (s *server) Sum(stream proto.HelloService_SumServer) error {
    var sum int32 = 0
    for {
        r, err := stream.Recv()
        if err == io.EOF {
            return stream.SendAndClose(&proto.SumResponse{Sum: sum})
        }
        if err != nil {
            return err
        }
        sum = sum + r.GetNum()
    }
}

从上面的代码可以看到,Sum 方法没有了 request 参数,只有一个 stream 参数,请求参数通过 stream.Recv 以流的形式读取,当读取结束后,stream.Recv 方法将返回 io.EOF 错误,这时我们通过 stream.SendAndClose 将处理之后的结果返回给客户端,并关闭连接。

client/main.go 文件中添加客户端实现:

stream2, err := c.Sum(ctx)
if err != nil {
    log.Fatalf("%v.Sum(_) = _, %v", c, err)
}
nums := []int32{1, 2, 3, 4, 5, 6, 7}
for _, num := range nums {
    if err := stream2.Send(&proto.SumRequest{Num: num}); err != nil {
        log.Fatalf("%v.Send(%v) = %v", stream, num, err)
    }
}
response, err := stream2.CloseAndRecv()
if err != nil {
    log.Fatalf("%v.CloseAndRecv() failed: %v", stream2, err)
}
log.Printf("Sum response: %v", response.GetSum())

在上面的代码中,Sum 方法返回一个 stream 变量,然后通过 stream.Send 不断向服务端发送请求,当数据发送结束后,再通过 stream.CloseAndRecv 关闭连接,并接受服务端响应。

双向流 RPC(Bidirectional streaming RPC

第三种叫双向流 RPC,这有点像网络聊天,服务端和客户端双方以任意的顺序互相通信,服务端可以在每次接受客户端请求时就返回一次响应,也可以接受多个请求后再返回一次响应。首先,我们在 .proto 文件中定义 Chat 方法和相应的消息体:

rpc Chat (stream ChatRequest) returns (stream ChatResponse) {}

然后,使用 protoc 生成服务端和客户端的代码,接着在 server/main.go 文件中添加服务端实现:

func (s *server) Chat(stream proto.HelloService_ChatServer) error {
    for {
        r, err := stream.Recv()
        if err == io.EOF {
            return nil
        }
        if err != nil {
            return err
        }
        if err = stream.Send(&proto.ChatResponse{Message: "Reply to " + r.GetMessage()}); err != nil {
            return err
        }
    }
}

上面的代码和客户端流 RPC 比较类似,只不过服务端的响应变得更及时,每次接受到客户端请求时都会响应,而不是等客户端请求结束后再响应。

client/main.go 文件中添加客户端实现:

stream3, err := c.Chat(ctx)
if err != nil {
    log.Fatalf("%v.Chat(_) = _, %v", c, err)
}
waitc := make(chan struct{})
go func() {
    for {
        in, err := stream3.Recv()
        if err == io.EOF {
            close(waitc)
            return
        }
        if err != nil {
            log.Fatalf("Failed to receive: %v", err)
        }
        log.Printf("Chat response: %s", in.GetMessage())
    }
}()

messages := []string{"Hello", "How're you?", "Bye"}
for _, message := range messages {
    if err := stream3.Send(&proto.ChatRequest{Message: message}); err != nil {
        log.Fatalf("Failed to send: %v", err)
    }
}
stream3.CloseSend()
<-waitc

双向流 RPC 的客户端实现要稍微复杂一点。首先,我们通过 stream.Send 来发送请求,由于发送和接受都是流式的,所以我们没法像客户端流 RPC 那样通过 stream.CloseAndRecv() 来获取响应,我们只能调用 stream.CloseSend() 告诉服务端发送结束,然后我们需要创建一个新的 goroutine 来接受响应,另外,我们创建了一个 channel,用于在响应接受结束后通知主线程,以便程序能正常退出。

参考

更多

gRPC 安全认证

根据官方的 gRPC 认证指南,gRPC 支持多种不同的认证方法,包括:SSL/TLS 认证ALTS 认证 以及一些基于 token 的认证方法,如 OAuth2、GCE 等。

除了这些原生的认证方法,我们也可以通过 Metadata 来传送认证信息,从而实现 gRPC 的认证功能;另外,gRPC 还支持拦截器特性,通过拦截器也可以实现安全认证,Go gRPC Middleware 提供了很多拦截器的例子。

扫描二维码,在手机上阅读!

WebAssembly 学习笔记

WebAssembly(简称 WASM)是一种以安全有效的方式运行可移植程序的新兴 Web 技术,下面是引用 MDN 上对它的定义

WebAssembly 是一种新的编码方式,可以在现代的网络浏览器中运行 - 它是一种低级的类汇编语言,具有紧凑的二进制格式,可以接近原生的性能运行,并为诸如 C/C++ 等语言提供一个编译目标,以便它们可以在 Web 上运行。它也被设计为可以与 JavaScript 共存,允许两者一起工作。

也就是说,无论你使用的是哪一种语言,我们都可以将其转换为 WebAssembly 格式,并在浏览器中以原生的性能运行。WebAssembly 的开发团队来自 Mozilla、Google、Microsoft 和 Apple,分别代表着四大网络浏览器 Firefox、Chrome、Microsoft Edge 和 Safari,从 2017 年 11 月开始,这四大浏览器就开始实验性的支持 WebAssembly。当时 WebAssembly 还没有形成标准,这么多的浏览器开发商对某个尚未标准化的技术 达成如此一致的意见,这在历史上是很罕见的,可以看出这绝对是一项值得关注的技术,被号称为 the future of web development

four-browsers.png

WebAssembly 在 2019 年 12 月 5 日被万维网联盟(W3C)推荐为标准,与 HTML,CSS 和 JavaScript 一起,成为 Web 的第四种语言。

WebAssembly 之前的历史

JavaScript 诞生于 1995 年 5 月,一个让人津津乐道的故事是,当时刚加入网景的 Brendan Eich 仅仅花了十天时间就开发出了 JavaScript 语言。开发 JavaScript 的初衷是为 HTML 提供一种脚本语言使得网页变得更动态,当时根本就没有考虑什么浏览器兼容性、安全性、移植性这些东西,对性能也没有特别的要求。但随着 Web 技术的发展,网页要解决的问题已经远不止简单的文本信息,而是包括了更多的高性能图像处理和 3D 渲染等方面,这时,JavaScript 的性能问题就凸显出来了。于是,如何让 JavaScript 执行的更快,变成了各大浏览器生产商争相竞逐的目标。

浏览器性能之战

这场关于浏览器的性能之战在 2008 年由 Google 带头打响,这一年的 9 月 2 日,Google 发布了一款跨时代的浏览器 Chrome,具备简洁的用户界面和极致的用户体验,内置的 V8 引擎采用了全新的 JIT 编译(Just-in-time compilation,即时编译)技术,使得浏览器的响应速度得到了几倍的提升。次年,Apple 发布了他们的浏览器新版本 Safari 4,其中引入新的 Nitro 引擎(也被称为 SquirrelFish 或 JavaScriptCore),同样使用的是 JIT 技术。紧接着,Mozilla 在 Firefox 3.5 中引入 TraceMonkey 技术,Microsoft 在 2011 年也推出 Chakra) 引擎。

使用 JIT 技术,极大的提高了 JavaScript 的性能。那么 JIT 是如何工作的呢?我们知道,JavaScript 是解释型语言,因此传统的 JavaScript 引擎需要逐行读取 JavaScript 代码,并将其翻译成可执行的机器码。很显然这是极其低效的,如果有一段代码需要执行上千次,那么 JavaScript 引擎也会傻傻的翻译上千次。JIT 技术的基本思路就是缓存,它将执行频次比较高的代码实时编译成机器码,并缓存起来,当下次执行到同样代码时直接使用相应的机器码替换掉,从而获得极大的性能提升。另外,对于执行频次非常高的代码,JIT 引擎还会使用优化编译器(Optimising Compiler)编译出更高效的机器码。关于 JIT 技术的原理可以参考 A crash course in just-in-time (JIT) compilers 这篇文章。

JIT 技术推出之后,JavaScript 的性能得到了飞速提升:

jit-performance.png

随着性能的提升,JavaScript 的应用范围也得到了极大的扩展,Web 内容变得更加丰富,图片、视频、游戏,等等等等,甚至有人将 JavaScript 用于后端开发(Node.js)。不过 JIT 也不完全是 “性能银弹”,因为通过 JIT 优化也是有一定代价的,比如存储优化后的机器码需要更多的内存,另外 JIT 优化对变量类型非常敏感,但是由于 JavaScript 动态类型 的特性,用户代码中对某个变量的类型并不会严格固定,这时 JIT 优化的效果将被大打折扣。比如下面这段简单的代码:

function arraySum(arr) {
  var sum = 0;
  for (var i = 0; i < arr.length; i++) {
    sum += arr[i];
  }
}

假设 JIT 检测到 sum += arr[i]; 这行代码被执行了很多次,开始对其进行编译优化,它首先需要确认 sumarriarr[i] 这些变量的类型,如果 arr[i]int 类型,这就是整数相加的操作,但如果 arr[i]string 类型,这又变成了字符串拼接的操作,这两种情况编译成的机器码是完全不同的。所以 JIT 引擎会先根据代码执行情况假设变量为某种类型,然后再进行优化,当执行时会对类型进行检测,一旦检测到类型不同时,这个 JIT 优化将被作废,这个过程叫做 去优化(deoptimization,或者 bailing out)。假如用户写出这样的代码:

arr = [1, "hello"];

JavaScript 这种动态类型的特点对 JIT 引擎是非常不友好的,反复的优化和去优化不仅无法提高性能,甚至会有副作用。所以在实际的生产环境中,JIT 的效果往往没有那么显著,通过 JIT 的优化很快就遇到了瓶颈。

但是日益丰富的 Web 内容对 JavaScript 的性能提出了更高的要求,尤其是 3D 游戏,这些游戏在 PC 上跑都很吃力,更别说在浏览器里运行了。如何让 JavaScript 执行地更快,是摆在各大浏览器生产商面前的一大难题,很快,Google 和 Mozilla 交出了各自的答卷。

Google 的 NaCl 解决方案

Google 在 2008 年开源了 NaCl 技术,并在 2011 年的 Chrome 14 中正式启用。NaCl 的全称为 Native Client,这是一种可以在浏览器中执行原生代码(native code)的技术,听起来很像是 Microsoft 当时所使用的 ActiveX 技术,不过 ActiveX 由于其安全性一直被人所诟病。而 NaCl 定义了一套原生代码的安全子集,执行于独立的沙盒环境之中,并通过一套被称为 PPAPI(Pepper Plugin API)的接口来和 JavaScript 交互,避免了可能的安全问题。NaCl 采取了和 JIT 截然不同的 AOT 编译(Ahead-of-time compilation,即提前编译)技术,所以在性能上的表现非常突出,几乎达到了和原生应用一样的性能。不过由于 NaCl 应用是 C/C++ 语言编写的,与 CPU 架构强关联,不具有可移植性,因此需要针对不同的平台进行开发以及编译,用户使用起来非常痛苦。

为了解决这个问题,Google 在 2013 年又推出了 PNaCl 技术(Portable Native Client),PNaCl 的创新之处在于使用 LLVM IR(Intermediate Representation)来分发应用,而不是直接分发原生代码,LLVM IR 也被称为 Bitcode,它是一种平台无关的中间语言表示,实现了和 Java 一样的目标:一次编译,到处运行。

如果我们站在今天的视角来看,PNaCl 这项技术是非常超前的,它的核心理念和如今的 WebAssembly 如出一辙,只不过它出现的时机不对,当时很多人都对在浏览器中执行原生代码持怀疑态度,担心可能出现和 ActiveX 一样的安全问题,而且当时 HTML5 技术正发展的如火如荼,人们都在想着如何从浏览器中移除诸如 Flash 或 Java Applet 这些 JavaScript 之外的技术,所以 PNaCl 技术从诞生以来,一直不温不火,尽管后来 Firefox 和 Opera 等浏览器也开始支持 NaCl 和 PPAPI,但是一直无法得到普及(当时的 IE 还占领着浏览器市场的半壁江山)。

随着 WebAssembly 技术的发展,Google Chrome 最终在 2018 年移除了对 PNaCl 的支持,决定全面拥抱 WebAssembly 技术。

Mozilla 的 asm.js 解决方案

2010 年,刚刚加入 Mozilla 的 Alon Zakai 在工作之余突发奇想,能不能将自己编写的 C/C++ 游戏引擎运行在浏览器上?当时 NaCl 技术还没怎么普及,Alon Zakai 一时之间并没有找到什么好的技术方案。好在 C/C++ 是强类型语言,JavaScript 是弱类型语言,所以将 C/C++ 代码转换为 JavaScript 在技术上是完全可行的。Alon Zakai 于是便开始着手编写这样的一个编译器,Emscripten 便由此诞生了!

Emscripten 和传统的编译器很类似,都是将某种语言转换为另一种语言形式,不过他们之间有着本质的区别。传统的编译器是将一种语言编译成某种 low-level 的语言,比如将 C/C++ 代码编译成二进制文件(机器码),这种编译器被称为 Compiler;而 Emscripten 是将 C/C++ 代码编译成和它 same-level 的 JavaScript 代码,这种编译器被称为 Transpiler 或者 Source to source compiler

Emscripten 相比于 NaCl 来说兼容性更好,于是很快就得到了 Mozilla 的认可。之后 Alon Zakai 被邀请加入 Mozilla 的研究团队并全职负责 Emscripten 的开发,以及通过 Emscripten 编译生成的 JavaScript 代码的性能优化上。在 2013 年,Alon Zakai 联合 Luke Wagner,David Herman 一起发布了 asm.js 规范,同年,Mozilla 也发布了 Firefox 22,并内置了新一代的 OdinMonkey 引擎,它是第一个支持 asm.js 规范的 JavaScript 引擎。

asm.js 的思想很简单,就是尽可能的在 JavaScript 中使用类型明确的参数,并通过 TypedArray 取消了垃圾回收机制,这样可以让 JIT 充分利用和优化,进而提高 JavaScript 的执行性能。比如下面这样一段 C 代码:

int f(int i) {
  return i + 1;
}

使用 Emscripten 编译生成的 JavaScript 代码如下:

function f(i) {
  i = i|0;
  return (i + 1)|0;
}

通过在变量和返回值后面加上 |0 这样的操作,我们明确了参数和返回值的数据类型,当 JIT 引擎检测到这样的代码时,便可以跳过语法分析和类型推断这些步骤,将代码直接转成机器语言。据称,使用 asm.js 能达到原生代码 50% 左右的速度,虽然没有 NaCl 亮眼,但是这相比于普通的 JavaScript 代码而言已经是极大的性能提升了。而且我们可以看出 asm.js 采取了和 NaCl 截然不同的思路,asm.js 其实和 JavaScript 没有区别,它只是 JavaScript 的一个子集而已,这样做不仅可以充分发挥出 JIT 的最大功效,而且能兼容所有的浏览器。

但是 asm.js 也存在着不少的问题。首先由于它还是和 JavaScript一样是文本格式,因此加载和解析都会花费比较长的时间,这被称为慢启动问题;其次,asm.js 除了在变量后面加 |0 之外,还有很多类似这样的标注代码:

asmjs.png

很显然,这让代码的可读性和可扩展性都变的很差;最后,仍然是性能问题,通过 asm.js 无论怎么优化最终生成的都还是 JavaScript 代码,性能自然远远比不上原生代码;因此这并不是一个非常理想的技术方案。

其他解决方案

除了 NaCl 和 asm.js,实际上还有一些其他的解决方案,但最终的结果要么夭折,要么被迫转型。其中值得一提的是 Google 发明的 Dart 语言,Dart 语言的野心很大,它最初的目的是要取代 JavaScript 成为 Web 的首选语言,为此 Google 还开发了一款新的浏览器 Dartium,内置 Dart 引擎可以执行 Dart 程序,而且对于不支持 Dart 程序的浏览器,它还提供了相应的工具将 Dart 转换为 JavaScript。这一套组合拳可谓是行云流水,可是结果如何可想而知,不仅很难得到用户的承认,而且也没得到其他浏览器的认可,最终 Google 在 2015 年取消了该计划。目前 Dart 语言转战移动开发领域,比如跨平台开发框架 Flutter 就是采用 Dart 开发的。

WebAssembly = NaCl + asm.js

随着技术的发展,Mozilla 和 Google 的工程师出现了很多次的交流和合作,通过汲取 NaCl 和 asm.js 两者的优点,双方推出了一种全新的技术方案:

  • 和 NaCl/PNaCl 一样,基于二进制格式,从而能够被快速解析,达到原生代码的运行速度;
  • 和 PNaCl 一样,依赖于通用的 LLVM IR,这样既具备可移植性,又便于其他语言快速接入;
  • 和 asm.js 一样,使用 Emscripten 等工具链进行编译;另外,Emscripten 同时支持生成 asm.js 和二进制格式,当浏览器不兼容新的二进制格式时,asm.js 可以作为降级方案;
  • 和 asm.js 一样,必须以非常自然的方式直接操作 Web API,而不用像 PNaCl 一样需要处理与 JavaScript 之间的通信;

这个技术方案在 2015 年正式命名为 WebAssembly,2017 年各大浏览器生产商纷纷宣布支持 WebAssembly,2019 年 WebAssembly 正式成为 W3C 标准,一场关于浏览器的性能革命已经悄然展开。

wasm-performance.png

WebAssembly 入门示例

从上面的学习中我们知道,WebAssembly 是一种通用的编码格式,并且已经有很多编程语言支持将源码编译成这种格式了,官方的 Getting Started 有一个详细的列表。这一节我们就跟着官方的教程实践一下下面这三种语言:

将 C/C++ 程序编译成 WebAssembly

首先我们参考 Emscripten 的官方文档 上的步骤下载并安装 Emscripten SDK,安装完成后通过下面的命令检查环境是否正常:

$ emcc --check
emcc (Emscripten gcc/clang-like replacement + linker emulating GNU ld) 3.1.24 (68a9f990429e0bcfb63b1cde68bad792554350a5)
shared:INFO: (Emscripten: Running sanity checks)

环境准备就绪后,我们就可以将 C/C++ 的代码编译为 WebAssembly 了。写一个简单的 Hello World 程序 hello.c

#include <stdio.h>

int main() {
    printf("Hello World\n");
    return 0;
}

然后使用 emcc 进行编译:

$ emcc hello.c -o hello.html

上面这个命令会生成三个文件:

  • hello.wasm - 这就是生成的 WebAssembly 二进制字节码文件
  • hello.js - 包含一段胶水代码(glue code)通过 JavaScript 来调用 WebAssembly 文件
  • hello.html - 方便开发调试,在页面上显示 WebAssembly 的调用结果

我们不能直接用浏览器打开 hello.html 文件,因为浏览器不支持 file:// 形式的 XHR 请求,所以在 HTML 中无法加载 .wasm 等相关的文件,为了看到效果,我们需要一个 Web Server,比如 Nginx、Tomcat 等,不过这些安装和配置都比较麻烦,我们还有很多其他的方法快速启动一个 Web Server。

比如通过 npm 启动一个本地 Web Server:

$ npx serve .

或者使用 Python3 的 http.server 模块:

$ python3 -m http.server

访问 hello.html 页面如下:

hello-html.png

可以看到我们在 C 语言中打印的 Hello World 成功输出到浏览器了。

另外,我们也可以将 C 语言中的函数暴露出来给 JavaScript 调用。默认情况下,Emscripten 生成的代码只会调用 main() 函数,其他函数忽略。我们可以使用 emscripten.h 中的 EMSCRIPTEN_KEEPALIVE 来暴露函数,新建一个 greet.c 文件如下:

#include <stdio.h>
#include <emscripten/emscripten.h>

int main() {
    printf("Hello World\n");
    return 0;
}

#ifdef __cplusplus
#define EXTERN extern "C"
#else
#define EXTERN
#endif

EXTERN EMSCRIPTEN_KEEPALIVE void greet(char* name) {
    printf("Hello, %s!\n", name);
}

上面的代码定义了一个 void greet(char* name) 函数,为了让这个函数可以在 JavaScript 中调用,编译时还需要指定 NO_EXIT_RUNTIMEEXPORTED_RUNTIME_METHODS 参数,将 ccall 导出来:

$ emcc -o greet.html greet.c -s NO_EXIT_RUNTIME=1 -s EXPORTED_RUNTIME_METHODS=ccall

greet.html 文件和上面的 hello.html 几乎是一样的,我们在该文件中加几行代码来测试我们的 greet() 函数,首先加一个按钮:

<button id="mybutton">Click me!</button>

然后为它添加点击事件,可以看到 JavaScript 就是通过上面导出的 ccall 来调用 greet() 函数的:

document.getElementById("mybutton").addEventListener("click", () => {
  const result = Module.ccall(
    "greet",         // name of C function
    null,            // return type
    ["string"],      // argument types
    ["WebAssembly"]  // arguments
  );
});

除了 ccall,我们还可以使用 -s EXPORTED_RUNTIME_METHODS=ccall,cwrap 同时导出 ccallcwrap 函数。ccall 的作用是直接调用某个 C 函数,而 cwrap 是将 C 函数编译为一个 JavaScript 函数,并可以反复调用,这在正式项目中更实用。

点击这个按钮,可以在页面和控制台上都看到 greet() 函数打印的内容:

greet-html.png

将 Rust 程序编译成 WebAssembly

首先按照官方文档 安装 Rust,安装包含了一系列常用的命令行工具,包括 rustuprustccargo 等,其中 cargo 是 Rust 的包管理器,可以使用它安装 wasm-pack

$ cargo install wasm-pack

wasm-pack 用于将 Rust 代码编译成 WebAssembly 格式,不过要注意它不支持 bin 项目,只支持 lib 项目,所以我们通过 --lib 来创建项目:

$ cargo new --lib rust-demo
     Created library `rust-demo` package

打开 ./src/lib.rs,输入以下代码:

use wasm_bindgen::prelude::*;

#[wasm_bindgen]
extern {
    pub fn alert(s: &str);
}

#[wasm_bindgen]
pub fn greet(name: &str) {
    alert(&format!("Hello, {}!", name));
}

在上面的代码中我们使用了 wasm-bindgen 这个工具,它实现了 JavaScript 和 Rust 之间的相互通信,关于它的详细说明可以参考 《The wasm-bindgen Guide》 这本电子书。我们首先通过 extern 声明了一个 JavaScript 中的 alert() 函数,然后我们就可以像调用正常的 Rust 函数一样调用这个外部函数。下面再通过 pub fngreet() 函数暴露出来,这样我们也可以从 JavaScript 中调用这个 Rust 函数。

接着修改 ./Cargo.toml 文件,添加如下内容:

[lib]
crate-type = ["cdylib"]

[dependencies]
wasm-bindgen = "0.2"

其中 crate-type = ["cdylib"] 表示生成一个 动态系统库。使用 wasm-pack 进行构建:

$ wasm-pack build --target web

这个命令会生成一个 pkg 目录,里面包含了 wasm 文件和对应的 JavaScript 胶水代码,这和上面的 emcc 结果类似,不过并没有生成相应的测试 HTML 文件。我们手工创建一个 index.html 文件,内容如下:

<!DOCTYPE html>
<html lang="en-US">
  <head>
    <meta charset="utf-8" />
    <title>hello-wasm example</title>
  </head>
  <body>
    <script type="module">
      import init, { greet } from "./pkg/rust_demo.js";
      init().then(() => {
        greet("WebAssembly");
      });
    </script>
  </body>
</html>

然后启动一个 Web Server,并在浏览器中打开测试页面:

rust-demo-html.png

我们成功在浏览器中调用了使用 Rust 编写的 greet() 函数!

将 Go 程序编译成 WebAssembly

首先确保你已经 安装了 Go

$ go version
go version go1.19 linux/amd64

使用 go mod init 初始化模块:

$ mkdir go-demo && cd go-demo
$ go mod init com.example

新建一个 main.go 文件:

package main

import "fmt"

func main() {
    fmt.Println("Hello, WebAssembly!")
}

使用 go build 可以将它编译成可执行文件,通过在命令之前指定 GOOS=js GOARCH=wasm 可以将它编译成 WebAssembly 文件:

$ GOOS=js GOARCH=wasm go build -o main.wasm

和上面的 C 语言或 Rust 语言的例子一样,为了测试这个 main.wasm 文件,我们还需要 JavaScript 胶水代码和一个测试 HTML 文件。Go 的安装目录下自带了一个 wasm_exec.js 文件,我们将其拷贝到当前目录:

$ cp "$(go env GOROOT)/misc/wasm/wasm_exec.js" .

然后创建一个 index.html 文件(也可以直接使用 Go 自带的 wasm_exec.html 文件):

<html>
  <head>
    <meta charset="utf-8"/>
      <script src="wasm_exec.js"></script>
      <script>
        const go = new Go();
        WebAssembly.instantiateStreaming(fetch("main.wasm"), go.importObject).then((result) => {
          go.run(result.instance);
        });
      </script>
  </head>
  <body></body>
</html>

启动 Web Server 后在浏览器中打开该页面:

go-demo-html.png

在控制台中我们就可以看到程序运行的结果了。

除了在浏览器中测试 WebAssembly 文件,也可以使用 Go 安装目录自带的 go_js_wasm_exec 工具来运行它:

$ $(go env GOROOT)/misc/wasm/go_js_wasm_exec ./main.wasm
Hello, WebAssembly!

或者 go run 时带上 -exec 参数来运行:

$ GOOS=js GOARCH=wasm go run -exec="$(go env GOROOT)/misc/wasm/go_js_wasm_exec" .
Hello, WebAssembly!

运行这个命令需要安装 Node.js v12 以上的版本,打开 go_js_wasm_exec 文件可以看到它实际上就是执行 node wasm_exec_node.js 这个命令。

上面的例子是直接在 JavaScript 中执行 Go 程序,如果我们需要将 Go 中的函数导出给 JavaScript 调用,可以通过 syscall/js 来实现:

package main

import (
    "syscall/js"
)

func addFunction(this js.Value, p []js.Value) interface{} {
    sum := p[0].Int() + p[1].Int()
    return js.ValueOf(sum)
}

func main() {
    js.Global().Set("add", js.FuncOf(addFunction))
    select {} // block the main thread forever
}

注意在 main() 函数中我们使用 select {} 将程序阻塞住,防止程序退出,否则 JavaScript 在调用 Go 函数时会报下面这样的错误:

wasm_exec.js:536 Uncaught Error: Go program has already exited
    at globalThis.Go._resume (wasm_exec.js:536:11)
    at wasm_exec.js:549:8
    at <anonymous>:1:1

由于 add 函数是直接添加到 js.Global() 中的,我们可以直接通过 window.add 来访问它:

go-add-html.png

js.Global() 为我们提供了一个 Go 和 JavaScript 之间的桥梁,我们不仅可以将 Go 函数暴露给 JavaScript 调用,甚至可以通过 js.Global() 来操作 DOM:

func hello(this js.Value, args []js.Value) interface{} {
    doc := js.Global().Get("document")
    h1 := doc.Call("createElement", "h1")
    h1.Set("innerText", "Hello World")
    doc.Get("body").Call("append", h1)
    return nil
}

除了官方的 go build 可以将 Go 程序编译成 WebAssembly 文件,你也可以尝试使用 TinyGo,这是 Go 语言的一个子集实现,它对 Go 规范做了适当的裁剪,只保留了一些比较重要的库,这让它成为了一种更加强大和高效的语言,你可以在意想不到的地方运行它(比如很多物联网设备)。另外,使用 TinyGo 编译 WebAssembly 还有一个很大的优势,它编译出来的文件比 Go 官方编译出来的文件小得多(上面的例子中 C/C++ 或 Rust 编译出来的 wasm 文件只有 100~200K,而 Go 编译出来的 wasm 文件竟然有 2M 多)。

WebAssembly 文本格式

上面我们使用了三种不同的编程语言来体验 WebAssembly,学习了如何编译,以及如何在浏览器中使用 JavaScript 调用它。不过这里有一个问题,由于 wasm 文件是二进制格式,对我们来说是完全黑盒的,不像 JavaScript 是纯文本的,我们可以方便地通过浏览器自带的开发者工具对其进行调试,而 wasm 如果调用出问题,我们将很难排查。实际上,WebAssembly 在设计之初就已经考虑了这样的问题,所以它不仅具有 二进制格式,而且还有一种类似于汇编语言的 文本格式,方便用户查看、编辑和调试。

下面是 WebAssembly 文本格式的一个简单例子:

(module
  (func $add (param $lhs i32) (param $rhs i32) (result i32)
    local.get $lhs
    local.get $rhs
    i32.add)
  (export "add" (func $add))
)

WebAssembly 代码中的基本单元是一个模块,每个模块通过一个大的 S-表达式 来表示,S-表达式是一种嵌套结构,实际上它是树的一种表示形式。上面的代码首先通过 (module) 定义了一个模块,然后模块中使用 (func $add (param $lhs i32) (param $rhs i32) (result i32)) 定义了一个 add() 函数,这个 S-表达式转换为比较好理解的形式就是 i32 add(i32 lhs, i32 rhs),最后通过 (export "add" (func $add)) 将该函数暴露出来,关于这段代码的详细解释可以参考 Mozilla 官方文档中的 Understanding WebAssembly text format

我们将上面的代码保存到 add.wat 文件中,并通过 WABT 工具包(The WebAssembly Binary Toolkit)中的 wat2wasm 将其转换为 wasm 格式:

$ wat2wasm add.wat -o add.wasm

使用下面的 JavaScript 脚本加载 wasm 并调用 add() 函数:

fetchAndInstantiate('add.wasm').then(function(instance) {
    console.log(instance.exports.add(1, 2));  // "3"
});

// fetchAndInstantiate() found in wasm-utils.js
function fetchAndInstantiate(url, importObject) {
    return fetch(url).then(response =>
    response.arrayBuffer()
    ).then(bytes =>
    WebAssembly.instantiate(bytes, importObject)
    ).then(results =>
    results.instance
    );
}

将这段 JavaScript 脚本放在一个 HTML 文件中,然后启动 Web Server 访问,可以看到控制台输出了 3,也就是 add(1, 2) 的结果,并且我们还可以通过 Chrome 提供的 开发者工具对 wasm 文件进行调试

wasm-debug.png

参考

  1. WebAssembly 官网
  2. WebAssembly | MDN
  3. WebAssembly 中文网
  4. WebAssembly Design Documents
  5. WebAssembly Specification
  6. WebAssembly - 维基百科
  7. asm.js 和 Emscripten 入门教程
  8. 浏览器是如何工作的:Chrome V8 让你更懂JavaScript
  9. WebAssembly完全入门——了解wasm的前世今身
  10. 浅谈WebAssembly历史
  11. A cartoon intro to WebAssembly Articles
  12. 一个白学家眼里的 WebAssembly
  13. 使用 Docker 和 Golang 快速上手 WebAssembly
  14. 如何评论浏览器最新的 WebAssembly 字节码技术?
  15. 如何看待 WebAssembly 这门技术?
  16. 系统学习WebAssembly(1) —— 理论篇
  17. 快 11K Star 的 WebAssembly,你应该这样学
  18. WebAssembly 与 JIT
  19. WebAssembly 初步探索
  20. WebAssembly 實戰 – 讓 Go 與 JS 在瀏覽器上共舞

更多

在非浏览器下运行 WebAssembly

WebAssembly 最早只应用于 Web 浏览器中,但鉴于它所拥有 可移植、安全及高效 等特性,WebAssembly 也被逐渐应用在 Web 领域之外的一些其他场景中,并为此提出了一项新的接口标准 —— WASI(WebAssembly System Interface)

要让 WebAssembly 跑在非 Web 环境下,我们必须有一款支持 WASI 接口的运行时(WASI runtime),目前比较流行的有:wasttimewasmerWasmEdge 等,这些运行时提供了不同编程语言的 SDK,可以使得我们在各种不同的语言中调用 WebAssembly 模块。

使用 WABT 工具包

WABT 工具包中除了上文所使用的 wat2wasm 之外,还提供了很多其他有用的工具:

扫描二维码,在手机上阅读!

Java 8 之 Stream API 用法总结

Java 编程语言发展迅速,从 Java 9 开始,Java 采取了小步迭代的发布方式,以每 6 个月发布一个版本的速度在持续更新,目前最新的版本已经升到 19 了

java-versions.png

尽管如此,据 JRebel 2022 年发布的 Java 开发者生产力报告 显示,Java 8 作为第一个 LTS 版本(另两个是 Java 11 和 17),仍然是使用最多的一个版本。

java-version-usage.png

Java 8 由 Oracle 公司于 2014 年 3 月 18 日发布,在这个版本中新增了大量的特性,首次引入了 Lambda 表达式和方法引用,开启了 Java 语言函数式编程的大门,其中新增的 Stream API(java.util.stream)特性更是将函数式编程发挥到了淋漓尽致的地步。

Stream API 概述

在 Java 8 之前,处理集合数据的常规方法是 for 循环:

List<String> words = List.of("A", "B", "C");
for (String word: words) {
    System.out.println(word.toLowerCase());
}

或者使用 iterator 迭代器:

List<String> words = List.of("A", "B", "C");
Iterator<String> iterator = words.iterator();
while (iterator.hasNext()) {
    System.out.println(iterator.next().toLowerCase());
}

这种集合的遍历方式被称为 外部迭代,也就是说由用户来决定 “做什么”(大写转小写) 和 “怎么做”(通过 foriterator 遍历)。

而在 Java 8 中,新增的 Stream API 通过 内部迭代 来处理集合数据,使用了 访问者设计模式(Visitor Pattern),用户只需要通过函数式的方法提供 “做什么” 即可,“怎么做” 交给 Stream API 内部实现:

List<String> words = List.of("A", "B", "C");
words.stream().forEach(word -> System.out.println(word.toLowerCase()));

使用内部迭代可以让用户更聚焦待解决的问题,编写代码不易出错,而且通常编写的代码更少也更易读。这是 Stream API 的一大特征。其实,上面的两种代码实际上对应着两种截然不同的编程风格,那种用户需要关注怎么做,需要 step-by-step 地告诉计算机执行细节的编程风格,被称为 命令式编程(Imperative programming),而用户只关注做什么,只需要告诉计算机想要什么结果,计算过程由计算机自己决定的编程风格,被称为 声明式编程(Declarative programming)

另外,正如 Stream API 的名字一样,Stream API 中有很多方法都会返回流对象本身,于是我们就可以将多个操作串联起来形成一个管道(pipeline),写出下面这样流式风格(fluent style)的代码:

List<String> names = students.stream()
    .filter(s -> s.getScore() >= 60)
    .sorted((x, y) -> x.getScore() - y.getScore())
    .map(Student::getName)
    .collect(Collectors.toList());

Stream API 使用

流的创建

JDK 中提供了很多途径来创建一个流,这一节总结一些常用的创建流的方法。流有一个很重要的特性:不会对数据源进行修改,所以我们可以对同一个数据源创建多个流。

创建一个空流

我们可以通过 Stream.empty() 创建一个不包含任何数据的空流:

Stream<String> streamEmpty = Stream.empty();

在代码中使用空指针是一种不好的编程风格,空流的作用就是为了避免在程序中返回空指针:

public Stream<String> streamOf(List<String> list) {
    return list == null || list.isEmpty() ? Stream.empty() : list.stream();
}

从集合类创建流

JDK 中自带了大量的集合类,比如 ListSetQueue 以及它们的子类,这些类都继承自 Collection 接口:

jdk-collections.gif

注意 Map 不是集合类,但是 Map 中的 keySet()values()entrySet() 方法返回的是集合类。

我们可以通过任何一个集合类的 stream() 方法创建一个流:

List<String> collection = Arrays.asList("a", "b", "c");
Stream<String> streamOfCollection = collection.stream();

从数组创建流

数组和集合类都是用于存储多个对象,只不过数组的长度固定,而集合的长度可变。我们可以使用 Arrays.stream() 静态方法从一个数组创建流:

String[] array = new String[]{"a", "b", "c"};
Stream<String> streamOfArray = Arrays.stream(array);

也可以使用 Stream.of() 方法来创建:

Stream<String> streamOfArray2 = Stream.of(array);

由于 Stream.of() 函数的入参定义是一个可变参数,本质上是个数组,所以既可以像上面那样传入一个数组,也可以直接传入数组元素创建:

Stream<String> streamOfArray3 = Stream.of("a", "b", "c");

使用 Stream.builder() 手工创建流

有时候流中的数据不是来自某个数据源,而是需要手工添加,我们可以使用 Stream.builder() 方法手工创建流:

Stream<String> streamOfBuilder = Stream.<String>builder()
    .add("a")
    .add("b")
    .add("c")
    .build();

也可以往 builder 中依次添加:

Stream.Builder<String> builder = Stream.<String>builder();
builder.add("a");
builder.add("b");
builder.add("c");
Stream<String> streamOfBuilder2 = builder.build();

使用 Stream.generate() 生成流

Stream.generate() 方法也可以用于手工创建流,这个方法需要提供一个 Supplier<T> 的实现,生成的是一个无限流,一般通过 limit 来限定数量:

Stream<String> streamOfGenerate = Stream.generate(() -> "hello").limit(3);

上面的例子中通过 Lambda 表达式 () -> "hello" 一直生成 hello 字符串。如果要生成不一样的数据,可以将变量传到 Lambda 表达式中,比如下面的例子生成 1 2 3 这样的连续整数:

AtomicInteger num = new AtomicInteger(0);
Stream<Integer> streamOfGenerate2 = Stream.generate(() -> num.incrementAndGet()).limit(3);

使用 Stream.iterate() 生成流

在上面的例子中,我们通过将变量传到 Lambda 表达式来生成一个整数数列,像这种根据迭代来生成数据的场景,还有一种更简单的实现:

Stream<Integer> streamOfIterate = Stream.iterate(1, n -> n + 1).limit(3);

iterate() 函数第一个参数为流的第一个元素,后续的元素通过第二个参数中的 UnaryOperator<T> 来迭代生成。

生成基础类型的流

由于 Stream<T> 接口使用了泛型,它的类型参数只能是对象类型,所以我们无法生成基础类型的流,我们只能使用相应的封装类型来生成流,这样就会导致自动装箱和拆箱(auto-boxing),影响性能。

于是 JDK 提供了几个特殊的接口来方便我们创建基础类型的流。JDK 一共有 8 个基础类型,包括 4 个整数类型(byteshortintlong),2 个浮点类型(floatdouble),1 个字符型(char)和 1 个布尔型(boolean),不过只提供了 3 个基础类型的流:IntStreamLongStreamDoubleStream

基础类型流和普通流接口基本一致,我们可以通过上面介绍的各种方法来创建基础类型流。JDK 还针对不同的基础类型提供了相应的更便捷的生成流的方法,比如 IntStream.range() 函数用于方便的生成某个范围内的整数序列:

IntStream intStream = IntStream.range(1, 4);

要注意的是这个数列是左闭右开的,不包含第二个参数,IntStream.rangeClosed() 函数生成的数列是左右都是闭区间:

IntStream intStream2 = IntStream.rangeClosed(1, 3);

此外,Random 类也提供了一些生成基础类型流的方法,比如下面的代码生成 3 个随机的 int 型整数:

IntStream intStream = new Random().ints(3);

生成随机的 longdouble 类型:

LongStream longStream = new Random().longs(3);
DoubleStream doubleStream = new Random().doubles(3);

使用 String.chars() 生成字符流

String 类提供了一个 chars() 方法,用于从字符串生成字符流,正如上面所说,JDK 只提供了 IntStreamLongStreamDoubleStream 三种基础类型流,并没有 CharStream 一说,所以返回值使用了 IntStream

IntStream charStream = "abc".chars();

使用 Pattern.splitAsStream() 生成字符串流

我们知道,String 类里有一个 split() 方法可以将一个字符串分割成子串,但是返回值是一个数组,如果要生成一个子串流,可以使用正则表达式包中 Pattern 类的 splitAsStream() 方法:

Stream<String> stringStream = Pattern.compile(", ").splitAsStream("a, b, c");

从文件生成字符串流

另外,Java NIO 包中的 Files 类提供了一个 lines() 方法,它依次读取文件的每一行并生成字符串流:

try (Stream<String> stringStream = Files.lines(Paths.get(filePath + "test.txt"));) {
    stringStream.forEach(System.out::println);
}

注意使用 try-with-resources 关闭文件。

中间操作

上一节主要介绍了一些常用的创建流的方法,流一旦创建好了,就可以对流执行各种操作。我们将对流的操作分成两种类型:中间操作(Intermediate operation)结束操作(Terminal operation),所有的中间操作返回的结果都是流本身,所以可以写出链式的代码,而结束操作会关闭流,让流无法再访问。

中间操作又可以分成 无状态操作(Stateless operation)有状态操作(Stateful operation) 两种,无状态是指元素的处理不受前面元素的影响,而有状态是指必须等到所有元素处理之后才知道最终结果。

下面通过一些实例来演示不同操作的具体用法,首先创建一个流,包含一些学生数据:

Stream<Student> students = Stream.of(
    Student.builder().name("张三").gender("男").age(27).number(3L).interests("画画、篮球").build(),
    Student.builder().name("李四").gender("男").age(29).number(2L).interests("篮球、足球").build(),
    Student.builder().name("王二").gender("女").age(27).number(1L).interests("唱歌、跳舞、画画").build(),
    Student.builder().name("麻子").gender("女").age(31).number(4L).interests("篮球、羽毛球").build()
);

无状态操作

filter

filter 用于对数据流进行过滤,它接受一个 Predicate<? super T> predicate 参数,返回符合该 Predicate 条件的元素:

students = students.filter(s -> s.getAge() > 30);
map / mapToInt / mapToLong / mapToDouble

map 接受一个 Function<? super T, ? extends R> mapper 类型的参数,对数据流的类型进行转换,从 T 类型转换为 R 类型,比如下面的代码将数据流 Stream<Student> 转换为 Stream<StudentDTO>

Stream<StudentDTO> studentDTOs = students.map(s -> {
    return StudentDTO.builder().name(s.getName()).age(s.getAge()).build();
});

如果要转换成基本类型流,可以使用 mapToIntmapToLongmapToDouble 方法:

LongStream studentAges = students.mapToLong(s -> s.getAge());

上面的 Lambda 也可以写成方法引用:

LongStream studentAges2 = students.mapToLong(Student::getAge);
flatMap / flatMapToInt / flatMapToLong / flatMapToDouble

flatMap 接受一个 Function<? super T, ? extends Stream<? extends R>> mapper 类型的参数,和 map 不同的是,他将 T 类型转换为 R 类型的流,而不是转换为 R 类型,然后再将流中所有数据平铺得到最后的结果:

Stream<String> studentInterests = students.flatMap(s -> Arrays.stream(s.getInterests().split("、")));

每个学生可能有一个或多个兴趣,使用 分割,上面的代码首先将每个学生的兴趣拆开得到一个字符串流,然后将流中的元素平铺,最后得到汇总后的字符串流,该流中包含了所有学生的所有兴趣(元素可能重复)。可以看出 flatMap 实际上是对多个流的数据进行合并。

peek

peek 一般用来调试,它接受一个 Consumer<? super T> action 参数,可以在流的计算过程中对元素进行处理,无返回结果,比如打印出元素的状态:

Stream<String> studentNames = students.filter(s -> s.getAge() > 20)
    .peek(System.out::println)
    .map(Student::getName)
    .peek(System.out::println);
unordered

相遇顺序(encounter order) 是流中的元素被处理时的顺序,创建流的数据源决定了流是否有序,比如 List 或数组是有序的,而 HashSet 是无序的。一些中间操作也可以修改流的相遇顺序,比如 sorted() 用于将无序流转换为有序,而 unordered() 也可以将一个有序流变成无序。

对于 串行流(sequential streams),相遇顺序并不会影响性能,只会影响确定性。如果一个流是有序的,每次执行都会得到相同的结果,如果一个流是无序的,则可能会得到不同的结果。

不过根据官方文档的说法,我使用 unordered() 将一个流改成无序流,重复执行得到的结果还是一样的 [2, 4, 6],并没有得到不同的结果:

List<Integer> ints = Stream.of(1, 2, 3).unordered()
   .map(x -> x*2)
   .collect(Collectors.toList());

网上有说法 认为,这是因为 unordered() 并不会打乱流原本的顺序,只会 消除流必须保持有序的约束,从而允许后续操作使用不必考虑排序的优化。

对于 并行流(parallel streams),去掉有序约束后可能会提高流的执行效率,有些聚合操作,比如 distinct()Collectors.groupingBy() 在不考虑元素有序时具备更好的性能。

有状态操作

distinct

distinct() 方法用于去除流中的重复元素:

Stream<Integer> intStream = Stream.of(1, 2, 3, 2, 4, 3, 1, 2);
intStream = intStream.distinct();

distinct() 是根据流中每个元素的 equals() 方法来去重的,所以如果流中是对象类型,可能需要重写其 equals() 方法。

sorted

sorted() 方法根据 自然序(natural order) 对流中的元素进行排序,流中的元素必须实现 Comparable 接口:

Stream<Integer> intStream = Stream.of(1, 3, 2, 4);
intStream = intStream.sorted();

如果流中的元素没有实现 Comparable 接口,我们可以提供一个比较器 Comparator<? super T> comparator 对流进行排序:

students = students.sorted(new Comparator<Student>() {

    @Override
    public int compare(Student o1, Student o2) {
        return o1.getAge().compareTo(o2.getAge());
    }
    
});

上面是通过匿名内部类的方式创建了一个比较器,我们可以使用 Lambda 来简化它的写法:

students = students.sorted((o1, o2) -> o1.getAge().compareTo(o2.getAge()));

另外,Comparator 还内置了一些静态方法可以进一步简化代码:

students = students.sorted(Comparator.comparing(Student::getAge));

甚至可以组合多个比较条件写出更复杂的排序逻辑:

students = students.sorted(
    Comparator.comparing(Student::getAge).thenComparing(Student::getNumber)
);
skip / limit

skiplimit 这两个方法有点类似于 SQL 中的 LIMIT offset, rows 语句,用于返回指定的记录条数,最常见的一个用处是用来做分页查询。

Stream<Integer> intStream = Stream.of(1, 2, 3, 4, 5, 6, 7, 8, 9, 10);
intStream = intStream.skip(3).limit(3);
dropWhile / takeWhile

dropWhiletakeWhile 这两个方法的作用也是返回指定的记录条数,只不过条数不是固定的,而是根据某个条件来决定返回哪些元素:

Stream<Integer> intStream = Stream.of(1, 2, 3, 4, 5, 6, 7, 8, 9, 10);
intStream = intStream.dropWhile(x -> x <= 3).takeWhile(x -> x <= 6);

结束操作

流的中间操作其实只是一个标记,它是延迟执行的,要等到结束操作时才会触发实际的计算,而且每个流只能有一个结束操作。结束操作会关闭流,对已经关闭的流再执行操作会抛出 IllegalStateException 异常。

结束操作也可以分成两种类型:短路操作(Short-Circuit operation)非短路操作(Non-Short-Circuit operation),短路操作是指不用处理全部元素就可以返回结果,它必须一个元素处理一次,而非短路操作可以批量处理数据,但是需要等全部元素都处理完才会返回结果。

短路操作

anyMatch / allMatch / nonMatch

这几个 match 方法非常类似,它们都接受一个 Predicate<? super T> predicate 条件,用于判断流中元素是否满足某个条件。

anyMatch 表示只要有一个元素满足条件即返回 true

boolean hasAgeGreaterThan30 = students.anyMatch(s -> s.getAge() > 30);

allMatch 表示所有元素都满足条件才返回 true

boolean allAgeGreaterThan20 = students.allMatch(s -> s.getAge() > 20);

noneMatch 表示所有元素都不满足条件才返回 true

boolean noAgeGreaterThan40 = students.noneMatch(s -> s.getAge() > 40);
findFirst / findAny

这两个 find 方法也是非常类似,都是从流中返回一个元素,如果没有,则返回一个空的 Optional,它们经常和 filter 方法联合使用。

findFirst 用于返回流中第一个元素:

// 返回的是 李四
Optional<Student> student = students.filter(s -> s.getAge() > 28).findFirst();

findAny() 返回的元素是不确定的,如果是串行流,返回的是第一个元素:

// 返回的是 李四
Optional<Student> student = students.filter(s -> s.getAge() > 28).findAny();

如果是并行流,则返回值是随机的:

// 返回不确定
Optional<Student> student = students.parallel().filter(s -> s.getAge() > 28).findAny();

非短路操作

forEach / forEachOrdered

这两个 forEach 方法有点类似于 peek 方法,都是接受一个 Consumer<? super T> action 参数,对流中每一个元素进行处理,只不过 forEach 是结束操作,而 peek 是中间操作。

intStream.forEach(System.out::println);

这两个方法的区别在于 forEach 的处理顺序是不确定的,而 forEachOrdered 会按照流中元素的 相遇顺序(encounter order) 来处理。比如下面的代码:

intStream.parallel().forEach(System.out::println);

由于这里使用了并行流,forEach 输出结果是随机的。如果换成 forEachOrdered,则会保证输出结果是有序的:

intStream.parallel().forEachOrdered(System.out::println);
toArray

toArray 方法用于将流转换为一个数组,默认情况下数组类型是 Object[]

Object[] array = students.toArray();

如果要转换为确切的对象类型,toArray 还接受一个 IntFunction<A[]> generator 参数,也是数组的构造函数:

Student[] array = students.toArray(Student[]::new);
reduce

在英语中 reduce 这个单词的意思是 “减少、缩小”,顾名思义,reduce 方法的作用也是如此,它会根据某种规则依次处理流中的元素,经过计算与合并后返回一个唯一的值。早在 2004 年,Google 就研究并提出了一种面向大规模数据处理的并行计算模型和方法,被称为 MapReduce,这里的 Map 表示 映射,Reduce 表示 规约,它们和 Java Stream API 中的 mapreduce 方法有着异曲同工之妙,都是从函数式编程语言中借鉴的思想。

reduce 方法有三种不同的函数形式,第一种也是最简单的:

Optional<T> reduce(BinaryOperator<T> accumulator);

它接受一个 BinaryOperator<T> accumulator 参数,BinaryOperator 是一个函数式接口,它是 BiFunction 接口的特殊形式,BiFunction 表示的是两个入参和一个出参的函数:

@FunctionalInterface
public interface BiFunction<T, U, R> {
    // ...
}

BinaryOperator 同样也是两个入参和一个出参的函数,但是它的两个入参的类型和出参的类型是一样的:

@FunctionalInterface
public interface BinaryOperator<T> extends BiFunction<T,T,T> {
    // ...
}

accumulator 的意思是累加器,它是一个函数,它有两个参数。它的第一个参数是上次函数执行的返回值(也称为中间结果),第二个参数是流中的元素,函数将两个值按照方法进行处理,得到值赋给下次执行这个函数的参数。第一次执行的时候第一参数的值是流中第一元素,第二个元素是流中第二元素,因为流可能为空,所以这个方法的返回值为 Optional

最容易想到的一个例子是通过 reduce 来求和:

Optional<Integer> result = students.map(Student::getAge).reduce((x, y) -> x + y);

其中的 Lambda 表达式 (x, y) -> x + y 也可以简写成方法引用 Integer::sum

Optional<Integer> result = students.map(Student::getAge).reduce(Integer::sum);

不仅如此,稍微改一下 accumulator 函数,我们还可以实现其他的功能,比如求最大值:

Optional<Integer> result = students.map(Student::getAge).reduce((x, y) -> x > y ? x : y);

求最小值:

Optional<Integer> result = students.map(Student::getAge).reduce((x, y) -> x < y ? x : y);

这些参数同样也都可以使用方法引用 Integer::maxInteger::min 进行简化。

reduce 的第二种形式是:

T reduce(T identity, BinaryOperator<T> accumulator);

它和第一种形式的区别在于多了一个和流中元素同类型的 T identity 参数,这个参数的作用是设置初始值,当流中元素为空时,返回初始值。这个形式的好处是不会返回 Optional 类型,代码看起来更简单,所以一般更推荐使用这种形式:

Integer result = students.map(Student::getAge).reduce(0, Integer::sum);

reduce 的 JDK 源码注释里,有一段伪代码很好地解释了 reduce 内部的处理逻辑:

U result = identity;
for (T element : this stream)
    result = accumulator.apply(result, element)
return result;

reduce 的第三种形式如下:

<U> U reduce(U identity, 
    BiFunction<U, ? super T, U> accumulator, 
    BinaryOperator<U> combiner);

可以看到第三种形式要稍微复杂一点,它接受三个参数,第一个参数 identity 表示初始值,第二个参数 accumulator 表示累加器,这和形式二是一样的,不过注意看会发现这两个参数的类型发生了变化,而且返回值的类型也变了,不再局限于和流中元素同类型。第三个参数 BinaryOperator<U> combiner 被称为组合器,这个参数有什么作用呢?在上面的例子中,我们使用的都是串行流,当我们处理并行流时,流会被拆分成多个子流进行 reduce 操作,很显然我们还需要将多个子流的处理结果进行汇聚,这个汇聚操作就是 combiner

不过如果你的汇聚操作和累加器逻辑是一样的,combiner 参数也可以省略:

Integer result = intStream.parallel().reduce(0, Integer::sum);

这个写法和下面的写法没有任何区别:

Integer result = intStream.parallel().reduce(0, Integer::sum, Integer::sum);

到目前为止我们还没有看到 reduce 方法的特别之处,可能你会觉得它不过就是普通的方法,用于 对流中的所有元素累积处理,最终得到一个处理结果。其实这是一个非常强大的工具,也是一个抽象程度非常高的概念,它的用法可以非常灵活,从下面几个例子可以一窥 reduce 的冰山一角。

统计元素个数:

Stream<Integer> intStream = Stream.of(1, 3, 2, 4, 2, 4, 2);
Map<Integer, Integer> countMap = intStream.reduce(new HashMap<>(), (x, y) -> {
    if (x.containsKey(y)) {
        x.put(y, x.get(y) + 1);
    } else {
        x.put(y, 1);
    }
    return x;
}, (x, y) -> new HashMap<>());

数组去重:

Stream<Integer> intStream = Stream.of(1, 3, 2, 4, 2, 4, 2);
List<Integer> distinctMap = intStream.reduce(new ArrayList<>(), (x, y) -> {
    if (!x.contains(y)) {
        x.add(y);
    }
    return x;
}, (x, y) -> new ArrayList<>());

List 转 Map:

Map<Long, Student> studentMap = students.reduce(new HashMap<Long, Student>(), (x, y) -> {
    x.put(y.getNumber(), y);
    return x;
}, (x, y) -> new HashMap<Long, Student>());

可以看到,一旦这个返回类型不做限制时,我们能做的事情就太多了。只要是类似的汇聚操作,都可以用 reduce 实现,这也是 MapReduce 可以用于大规模数据处理的原因。不过上面处理的都是串行流,所以 combiner 参数并没有什么用,随便写都不影响处理结果,但是当我们处理并行流时,combiner 参数就不能乱写了,也不能省略,这是因为它和累加器的参数是不一样的,而且它们的处理逻辑也略有区别。比如上面的 List 转 Map 的例子,如果使用并行流,则必须写 combiner 参数:

Map<Long, Student> studentMap = students.parallel().reduce(new HashMap<Long, Student>(), (x, y) -> {
    x.put(y.getNumber(), y);
    return x;
}, (x, y) -> {
    for (Map.Entry<Long, Student> entry : y.entrySet()) {
        x.put(entry.getKey(), entry.getValue());
    }
    return x;
});
collect

collect 函数正如它的名字一样,可以将流中的元素经过处理并收集起来,得到收集后的结果,这听起来感觉和 reduce 函数有点像,而且它的函数定义也和 reduce 函数很类似:

<R> R collect(Supplier<R> supplier,
    BiConsumer<R, ? super T> accumulator,
    BiConsumer<R, R> combiner);

不过区别还是有的,collect 函数的第一个参数也是用于设置初始值,不过它是通过一个 Supplier<R> supplier 来设置,这是一个没有参数的函数,函数的返回值就是初始值。第二个和第三个参数也是累加器 accumulator 和组合器 combiner,它们的作用和在 reduce 中是一样的,不过它们的类型是 BiConsumer 而不是 BinaryOperator(也不是 BiFunction),这也就意味着累加器和组合器是没有返回值的,所以需要在累加器中使用引用类型来储存中间结果,下面是使用 collect 对流中元素求和的例子:

Stream<Integer> intStream = Stream.of(1, 3, 2, 4);
AtomicInteger result = intStream.collect(
    () -> new AtomicInteger(),
    (a, b) -> a.addAndGet(b), 
    (a, b) -> {}
);

将上面的代码和 reduce 求和的代码对比一下,可以看出两者几乎是一样的,一般来说 reduce 能实现的功能,collect 基本上也都能实现,区别在于它的初始值是一个引用变量,并且中间的计算结果也一直储存在这个引用变量中,最后的返回值也是这个引用变量。很显然,这个引用变量是一个 可变的容器(mutable container),所以 collect 在官方文档中也被称为 Mutable reduction 操作。

而且 collect 相比于 reduce 来说显得更强大,因为它还提供了一个更简单的形式,它将 supplieraccumulatorcombiner 抽象为收集器 Collector 接口:

<R, A> R collect(Collector<? super T, A, R> collector);

这个函数的定义虽然看上去非常简单,但是不得不说,collect 可能是 Stream API 中最为复杂的函数,其复杂之处就在于收集器的创建,为了方便我们创建收集器,Stream API 提供了一个工具类 Collectors,它内置了大量的静态方法可以创建一些常用的收集器,比如我们最常用的 Collectors.toList() 可以将流中元素收集为一个列表:

List<Integer> result = intStream.collect(Collectors.toList());

从源码中可以看出这个收集器是由 ArrayList::newList::add 组成的:

public static <T>
Collector<T, ?, List<T>> toList() {
    return new CollectorImpl<>(
        (Supplier<List<T>>) ArrayList::new, 
        List::add,
        (left, right) -> { left.addAll(right); return left; },
        CH_ID);
}

上面 reduce 中的几个例子,我们一样可以使用 collect 来实现,比如求和:

Integer result = intStream.collect(Collectors.summingInt(Integer::valueOf));

求最大值:

Optional<Integer> result = intStream.collect(Collectors.maxBy(Integer::compareTo));

统计元素个数:

Map<Integer, Long> result = intStream.collect(Collectors.groupingBy(i -> i, Collectors.counting()));

数组去重:

Map<Integer, Integer> result = intStream.collect(Collectors.toMap(i -> i, i -> i, (i, j) -> i));

List 转 Map:

Map<Long, Student> result = students.collect(Collectors.toMap(Student::getNumber, Function.identity()));

除此之外,Collectors 还内置了很多其他的静态方法,比如字符串拼接:

String result = students.map(Student::getName).collect(Collectors.joining("、"));

按条件将数据分为两组:

Map<Boolean, List<Student>> result = students.collect(Collectors.partitioningBy(x -> x.getAge() > 30));

按字段值将数据分为多组:

Map<Integer, List<Student>> result = students.collect(Collectors.groupingBy(Student::getAge));

partitioningBygroupingBy 函数非常类似,只不过一个将数据分成两组,一个将数据分为多组,它们的第一个参数都是 Function<? super T, ? extends K> classifier,又被称为 分类函数(classification function),分组返回的 Map 的键就是由它产生的,而对应的 Map 的值是该分类的数据列表。很容易想到,既然得到了每个分类的数据列表,我们当然可以继续使用 Stream API 对每个分类的数据进一步处理。所以 groupingBy 函数还提供了另一种形式:

Collector<T, ?, Map<K, D>> groupingBy(
    Function<? super T, ? extends K> classifier, 
    Collector<? super T, A, D> downstream)

第二个参数仍然是一个收集器 Collector,这被称为 下游收集器(downstream collector),比如上面那个统计元素个数的例子:

Map<Integer, Long> result = intStream.collect(Collectors.groupingBy(i -> i, Collectors.counting()));

这里就使用了下游收集器 Collectors.counting() 对每个分组的数据进行计数。我们甚至可以对下游收集器返回的结果继续使用下游收集器处理,比如我希望得修改分组后的数据类型:

Map<String, List<String>> result = students.collect(Collectors.groupingBy(
    Student::getGender, Collectors.mapping(
        Student::getName, Collectors.toList())));

这里我希望按学生性别分组,并得到每个性别的学生姓名列表,而不是学生列表。首先使用收集器 Collectors.mapping() 将 Student 对象转换为姓名,然后再使用 Collectors.toList() 将学生姓名收集到一个列表。这种包含一个或多个下游收集器的操作被称为 Multi-level reduction

count

count 比较简单,用于统计流中元素个数:

long count = students.count();
max / min

maxmin 函数用于计算流中的最大元素和最小元素,元素的大小通过比较器 Comparator<? super T> comparator 来决定。比如获取年龄最大的学生:

Optional<Student> maxAgeStudent = students.max(Comparator.comparingInt(Student::getAge));

不过对于基础类型流,maxmin 函数进行了简化,不需要比较器参数:

OptionalInt maxAge = students.mapToInt(Student::getAge).max();
sum / average / summaryStatistics

另外,对于基础类型流,还特意增加了一些统计类的函数,比如 sum 用于对流中数据进行求和:

int sumAge = students.mapToInt(Student::getAge).sum();

average 用于求平均值:

OptionalDouble averageAge = students.mapToInt(Student::getAge).average();

summaryStatistics 用于一次性获取流中数据的统计信息(包括最大值、最小值、总和、数量、平均值):

IntSummaryStatistics summaryStatistics = students.mapToInt(Student::getAge).summaryStatistics();
System.out.println("Max = " + summaryStatistics.getMax());
System.out.println("Min = " + summaryStatistics.getMin());
System.out.println("Sum = " + summaryStatistics.getSum());
System.out.println("Count = " + summaryStatistics.getCount());
System.out.println("Average = " + summaryStatistics.getAverage());

参考

  1. Java8 Stream的总结
  2. Java 8 新特性 | 菜鸟教程
  3. Java 8 Stream | 菜鸟教程
  4. Package java.util.stream Description
  5. https://www.baeldung.com/java-streams
  6. https://www.baeldung.com/tag/java-streams/
  7. https://www.cnblogs.com/wangzhuxing/p/10204894.html
  8. https://www.cnblogs.com/yulinfeng/p/12561664.html

更多

Collectors 静态方法一览

  • 转换为集合

    • Collector<T, ?, C> toCollection(Supplier<C> collectionFactory)
    • Collector<T, ?, List<T>> toList()
    • Collector<T, ?, Set<T>> toSet()
  • 统计计算

    • Collector<T, ?, IntSummaryStatistics> summarizingInt(ToIntFunction<? super T> mapper)
    • Collector<T, ?, LongSummaryStatistics> summarizingLong(ToLongFunction<? super T> mapper)
    • Collector<T, ?, DoubleSummaryStatistics> summarizingDouble(ToDoubleFunction<? super T> mapper)
    • Collector<T, ?, Optional<T>> minBy(Comparator<? super T> comparator)
    • Collector<T, ?, Optional<T>> maxBy(Comparator<? super T> comparator)
    • Collector<T, ?, Integer> summingInt(ToIntFunction<? super T> mapper)
    • Collector<T, ?, Long> summingLong(ToLongFunction<? super T> mapper)
    • Collector<T, ?, Double> summingDouble(ToDoubleFunction<? super T> mapper)
    • Collector<T, ?, Double> averagingInt(ToIntFunction<? super T> mapper)
    • Collector<T, ?, Double> averagingLong(ToLongFunction<? super T> mapper)
    • Collector<T, ?, Double> averagingDouble(ToDoubleFunction<? super T> mapper)
    • Collector<T, ?, Long> counting()
  • 字符串拼接

    • Collector<CharSequence, ?, String> joining()
    • Collector<CharSequence, ?, String> joining(CharSequence delimiter)
    • Collector<CharSequence, ?, String> joining(CharSequence delimiter, CharSequence prefix, CharSequence suffix)
  • Map & Reduce

    • Collector<T, ?, R> mapping(Function<? super T, ? extends U> mapper, Collector<? super U, A, R> downstream)
    • Collector<T, ?, T> reducing(T identity, BinaryOperator<T> op)
    • Collector<T, ?, Optional<T>> reducing(BinaryOperator<T> op)
    • Collector<T, ?, U> reducing(U identity, Function<? super T, ? extends U> mapper, BinaryOperator<U> op)
  • 分组

    • Collector<T, ?, Map<K, List<T>>> groupingBy(Function<? super T, ? extends K> classifier)
    • Collector<T, ?, Map<K, D>> groupingBy(Function<? super T, ? extends K> classifier, Collector<? super T, A, D> downstream)
    • Collector<T, ?, M> groupingBy(Function<? super T, ? extends K> classifier, Supplier<M> mapFactory, Collector<? super T, A, D> downstream)
    • Collector<T, ?, ConcurrentMap<K, List<T>>> groupingByConcurrent(Function<? super T, ? extends K> classifier)
    • Collector<T, ?, ConcurrentMap<K, D>> groupingByConcurrent(Function<? super T, ? extends K> classifier, Collector<? super T, A, D> downstream)
    • Collector<T, ?, M> groupingByConcurrent(Function<? super T, ? extends K> classifier, Supplier<M> mapFactory, Collector<? super T, A, D> downstream)
    • Collector<T, ?, Map<Boolean, List<T>>> partitioningBy(Predicate<? super T> predicate)
    • Collector<T, ?, Map<Boolean, D>> partitioningBy(Predicate<? super T> predicate, Collector<? super T, A, D> downstream)
  • List 转 Map

    • Collector<T, ?, Map<K,U>> toMap(Function<? super T, ? extends K> keyMapper, Function<? super T, ? extends U> valueMapper)
    • Collector<T, ?, Map<K,U>> toMap(Function<? super T, ? extends K> keyMapper, Function<? super T, ? extends U> valueMapper, BinaryOperator<U> mergeFunction)
    • Collector<T, ?, M> toMap(Function<? super T, ? extends K> keyMapper, Function<? super T, ? extends U> valueMapper, BinaryOperator<U> mergeFunction, Supplier<M> mapSupplier)
    • Collector<T, ?, ConcurrentMap<K,U>> toConcurrentMap(Function<? super T, ? extends K> keyMapper, Function<? super T, ? extends U> valueMapper)
    • Collector<T, ?, ConcurrentMap<K,U>> toConcurrentMap(Function<? super T, ? extends K> keyMapper, Function<? super T, ? extends U> valueMapper, BinaryOperator<U> mergeFunction)
    • Collector<T, ?, M> toConcurrentMap(Function<? super T, ? extends K> keyMapper, Function<? super T, ? extends U> valueMapper, BinaryOperator<U> mergeFunction, Supplier<M> mapSupplier)
  • 其他

    • Collector<T,A,RR> collectingAndThen(Collector<T,A,R> downstream, Function<R,RR> finisher)
扫描二维码,在手机上阅读!

使用 Visual Studio Code 进行 Go 开发

Visual Studio Code(简称 VS Code)是微软于 2015 年 4 月在微软开发者大会(Microsoft Build 2015)上开源的一款非常优秀的跨平台源代码编辑器,它不仅原生支持 JavaScript、TypeScript、CSS 和 HTML,而且可以通过强大的插件系统支持其他任意的编程语言,比如:PythonJavaC/C++Go 等等。你可以在 插件市场 找到更多其他的插件。通过统一的接口模型,VS Code 为不同的编程语言提供了统一的编程体验,你再也不需要在不同语言的 IDE 之间来回切换了。

VS Code 为不同的编程语言提供了如下通用的语言特性:

  • 语法高亮(Syntax highlighting)、括号匹配(Bracket matching)
  • 代码自动补全(IntelliSense)
  • 语法检查(Linting and corrections)
  • 代码导航(Go to Definition, Find All References)
  • 调试
  • 重构

VS Code 使用 Monaco Editor 作为其底层的代码编辑器,不仅可以跨平台使用,而且还可以通过浏览器在线使用,你可以访问 vscode.dev,操作界面和桌面版几乎是一样的。在 2019 年的 Stack Overflow 组织的开发者调查中,VS Code 被认为是最受开发者欢迎的开发环境。

安装 Go 插件

Go 语言 又被称为 Golang,是 Google 开发的一种静态强类型、编译型、并发型,并具有垃圾回收功能的编程语言。它于 2007 年 9 月开始设计,并在 2009 年 11 月正式发布并完全开源,至今已有 13 年的历史了。目前的 Go 语言在国内外的技术社区都非常热门,并诞生了很多著名的开源项目,如 Kubernetes、etcd 和 Prometheus 等,在近年来热门的微服务架构和云原生技术的发展中起到了举足轻重的作用。

在这篇笔记中,我们将学习如何在 VS Code 中进行 Go 语言的开发。

首先打开官网的 Download and install 页面,按照提示的步骤下载并安装 Go 语言开发环境。

然后在 VS Code 中安装 Go 插件

go-extension.png

此时,我们只需要打开以 .go 结尾的文件,就可以激活该插件,左下角会显示出 Go 的状态栏,并在状态栏上可以看到当前使用的 Go 版本:

status-bar-menu.png

另外,这个插件还依赖 一些 Go 工具,比如 goplsdlv 等。gopls 是 Go 官方的 language server,dlv 使用 Delve 进行 Go 语言的调试和测试,都是开发过程中必不可少的组件。如果其中任何一个工具缺失,VS Code 下面的状态栏就会弹出 ⚠️ Analysis Tools Missing 的警告提示,点击提示将自动下载安装这些工具:

install-tools.gif

安装完成后,一切准备就绪,就可以开始我们的 Go 语言之旅了。

You are ready to Go :-)

从这里可以看到 Go 插件支持的 所有特性

Go 入门示例

这一节我们将演示如何在 VS Code 中开发一个 Go 项目。首先创建一个空目录 demo,并在 VS Code 中打开它。然后我们新建一个终端,输入下面的命令创建一个 Go 模块(module):

$ go mod init example.com/demo
go: creating new go.mod: module example.com/demo

运行成功后,可以发现创建了一个 go.mod 文件,这个文件类似于 Maven 项目中 pom.xml 文件,用于管理项目依赖的模块。早期的版本中,Go 语言是没有依赖管理功能的,所有依赖的第三方包都放在 GOPATH 目录下,这就导致了同一个包只能保存一个版本,如果不同的项目依赖同一个包的不同版本,该怎么办呢?

于是 Go 语言从 v1.5 版本开始引入 vendor 模式,如果项目目录下有 vendor 目录,那么 Go 会优先使用 vendor 内的包,可以使用 godepdep 来管理 vender 模式下的依赖包。

不过从 v1.11 版本开始,官方又推出了 Go module 功能,并在 v1.13 版本中作为 Go 语言默认的依赖管理工具。使用 Go module 依赖管理会在项目根目录下生成 go.modgo.sum 两个文件。

我们打开 go.mod 这个文件,目前内容还比较简单,只是定义了当前的模块名以及使用的 Go 版本:

module example.com/demo

go 1.19

接下来我们在项目中创建一个 包(package),也就是一个目录,比如 hello,并在该目录下创建一个文件 hello.go,打开这个文件时会激活 Go 插件。等插件加载完毕,我们就可以编写 Go 代码了,在文件中输入如下内容:

package hello

func SayHello() string {
    return "Hello world"
}

第一行使用 package 声明包,然后下面通过 func 定义了一个 SayHello() string 方法,注意在 Go 语言中类型是写在方法名后面的。

接下来,在项目根目录下创建一个 main.go 文件,内容如下:

package main

import (
    "fmt"

    "example.com/demo/hello"
)

func main() {
    fmt.Println(hello.SayHello())
}

第一行依然是使用 package 来声明包,每个 .go 文件都需要声明包,只不过包名不同;然后使用 import 导入我们要使用的包,这里我们使用了 fmt 这个系统包,它是用于打印输出的,还使用了我们上面创建的 example.com/demo/hello 这个包,这样我们就可以调用其他包里的方法了;最后通过 func 定义了一个 main() 方法,这个方法是整个程序的入口。

就这样一个简单的示例项目就完成了。我们打开终端,输入 go run 命令即可运行程序:

$ go run main.go
Hello world

或者使用 go build 将代码编译为可执行程序:

$ go build main.go

运行生成的可执行程序:

$ ./main
Hello world

引用三方包

上面的例子中我们只使用了系统包和自己代码中的包,如果要使用第三方包该怎么办呢?

我们可以使用 go get 下载第三方包并将依赖更新到 go.mod 文件中,比如我们要添加 rsc.io/quote 这个依赖包,执行如下命令:

$ go get rsc.io/quote
go: downloading rsc.io/quote v1.5.2
go: added golang.org/x/text v0.0.0-20170915032832-14c0d48ead0c
go: added rsc.io/quote v1.5.2

这个命令默认会从 Go 官方的模块代理(https://proxy.golang.org)下载依赖包,如果遇到网络问题,可以使用下面的命令改为国内的代理(https://goproxy.cn):

$ go env -w GOPROXY=https://goproxy.cn,direct

go get 命令执行成功后,重新打开 go.mod 文件,可以看到自动添加了依赖:

require (
    golang.org/x/text v0.0.0-20170915032832-14c0d48ead0c // indirect
    rsc.io/quote v1.5.2 // indirect
    rsc.io/sampler v1.3.0 // indirect
)

这时我们就可以在代码中使用 rsc.io/quote 这个包了:

package main

import (
    "fmt"

    "example.com/demo/hello"
    "rsc.io/quote"
)

func main() {
    fmt.Println(hello.SayHello())
    fmt.Println(quote.Go())
}

重新运行程序:

$ go run main.go
Hello world
Don't communicate by sharing memory, share memory by communicating.

编写单元测试

这一节我们使用 Go 语言的标准库 testing 对我们的代码进行单元测试。Go 语言推荐将测试文件和源代码文件放在一起,测试文件以 _test.go 结尾,比如我们要对上面的 hello.go 编写单元测试,可以在同目录创建一个 hello_test.go 文件,文件内容如下:

package hello_test

import (
    "testing"

    "example.com/demo/hello"
)

func TestSayHello(t *testing.T) {
    if hello.SayHello() != "Hello world" {
        t.Fatal("Not good")
    }
}

测试用例名称一般命名为 Test 加上待测试的方法名,比如这里的 TestSayHello 是对 SayHello 的测试,测试用的参数有且只有一个,在这里是 t *testing.T,表示这是一个单元测试,如果是基准测试,这个参数类型为 *testing.B

VS Code 会自动识别单元测试的包和方法,并在包和方法上显示一个链接:

unit-test.png

我们可以点击方法上的 run testdebug test 来执行测试,或者使用 go test 命令来执行,由于这个测试是写在 hello 这个目录下,我们需要进入该目录执行测试:

$ cd hello
$ go test
PASS
ok      example.com/demo/hello  0.277s

这里有一点需要特别注意,我们在这个文件的最顶部声明包时用的是 package hello_test,而不是 package hello,其实两种方法都可以,这取决于你编写的是黑盒测试还是白盒测试。如果你使用 package hello,那么在单元测试代码中就可以对私有方法进行测试,相当于白盒测试,而这里我们使用的是黑盒测试,也就是只对包里公共方法进行测试。

调试 Go 程序

在上面的单元测试方法上面有一个 debug test 链接,点击该链接就可以调试 Go 程序了。如果要以调试模式启动 main() 函数,可以打开 main.go 文件,使用 F5 快捷键启动调试器。

go-debugging.png

或者打开 VS Code 的 “运行和调试” 侧边栏,然后点击 “运行和调试” 按钮也可以启动调试器。如果调试器启动成功,我们可以在下方的调试控制台看到类似这样的输出:

Starting: C:\Users\aneasystone\go\bin\dlv.exe dap --check-go-version=false --listen=127.0.0.1:60508 from d:\code\weekly-practice\notes\week021-go-in-visual-studio-code\demo
DAP server listening at: 127.0.0.1:60508

Go 语言的官方调试器是 dlv,它的全称为 Delve,VSCode 通过运行 dlv dap 命令来启动 Go 语言的调试器,这个命令会在本地启动一个 TCP 服务器,并通过 DAP 协议(Debug Adaptor Protocol)) 和 VS Code 进行通信实现调试的功能。

使用 F5 快捷键或 “运行和调试” 按钮时,VS Code 会使用默认配置对当前打开的文件进行调试。如果想修改配置参数,我们可以创建一个 launch.json 配置文件:

create-launch-json.png

点击 “创建 launch.json 文件” 按钮会弹出一个下拉框,我们可以:

  • 调试一个包(Launch Package)
  • 附加到本地进程(Attach to local process)
  • 连接到远程服务(Connect to server)

我们选择第一个,创建的 launch.json 配置文件如下:

{
    "version": "0.2.0",
    "configurations": [
        {
            "name": "Launch Package",
            "type": "go",
            "request": "launch",
            "mode": "auto",
            "program": "${fileDirname}"
        }
    ]
}

我们将 ${fileDirname} 变量修改为 .,表示项目的根目录。这样我们就可以在打开任意文件的时候快速调试 main() 方法了,而不用每次都打开 main.go 文件来调试。如果我们需要对调试器进行配置,比如配置命令行参数启动(args),修改当前工作目录(cwd),配置 dlv 调试器(dlvFlags)等等,我们在 launch.json 中输入引号后 VS Code 会自动提示所有支持的配置项:

create-launch-json-args.png

这些配置项的含义可以参考 Launch.json Attributes

参考

  1. Go in Visual Studio Code
  2. VSCode Go Wiki
  3. Go Documentation
  4. Getting started with VS Code Go
  5. Go语言之依赖管理
  6. Go Test 单元测试简明教程
  7. Proper package naming for testing with the Go language
  8. Debug Go programs in VS Code
扫描二维码,在手机上阅读!

写一个简单的 Kubernetes Operator

Kubernetes Operator 这一概念是由 CoreOS 的工程师于 2016 年提出的,它是一种通过 自定义资源custom resourceCR)来包装、运行和管理 Kubernetes 应用的方式。Kubernetes 1.7 版本以来就引入了自定义资源的概念,该功能可以让开发人员扩展新功能或更新现有功能,并且可以自动执行一些管理任务,这些自定义资源就像 Kubernetes 的原生组件一样。

通过自定义资源,我们可以将应用抽象为一个整体,而不用去关心该应用是由哪些 Kubernetes 原生组件构成的,什么 Pods、Deployments、Services 或 ConfigMaps 统统交给 Operator 来管理。创建 Operator 的关键是自定义资源的设计,通过直接调用 Kubernetes API,编写自定义规则自动管理和维护 Kubernetes 集群中的应用,包括自动化安装、配置、更新、故障转移、备份恢复等等。这样的应用也被称为 Kubernetes 原生应用(Kubernetes-native application)。可以把 Operator 当做是一个运维人员,它以软件的形式帮助我们管理 Kubernetes 中运行的应用。Operator 可以帮我们实现下面这些运维工作:

operator-capabilitiy-model.png

这个图也被称为 Operator 的能力模型,将 Operator 的能力由低到高分成了 5 个等级。

控制器循环

Kubernetes Operator 遵循 control loop 原则,这是 Kubernetes 的核心原则之一,也是机器人和自动化领域中一种常见的持续运行动态系统的机制。它依赖于一种快速调整工作负载需求的能力,进而能够尽可能准确地适应现有资源。

reconciliation-loop.png

在 Kubernetes 中,这个循环被称为 reconciliation loop。在这个循环中,有一个非常重要的角色:控制器(Controller),它可以对集群的变化做出响应,并执行相应的动作。控制器首先观察 Kubernetes 对象的当前状态,然后通过 Kubernetes API 进行持续调整,直到将对象的当前状态变成所需状态为止。

第一个 Kubernetes Controller 是 kube-controller-manager,它被认为是所有 Operator 的鼻祖。

使用 Operator Framework 开发 Operator

Operator Framework 是 CoreOS 开源的一个用于快速开发或管理 Operator 的工具包,主要分为三大部分:

  • Operator SDKBuild, test, iterate. 你无需了解复杂的 Kubernetes API 特性,就可以根据你自己的专业知识构建一个 Operator 应用。
  • Operator Lifecycle Managerinstall, manage, update. OLM 是一款帮助你安装、更新和管理 Kubernetes Operator 的工具。
  • OperatorHub.ioPublish & share. OperatorHub 是一个类似 DockerHub 的仓库,你可以在这里搜索你想要的 Operator,或者将你的 Operator 发布并分享给其他人。

通过 Operator SDK 我们可以快速开发一个 Kubernetes Operator,它不仅提供了一套 High level API 来方便我们处理业务逻辑,还提供了一个命令行工具用于快速生成一个 Operator 的脚手架项目。

安装 operator-sdk

在开发 Operator 之前,先确保你已经有一个能访问的 Kubernetes 集群环境,Kubernetes 的安装可以参考 Kubernetes 安装小记。查看 Kubernetes 集群信息:

$ kubectl cluster-info
Kubernetes control plane is running at https://kubernetes.docker.internal:6443
CoreDNS is running at https://kubernetes.docker.internal:6443/api/v1/namespaces/kube-system/services/kube-dns:dns/proxy

To further debug and diagnose cluster problems, use 'kubectl cluster-info dump'.

另外,Go 的开发环境也是必不可少的,可以参考 Go 的 官方文档 下载并安装。

$ curl -LO https://go.dev/dl/go1.19.linux-amd64.tar.gz
$ sudo tar -C /usr/local -xzf go1.19.linux-amd64.tar.gz

将路径 /usr/local/go/bin 添加到 PATH 环境变量,或者将下面这行添加到 ~/.profile 文件中:

$ export PATH=$PATH:/usr/local/go/bin

查看 Go 版本:

$ go version
go version go1.19 linux/amd64

接下来,我们继续安装 Operator SDK。我们在 Operator SDK 的 Releases 页面 找到合适的版本并下载:

$ curl -LO https://github.com/operator-framework/operator-sdk/releases/download/v1.23.0/operator-sdk_linux_amd64

将其移动到 /usr/local/bin/ 目录即可完成安装:

$ chmod +x operator-sdk_linux_amd64 && sudo mv operator-sdk_linux_amd64 /usr/local/bin/operator-sdk

查看已安装的 operator-sdk 版本:

$ operator-sdk version
operator-sdk version: "v1.23.0", commit: "1eaeb5adb56be05fe8cc6dd70517e441696846a4", kubernetes version: "1.24.2", go version: "go1.18.5", GOOS: "linux", GOARCH: "amd64"

另外,operator-sdk 依赖于 makegcc,确保系统上已经安装了 makegcc 工具。

使用 operator-sdk 初始化 Operator 项目

Operator SDK 提供了三种方式开发 Operator:

我们这里将使用 Go 来开发 Operator,这种方式也是最灵活的,你可以使用 client-go 调用 Kubernetes API 来对 Kubernetes 对象进行操作。首先使用 operator-sdk init 初始化项目结构:

$ operator-sdk init --domain example.com --project-name memcached-operator --repo github.com/example/memcached-operator
Writing kustomize manifests for you to edit...
Writing scaffold for you to edit...
Get controller runtime:
$ go get sigs.k8s.io/controller-runtime@v0.12.2
Update dependencies:
$ go mod tidy
Next: define a resource with:
$ operator-sdk create api

其中 --project-name 参数可以省略,默认项目名称就是目录名。--domain--project-name 两个参数用于组成 Operator 的镜像名称 example.com/memcached-operator,而 --repo 参数用于定义 Go 模块名:

module github.com/example/memcached-operator

初始化后的完整项目结构如下:

$ tree .
.
├── Dockerfile
├── Makefile
├── PROJECT
├── README.md
├── config
│   ├── default
│   │   ├── kustomization.yaml
│   │   ├── manager_auth_proxy_patch.yaml
│   │   └── manager_config_patch.yaml
│   ├── manager
│   │   ├── controller_manager_config.yaml
│   │   ├── kustomization.yaml
│   │   └── manager.yaml
│   ├── manifests
│   │   └── kustomization.yaml
│   ├── prometheus
│   │   ├── kustomization.yaml
│   │   └── monitor.yaml
│   ├── rbac
│   │   ├── auth_proxy_client_clusterrole.yaml
│   │   ├── auth_proxy_role.yaml
│   │   ├── auth_proxy_role_binding.yaml
│   │   ├── auth_proxy_service.yaml
│   │   ├── kustomization.yaml
│   │   ├── leader_election_role.yaml
│   │   ├── leader_election_role_binding.yaml
│   │   ├── role_binding.yaml
│   │   └── service_account.yaml
│   └── scorecard
│       ├── bases
│       │   └── config.yaml
│       ├── kustomization.yaml
│       └── patches
│           ├── basic.config.yaml
│           └── olm.config.yaml
├── go.mod
├── go.sum
├── hack
│   └── boilerplate.go.txt
└── main.go

主要包括以下几个文件:

  • go.mod - 用于定义 Go 项目的依赖信息
  • PROJECT - 用于保存项目的配置信息
  • Makefile - 包含一些有用的项目构建目标(make targets
  • config - 该目录下包含一些用于项目部署的 YAML 文件
  • main.go - Operator 的主程序入口

创建 API

初始化项目之后,接着就可以使用 operator-sdk create api 命令创建 API 了:

$ operator-sdk create api --group cache --version v1alpha1 --kind Memcached --resource --controller
Writing kustomize manifests for you to edit...
Writing scaffold for you to edit...
api/v1alpha1/memcached_types.go
controllers/memcached_controller.go
Update dependencies:
$ go mod tidy
Running make:
$ make generate
./memcached-operator/bin/controller-gen object:headerFile="hack/boilerplate.go.txt" paths="./..."
Next: implement your new API and generate the manifests (e.g. CRDs,CRs) with:
$ make manifests

使用 operator-sdk create 命令可以生成 apiwebhook 的脚手架代码,我们这里生成的是 api,包括两部分内容:自定义资源(--resource)和控制器相关的逻辑代码(--controller),其中 --group--version--kind 分别用来设置资源的分组、版本和类型。

接下来可以从这些文件开始入手:

  • api/v1beta1/memcached_types.go
  • controllers/memcached_controller.go
  • controllers/suite_test.go

memcached_types.go 文件用于定义资源的接口规范,我们在 MemcachedSpec 中添加一个新字段 Size 如下(默认已经生成了一个 Foo 字段):

// MemcachedSpec defines the desired state of Memcached
type MemcachedSpec struct {
    // INSERT ADDITIONAL SPEC FIELDS - desired state of cluster
    // Important: Run "make" to regenerate code after modifying this file

    // Foo is an example field of Memcached. Edit memcached_types.go to remove/update
    Foo string `json:"foo,omitempty"`
    Size int32 `json:"size"`
}

接着打开 memcached_controller.go 文件,其中 Reconcile 方法就是上面所介绍的 reconciliation loop 的核心代码,可以在这里实现自己的业务逻辑,比如调用 Kubernetes API 创建、删除或更新各种 Kubernetes 资源。我们这里只是简单地将资源的属性值打印出来(官方对 memcached-operator 有完整的示例代码,可以 参考这里):

func (r *MemcachedReconciler) Reconcile(ctx context.Context, req ctrl.Request) (ctrl.Result, error) {
    _ = log.FromContext(ctx)

    instance := &cachev1alpha1.Memcached{}
    err := r.Get(context.TODO(), req.NamespacedName, instance)
    if err != nil {
        fmt.Println("Get instance err")
        return ctrl.Result{}, err
    }

    fmt.Printf("Foo = %s, Size = %d\n", instance.Spec.Foo, instance.Spec.Size)

    return ctrl.Result{}, nil
}

然后执行下面的命令生成自定义资源文件:

$ make manifests
test -s ./memcached-operator/bin/controller-gen || GOBIN=./memcached-operator/bin go install sigs.k8s.io/controller-tools/cmd/controller-gen@v0.9.2
./memcached-operator/bin/controller-gen rbac:roleName=manager-role crd webhook paths="./..." output:crd:artifacts:config=config/crd/bases

生成的自定义资源文件位于 config/crd/bases/cache.example.com_memcacheds.yaml,文件内容如下:

---
apiVersion: apiextensions.k8s.io/v1
kind: CustomResourceDefinition
metadata:
  annotations:
    controller-gen.kubebuilder.io/version: v0.9.2
  creationTimestamp: null
  name: memcacheds.cache.example.com
spec:
  group: cache.example.com
  names:
    kind: Memcached
    listKind: MemcachedList
    plural: memcacheds
    singular: memcached
  scope: Namespaced
  versions:
  - name: v1alpha1
    schema:
      openAPIV3Schema:
        description: Memcached is the Schema for the memcacheds API
        properties:
          apiVersion:
            description: 'APIVersion defines the versioned schema of this representation
              of an object. Servers should convert recognized schemas to the latest
              internal value, and may reject unrecognized values. More info: https://git.k8s.io/community/contributors/devel/sig-architecture/api-conventions.md#resources'
            type: string
          kind:
            description: 'Kind is a string value representing the REST resource this
              object represents. Servers may infer this from the endpoint the client
              submits requests to. Cannot be updated. In CamelCase. More info: https://git.k8s.io/community/contributors/devel/sig-architecture/api-conventions.md#types-kinds'
            type: string
          metadata:
            type: object
          spec:
            description: MemcachedSpec defines the desired state of Memcached
            properties:
              foo:
                description: Foo is an example field of Memcached. Edit memcached_types.go
                  to remove/update
                type: string
              size:
                format: int32
                type: integer
            required:
            - size
            type: object
          status:
            description: MemcachedStatus defines the observed state of Memcached
            type: object
        type: object
    served: true
    storage: true
    subresources:
      status: {}

在这个文件中,我们定义了一个名为 Memcached 的自定义资源(Custom Resource Definition,简称 CRD),并定义了 foosize 两个属性,且 size 属性为必填项。

本地调试 Operator

至此,一个简单的 Operator 就开发好了,接下来我们运行 make install 命令,该命令使用 kustomize build 生成 CRD 配置文件并执行 kubectl apply 将 CRD 安装到 Kubernetes 集群中:

$ make install
test -s ./memcached-operator/bin/controller-gen || GOBIN=./memcached-operator/bin go install sigs.k8s.io/controller-tools/cmd/controller-gen@v0.9.2
./memcached-operator/bin/controller-gen rbac:roleName=manager-role crd webhook paths="./..." output:crd:artifacts:config=config/crd/bases
./memcached-operator/bin/kustomize build config/crd | kubectl apply -f -
customresourcedefinition.apiextensions.k8s.io/memcacheds.cache.example.com created

通过 kubectl get crds 可以查看集群中的自定义资源是否创建成功:

$ kubectl get crds
NAME                           CREATED AT
memcacheds.cache.example.com   2022-08-26T09:24:19Z

可以看到集群中多了一个自定义资源 memcacheds.cache.example.com。然后运行 make run 命令在本地启动控制器:

$ make run
test -s ./memcached-operator/bin/controller-gen || GOBIN=./memcached-operator/bin go install sigs.k8s.io/controller-tools/cmd/controller-gen@v0.9.2
./memcached-operator/bin/controller-gen rbac:roleName=manager-role crd webhook paths="./..." output:crd:artifacts:config=config/crd/bases
./memcached-operator/bin/controller-gen object:headerFile="hack/boilerplate.go.txt" paths="./..."
go fmt ./...
api/v1alpha1/groupversion_info.go
go vet ./...
go run ./main.go
1.6615063195978441e+09  INFO    controller-runtime.metrics      Metrics server is starting to listen    {"addr": ":8080"}
1.6615063195986106e+09  INFO    setup   starting manager
1.6615063195992978e+09  INFO    Starting server {"path": "/metrics", "kind": "metrics", "addr": "[::]:8080"}
1.6615063195993063e+09  INFO    Starting server {"kind": "health probe", "addr": "[::]:8081"}
1.661506319599374e+09   INFO    Starting EventSource    {"controller": "memcached", "controllerGroup": "cache.example.com", "controllerKind": "Memcached", "source": "kind source: *v1alpha1.Memcached"}
1.6615063196000834e+09  INFO    Starting Controller     {"controller": "memcached", "controllerGroup": "cache.example.com", "controllerKind": "Memcached"}
1.6615063197010505e+09  INFO    Starting workers        {"controller": "memcached", "controllerGroup": "cache.example.com", "controllerKind": "Memcached", "worker count": 1}

接下来我们就可以创建一个自定义资源实例测试一下。首先修改 config/samples/cache_v1alpha1_memcached.yaml 文件,填入 foosize 两个属性:

apiVersion: cache.example.com/v1alpha1
kind: Memcached
metadata:
  name: memcached-sample
spec:
  foo: Hello World
  size: 10

然后执行 kubectl apply 命令创建自定义资源实例:

$ kubectl apply -f config/samples/cache_v1alpha1_memcached.yaml
memcached.cache.example.com/memcached-sample created

此时查看控制器的输出如下:

Foo = Hello World, Size = 10

说明控制器监听到了自定义资源的创建,并输出了它的属性值。使用 kubectl get 查看刚刚创建的自定义资源:

$ kubectl get memcached.cache.example.com/memcached-sample
NAME               AGE
memcached-sample   13m

然后我们测试下自定义资源更新时的情况,修改 cache_v1alpha1_memcached.yaml 文件,比如将 size 改为 9,重新执行 kubectl apply 命令,控制器会立即监听到该修改,并输出新的属性值:

Foo = Hello World, Size = 9

部署 Operator

Operator 开发完成后,我们需要将它部署到 Kubernetes 集群中。首先我们将其构建成 Docker 镜像,可以使用下面的命令构建,并将镜像推送到镜像仓库:

$ make docker-build docker-push IMG="aneasystone/memcached-operator:v0.0.1"
test -s ./memcached-operator/bin/controller-gen || GOBIN=./memcached-operator/bin go install sigs.k8s.io/controller-tools/cmd/controller-gen@v0.9.2
./memcached-operator/bin/controller-gen rbac:roleName=manager-role crd webhook paths="./..." output:crd:artifacts:config=config/crd/bases
./memcached-operator/bin/controller-gen object:headerFile="hack/boilerplate.go.txt" paths="./..."
go fmt ./...
go vet ./...
KUBEBUILDER_ASSETS="/home/aneasystone/.local/share/kubebuilder-envtest/k8s/1.24.2-linux-amd64" go test ./... -coverprofile cover.out
?       github.com/example/memcached-operator   [no test files]
?       github.com/example/memcached-operator/api/v1alpha1      [no test files]
ok      github.com/example/memcached-operator/controllers       8.935s  coverage: 0.0% of statements
docker build -t aneasystone/memcached-operator:v0.0.1 .
[+] Building 3.3s (18/18) FINISHED                                                                                                                                
 => [internal] load build definition from Dockerfile
 => => transferring dockerfile: 38B                                                         0.0s
 => [internal] load .dockerignore                                                           0.0s
 => => transferring context: 35B                                                            0.0s
 => [internal] load metadata for gcr.io/distroless/static:nonroot                           0.7s
 => [internal] load metadata for docker.io/library/golang:1.18                              3.0s
 => [auth] library/golang:pull token for registry-1.docker.io0.0s
 => [builder 1/9] FROM docker.io/library/golang:1.18@sha256:5540a6a6b3b612c382accc545b3f6702de21e77b15d89ad947116c94b5f42993        0.0s
 => [internal] load build context                                                           0.1s
 => => transferring context: 3.84kB                                                         0.0s
 => [stage-1 1/3] FROM gcr.io/distroless/static:nonroot@sha256:1f580b0a1922c3e54ae15b0758b5747b260bd99d39d40c2edb3e7f6e2452298b     0.0s
 => CACHED [builder 2/9] WORKDIR /workspace                                                 0.0s
 => CACHED [builder 3/9] COPY go.mod go.mod                                                 0.0s
 => CACHED [builder 4/9] COPY go.sum go.sum                                                 0.0s
 => CACHED [builder 5/9] RUN go mod download                                                0.0s
 => CACHED [builder 6/9] COPY main.go main.go                                               0.0s
 => CACHED [builder 7/9] COPY api/ api/                                                     0.0s
 => CACHED [builder 8/9] COPY controllers/ controllers/                                     0.0s
 => CACHED [builder 9/9] RUN CGO_ENABLED=0 GOOS=linux GOARCH=amd64 go build -a -o manager main.go                                   0.0s
 => CACHED [stage-1 2/3] COPY --from=builder /workspace/manager .                           0.0s
 => exporting to image                                                                      0.0s
 => => exporting layers                                                                     0.0s
 => => writing image sha256:84df51146080fec45fb74d5be29705f41c27de062e1192cb7c43a3a80c22977e                                        0.0s
 => => naming to docker.io/aneasystone/memcached-operator:v0.0.1                            0.0s
docker push aneasystone/memcached-operator:v0.0.1
The push refers to repository [docker.io/aneasystone/memcached-operator]
b399109810db: Pushed 
c456571abc85: Pushed 
v0.0.1: digest: sha256:60822319ac3578e3f62a73530c5ca08472014bf7861b75de6dd88502ee11d088 size: 739

上面我将镜像推送到 Docker 官方镜像仓库 docker.io,你也可以配置成自己的镜像仓库地址。

然后就可以将镜像部署到 Kubernetes 集群中了,官方提供了两种部署方式:直接部署 或 使用 OLM 部署。

直接部署

运行下面的 make deploy 命令:

$ make deploy IMG="aneasystone/memcached-operator:v0.0.1"
test -s ./memcached-operator/bin/controller-gen || GOBIN=./memcached-operator/bin go install sigs.k8s.io/controller-tools/cmd/controller-gen@v0.9.2
./memcached-operator/bin/controller-gen rbac:roleName=manager-role crd webhook paths="./..." output:crd:artifacts:config=config/crd/bases
test -s ./memcached-operator/bin/kustomize || { curl -s "https://raw.githubusercontent.com/kubernetes-sigs/kustomize/master/hack/install_kustomize.sh" | bash -s -- 3.8.7 ./memcached-operator/bin; }
cd config/manager && ./memcached-operator/bin/kustomize edit set image controller=aneasystone/memcached-operator:v0.0.1
./memcached-operator/bin/kustomize build config/default | kubectl apply -f -
namespace/memcached-operator-system created
customresourcedefinition.apiextensions.k8s.io/memcacheds.cache.example.com unchanged
serviceaccount/memcached-operator-controller-manager created
role.rbac.authorization.k8s.io/memcached-operator-leader-election-role created
clusterrole.rbac.authorization.k8s.io/memcached-operator-manager-role created
clusterrole.rbac.authorization.k8s.io/memcached-operator-metrics-reader created
clusterrole.rbac.authorization.k8s.io/memcached-operator-proxy-role created
rolebinding.rbac.authorization.k8s.io/memcached-operator-leader-election-rolebinding created
clusterrolebinding.rbac.authorization.k8s.io/memcached-operator-manager-rolebinding created
clusterrolebinding.rbac.authorization.k8s.io/memcached-operator-proxy-rolebinding created
configmap/memcached-operator-manager-config created
service/memcached-operator-controller-manager-metrics-service created
deployment.apps/memcached-operator-controller-manager created

从日志可以看到部署了一堆的东西,包括一个名字空间:

  • namespace/memcached-operator-system created

一个自定义资源:

  • customresourcedefinition.apiextensions.k8s.io/memcacheds.cache.example.com unchanged

一个 ConfigMap、Service 和 Deployment(这就是我们的 Operator):

  • configmap/memcached-operator-manager-config created
  • service/memcached-operator-controller-manager-metrics-service created
  • deployment.apps/memcached-operator-controller-manager created

还有一堆账户角色这些和安全相关的资源:

  • serviceaccount/memcached-operator-controller-manager created
  • role.rbac.authorization.k8s.io/memcached-operator-leader-election-role created
  • clusterrole.rbac.authorization.k8s.io/memcached-operator-manager-role created
  • clusterrole.rbac.authorization.k8s.io/memcached-operator-metrics-reader created
  • clusterrole.rbac.authorization.k8s.io/memcached-operator-proxy-role created
  • rolebinding.rbac.authorization.k8s.io/memcached-operator-leader-election-rolebinding created
  • clusterrolebinding.rbac.authorization.k8s.io/memcached-operator-manager-rolebinding created
  • clusterrolebinding.rbac.authorization.k8s.io/memcached-operator-proxy-rolebinding created

这些和正常的 Kubernetes 资源是完全一样的,我们可以使用 kubectl get 查询各个资源的详情,注意指定名字空间(-n memcached-operator-system):

$ kubectl get deployment -n memcached-operator-system
NAME                                    READY   UP-TO-DATE   AVAILABLE   AGE
memcached-operator-controller-manager   1/1     1            1           9m6s
$ kubectl get pods -n memcached-operator-system
NAME                                                     READY   STATUS    RESTARTS   AGE
memcached-operator-controller-manager-689d94c9bf-bqv2q   2/2     Running   0          8m54s
$ kubectl get service -n memcached-operator-system
NAME                                                    TYPE        CLUSTER-IP     EXTERNAL-IP   PORT(S)    AGE
memcached-operator-controller-manager-metrics-service   ClusterIP   10.96.197.28   <none>        8443/TCP   11m

同样的,也可以使用 kubectl logs 查看 Operator 的日志:

$ kubectl logs -f memcached-operator-controller-manager-689d94c9bf-bqv2q -n memcached-operator-system

如果要卸载 Operator,执行 make undeploy 命令即可:

$ make undeploy
./memcached-operator/bin/kustomize build config/default | kubectl delete --ignore-not-found=false -f -
namespace "memcached-operator-system" deleted
customresourcedefinition.apiextensions.k8s.io "memcacheds.cache.example.com" deleted
serviceaccount "memcached-operator-controller-manager" deleted
role.rbac.authorization.k8s.io "memcached-operator-leader-election-role" deleted
clusterrole.rbac.authorization.k8s.io "memcached-operator-manager-role" deleted
clusterrole.rbac.authorization.k8s.io "memcached-operator-metrics-reader" deleted
clusterrole.rbac.authorization.k8s.io "memcached-operator-proxy-role" deleted
rolebinding.rbac.authorization.k8s.io "memcached-operator-leader-election-rolebinding" deleted
clusterrolebinding.rbac.authorization.k8s.io "memcached-operator-manager-rolebinding" deleted
clusterrolebinding.rbac.authorization.k8s.io "memcached-operator-proxy-rolebinding" deleted
configmap "memcached-operator-manager-config" deleted
service "memcached-operator-controller-manager-metrics-service" deleted
deployment.apps "memcached-operator-controller-manager" deleted

使用 OLM 部署

OLM 的全称为 Operator Lifecycle Manager,是一款用于 Operator 的管理工具,可以使用 OLM 来帮你安装或更新 Kubernetes Operator。我们首先通过 operator-sdk 安装 OLM:

$ operator-sdk olm install
INFO[0001] Fetching CRDs for version "latest"
INFO[0001] Fetching resources for resolved version "latest"
I0827 15:01:42.199954   12688 request.go:601] Waited for 1.0471208s due to client-side throttling, not priority and fairness, request: GET:https://kubernetes.docker.internal:6443/apis/autoscaling/v1?timeout=32s
INFO[0012] Creating CRDs and resources
INFO[0012]   Creating CustomResourceDefinition "catalogsources.operators.coreos.com"
INFO[0012]   Creating CustomResourceDefinition "clusterserviceversions.operators.coreos.com"
INFO[0012]   Creating CustomResourceDefinition "installplans.operators.coreos.com"
INFO[0012]   Creating CustomResourceDefinition "olmconfigs.operators.coreos.com"
INFO[0012]   Creating CustomResourceDefinition "operatorconditions.operators.coreos.com"
INFO[0012]   Creating CustomResourceDefinition "operatorgroups.operators.coreos.com"
INFO[0012]   Creating CustomResourceDefinition "operators.operators.coreos.com"
INFO[0012]   Creating CustomResourceDefinition "subscriptions.operators.coreos.com"
INFO[0012]   Creating Namespace "olm"
INFO[0012]   Creating Namespace "operators"
INFO[0012]   Creating ServiceAccount "olm/olm-operator-serviceaccount"
INFO[0012]   Creating ClusterRole "system:controller:operator-lifecycle-manager"
INFO[0012]   Creating ClusterRoleBinding "olm-operator-binding-olm"
INFO[0012]   Creating OLMConfig "cluster"
INFO[0015]   Creating Deployment "olm/olm-operator"
INFO[0015]   Creating Deployment "olm/catalog-operator"
INFO[0015]   Creating ClusterRole "aggregate-olm-edit"
INFO[0015]   Creating ClusterRole "aggregate-olm-view"
INFO[0015]   Creating OperatorGroup "operators/global-operators"
INFO[0015]   Creating OperatorGroup "olm/olm-operators"
INFO[0015]   Creating ClusterServiceVersion "olm/packageserver"
INFO[0015]   Creating CatalogSource "olm/operatorhubio-catalog"
INFO[0016] Waiting for deployment/olm-operator rollout to complete
INFO[0016]   Waiting for Deployment "olm/olm-operator" to rollout: 0 of 1 updated replicas are available
INFO[0019]   Deployment "olm/olm-operator" successfully rolled out
INFO[0019] Waiting for deployment/catalog-operator rollout to complete
INFO[0019]   Deployment "olm/catalog-operator" successfully rolled out
INFO[0019] Waiting for deployment/packageserver rollout to complete
INFO[0019]   Waiting for Deployment "olm/packageserver" to rollout: 0 of 2 updated replicas are available
INFO[0033]   Deployment "olm/packageserver" successfully rolled out
INFO[0033] Successfully installed OLM version "latest"

NAME                                            NAMESPACE    KIND                        STATUS
catalogsources.operators.coreos.com                          CustomResourceDefinition    Installed
clusterserviceversions.operators.coreos.com                  CustomResourceDefinition    Installed
installplans.operators.coreos.com                            CustomResourceDefinition    Installed
olmconfigs.operators.coreos.com                              CustomResourceDefinition    Installed
operatorconditions.operators.coreos.com                      CustomResourceDefinition    Installed
operatorgroups.operators.coreos.com                          CustomResourceDefinition    Installed
operators.operators.coreos.com                               CustomResourceDefinition    Installed
subscriptions.operators.coreos.com                           CustomResourceDefinition    Installed
olm                                                          Namespace                   Installed
operators                                                    Namespace                   Installed
olm-operator-serviceaccount                     olm          ServiceAccount              Installed
system:controller:operator-lifecycle-manager                 ClusterRole                 Installed
olm-operator-binding-olm                                     ClusterRoleBinding          Installed
cluster                                                      OLMConfig                   Installed
olm-operator                                    olm          Deployment                  Installed
catalog-operator                                olm          Deployment                  Installed
aggregate-olm-edit                                           ClusterRole                 Installed
aggregate-olm-view                                           ClusterRole                 Installed
global-operators                                operators    OperatorGroup               Installed
olm-operators                                   olm          OperatorGroup               Installed
packageserver                                   olm          ClusterServiceVersion       Installed
operatorhubio-catalog                           olm          CatalogSource               Installed

如上所示,OLM 会在 Kubernetes 集群中安装一堆的资源,可以看到 OLM 本身也包含了两个 Operator:OLM Operator 和 Catalog Operator。关于他们的作用可以参考 《如何管理越来越多的 operator?OLM 给你答案》 这篇文章。

OLM 通过 Bundle 形式来组织和管理 Operator,使用 make bundle 生成 Bundle 相关的配置文件:

$ make bundle IMG="aneasystone/memcached-operator:v0.0.1"
test -s ./memcached-operator/bin/controller-gen || GOBIN=./memcached-operator/bin go install sigs.k8s.io/controller-tools/cmd/controller-gen@v0.9.2
./memcached-operator/bin/controller-gen rbac:roleName=manager-role crd webhook paths="./..." output:crd:artifacts:config=config/crd/bases
test -s ./memcached-operator/bin/kustomize || { curl -s "https://raw.githubusercontent.com/kubernetes-sigs/kustomize/master/hack/install_kustomize.sh" | bash -s -- 3.8.7 ./memcached-operator/bin; }
operator-sdk generate kustomize manifests -q

Display name for the operator (required):
> memcached-operator

Description for the operator (required):
> memcached operator

Provider's name for the operator (required):
> aneasystone

Any relevant URL for the provider name (optional):
> https://www.aneasystone.com

Comma-separated list of keywords for your operator (required):
> memcached

Comma-separated list of maintainers and their emails (e.g. 'name1:email1, name2:email2') (required):
> aneasystone@gmail.com
cd config/manager && ./memcached-operator/bin/kustomize edit set image controller=aneasystone/memcached-operator:v0.0.1
./memcached-operator/bin/kustomize build config/manifests | operator-sdk generate bundle -q --overwrite --version 0.0.1
INFO[0001] Creating bundle.Dockerfile
INFO[0001] Creating bundle/metadata/annotations.yaml
INFO[0001] Bundle metadata generated suceessfully
operator-sdk bundle validate ./bundle
INFO[0001] All validation tests have completed successfully

然后将 Bundle 构建成镜像并推送到镜像仓库:

$ make bundle-build bundle-push BUNDLE_IMG="aneasystone/memcached-operator-bundle:v0.0.1"
docker build -f bundle.Dockerfile -t aneasystone/memcached-operator-bundle:v0.0.1 .
[+] Building 0.6s (7/7) FINISHED
 => [internal] load build definition from bundle.Dockerfile                                                            0.1s
 => => transferring dockerfile: 971B                                                                                   0.0s
 => [internal] load .dockerignore                                                                                      0.1s
 => => transferring context: 35B                                                                                       0.0s
 => [internal] load build context                                                                                      0.0s
 => => transferring context: 12.72kB                                                                                   0.0s
 => [1/3] COPY bundle/manifests /manifests/                                                                            0.0s
 => [2/3] COPY bundle/metadata /metadata/                                                                              0.1s
 => [3/3] COPY bundle/tests/scorecard /tests/scorecard/                                                                0.1s
 => exporting to image                                                                                                 0.1s
 => => exporting layers                                                                                                0.1s
 => => writing image sha256:849fde8bbc55db7a1cd884ccdc7c61bfdca343650f72eb65e616c98c17193bca                           0.0s
 => => naming to docker.io/aneasystone/memcached-operator-bundle:v0.0.1                                                0.0s
make docker-push IMG=aneasystone/memcached-operator-bundle:v0.0.1
make[1]: Entering directory './memcached-operator'
docker push aneasystone/memcached-operator-bundle:v0.0.1
The push refers to repository [docker.io/aneasystone/memcached-operator-bundle]
ee3ff18c6586: Pushed
1cca854eb4c8: Pushed
2fa3c5f0ef35: Pushed
v0.0.1: digest: sha256:c42ec3c4f9d461128c640f5568886b006e0332ea0d4a173008e97addefbfd3f9 size: 939
make[1]: Leaving directory './memcached-operator'

运行 Bundle 将我们的 Operator 部署到 Kubernetes 集群中:

$ operator-sdk run bundle docker.io/aneasystone/memcached-operator-bundle:v0.0.1
INFO[0023] Creating a File-Based Catalog of the bundle "docker.io/aneasystone/memcached-operator-bundle:v0.0.1"
INFO[0028] Generated a valid File-Based Catalog
INFO[0033] Created registry pod: docker-io-aneasystone-memcached-operator-bundle-v0-0-1
INFO[0033] Created CatalogSource: memcached-operator-catalog
INFO[0033] OperatorGroup "operator-sdk-og" created
INFO[0033] Created Subscription: memcached-operator-v0-0-1-sub
INFO[0037] Approved InstallPlan install-z264c for the Subscription: memcached-operator-v0-0-1-sub
INFO[0037] Waiting for ClusterServiceVersion "default/memcached-operator.v0.0.1" to reach 'Succeeded' phase
INFO[0037]   Waiting for ClusterServiceVersion "default/memcached-operator.v0.0.1" to appear
INFO[0056]   Found ClusterServiceVersion "default/memcached-operator.v0.0.1" phase: Pending
INFO[0058]   Found ClusterServiceVersion "default/memcached-operator.v0.0.1" phase: Installing
INFO[0069]   Found ClusterServiceVersion "default/memcached-operator.v0.0.1" phase: Succeeded
INFO[0069] OLM has successfully installed "memcached-operator.v0.0.1"

可以使用 kubectl get 检查 Operator 运行的状态,和上一节直接部署不一样的是,Operator 被安装在默认的 default 名字空间里了,其他的几乎没啥区别。可以更新 config/samples/cache_v1alpha1_memcached.yaml 文件来对 Operator 进行测试。

如果要卸载 Operator,执行下面的命令:

$ operator-sdk cleanup memcached-operator

卸载 OLM:

$ operator-sdk olm uninstall

使用 kubernetes-sigs/kubebuilder 开发 Operator

operator-sdkkubebuilder 都是为了方便用户创建和管理 Operator 而生的脚手架项目,其实 operator-sdk 在底层也使用了 kubebuilder,比如 operator-sdk 的命令行工具就是直接调用 kubebuilder 的命令行工具。无论由 operator-sdk 还是 kubebuilder 创建的 Operator 项目都是调用的 controller-runtime 接口,具有相同的项目目录结构。

参考

  1. Kubernetes 文档 / 概念 / 扩展 Kubernetes / Operator 模式
  2. Kubernetes Operator 基础入门
  3. Kubernetes Operator 快速入门教程
  4. Kubernetes Operators 入门笔记
  5. 亲历者说:Kubernetes API 与 Operator,不为人知的开发者战争
  6. 《Kubernetes Operators eBook》By Jason Dobies & Joshua Wood
  7. Quickstart for Go-based Operators
  8. What is a Kubernetes operator?
  9. Introducing Operators: Putting Operational Knowledge into Software
  10. Kubernetes Operators 101, Part 1: Overview and key features
  11. Kubernetes Operators 101, Part 2: How operators work
  12. 如何管理越来越多的 operator?OLM 给你答案

更多

1. 安装 gcc 报 404 Not Found 错

在 Ubuntu 上使用 sudo apt install gcc 安装 gcc 时,报如下错误:

E: Failed to fetch http://security.ubuntu.com/ubuntu/pool/main/l/linux/linux-libc-dev_4.15.0-189.200_amd64.deb  404  Not Found [IP: 2001:67c:1562::15 80]
E: Unable to fetch some archives, maybe run apt-get update or try with --fix-missing?

解决方法很简单,执行 sudo apt update 更新软件源中的所有软件列表即可。

2. 使用 operator-sdk 创建 API 报错

执行 operator-sdk create api 命令创建 API 时,报如下错误:

/usr/local/go/src/net/cgo_linux.go:12:8: no such package located
Error: not all generators ran successfully
run `controller-gen object:headerFile=hack/boilerplate.go.txt paths=./... -w` to see all available markers, or `controller-gen object:headerFile=hack/boilerplate.go.txt paths=./... -h` for usage
Makefile:94: recipe for target 'generate' failed
make: *** [generate] Error 1
Error: failed to create API: unable to run post-scaffold tasks of "base.go.kubebuilder.io/v3": exit status 2

没有安装 gcc 工具,使用 sudo apt install gcc 安装 gcc 即可。

3. make buildmake test 时报错

在公司电脑开发 Operator 时遇到了这个问题,执行 make buildmake test 时报下面这样的错:

STEP: bootstrapping test environment
1.6621765789962418e+09  DEBUG   controller-runtime.test-env     starting control plane

1.6621765802518039e+09  ERROR   controller-runtime.test-env     unable to start the controlplane        {"tries": 0, "error": "timeout waiting for process etcd to start successfully (it may have failed to start, or stopped unexpectedly before becoming ready)"}

看报错信息猜测可能是和 etcd 有关,使用 ps aux | grep etcd 确实可以看到在执行测试时启动了一个 etcd 的进程:

$ ps aux | grep etcd
aneasystone  2609 23.0  0.1 737148 22560 pts/0    Sl   13:34   0:00 /home/aneasystone/.local/share/kubebuilder-envtest/k8s/1.24.1-linux-amd64/etcd --advertise-client-urls=http://127.0.0.1:52467 --data-dir=/tmp/k8s_test_framework_3831360890 --listen-client-urls=http://127.0.0.1:52467 --listen-peer-urls=http://127.0.0.1:52468 --unsafe-no-fsync=true

于是我试着手工运行这个命令,发现 etcd 服务启动时报错了:

2022-09-03 11:42:28.499748 E | etcdserver: publish error: etcdserver: request timed out
2022-09-03 11:42:35.501458 E | etcdserver: publish error: etcdserver: request timed out

使用 etcdctl 也连不上该 etcd 服务。一开始我以为是 kubebuilder 自带的 etcd 文件有问题,于是就自己安装了一个 etcd,直接运行时也是报错,只不过报错信息有点不一样:

panic: invalid page type: 0: 4

goroutine 1 [running]:

github.com/etcd-io/bbolt.(*Cursor).search(0xc00005be18, {0xc00005be70, 0x8, 0x8}, 0xc00005bdb8?)

看报错是位于 etcd-io/bbolt 这个包,BoltDB 是 etcd 使用的内存 KV 数据库。使用 boltpanic: invalid page type 为关键字,很快就在 microsoft/WSL 里找到了一个相关的 Issue:BoltDB panics on cursor search since April update,根据 Issue 里的描述,写了一个 BoltDB 的简单示例:
package main

import (
    "fmt"
    "log"
    "os"

    "github.com/boltdb/bolt"
)

func main() {
    os.Remove("test.db")
    db, err := bolt.Open("test.db", 0600, nil)
    if err != nil {
        log.Fatal(err)
    }
    defer db.Close()

    db.Update(func(tx *bolt.Tx) error {
        _, err := tx.CreateBucket([]byte("MyBucket"))
        if err != nil {
            return fmt.Errorf("create bucket: %s", err)
        }
        return err
    })

    db.View(func(tx *bolt.Tx) error {
        b := tx.Bucket([]byte("MyBucket"))
        c := b.Cursor()
        c.Seek([]byte("test"))
        return nil
    })
    os.Remove("test.db")
}

运行代码后也是和上面几乎一模一样的报错:

$ go run main.go
panic: invalid page type: 0: 4

goroutine 1 [running]:
github.com/boltdb/bolt.(*Cursor).search(0xc00005be18, {0xc00005be70, 0x8, 0x8}, 0xc00005bdb8?)

至此大概可以推断这应该是 WSL 的问题,WSL 目前最新版本是 WSL 2,不过要注意的是,根据 Microsoft 官方的升级指南,WSL 2 只支持 Windows 10 Build 18362 之后的版本:

Builds lower than 18362 do not support WSL 2. Use the Windows Update Assistant to update your version of Windows.

打开 Windows 更新,更新完成后重启,问题解决。

4. Operator 示例

扫描二维码,在手机上阅读!

使用 qiankun 开发微前端应用

微前端(Micro Frontends) 这个概念是在 2016 年底的时候在 ThoughtWorks Technology Radar 上首次提出来的,它将服务端的微服务概念延伸到前端领域。随着应用规模的不断变大,传说中的 SPA(单页面应用)会变得越来越复杂,也越来越难以维护。这样大规模的前端应用一般都是由很多相对独立的功能模块组合而成,且不同的功能模块由不同的团队负责,根据分而治之的思想,于是就有了将这些功能模块拆分成不同前端项目的想法,微前端技术也就此诞生。

qiankun 是阿里开源的一款微前端框架,它的灵感来自于 single-spa 项目,号称 可能是你见过最完善的微前端解决方案。single-spa 于 2018 年诞生,也是一个用于前端微服务化的解决方案,它实现了路由劫持和应用加载,不过它的缺点是不够灵活,不能动态加载 js 文件,而且没有处理样式隔离,不支持 js 沙箱机制。qiankun 于 2019 年开源,提供了更加开箱即用的 API (single-spa + sandbox + import-html-entry),它基于 single-spa,具备 js 沙箱、样式隔离、HTML Loader、预加载 等微前端系统所需的能力。qiakun 升级 2.0 后,支持多个微应用的同时加载,有了这个特性,我们基本可以像接入 iframe 一样方便的接入微应用。

官方示例

qiankun 的源码里提供了大量完整的示例项目,我们先来体验体验这些示例,感受下微前端的魅力。首先,将 qiankun 的代码 clone 到本地:

$ git clone https://github.com/umijs/qiankun.git

qiankun 使用 Yarn 构建和打包项目,首先安装 Yarn:

$ npm install -g yarn

然后安装 qiankun 框架所依赖的包以及示例项目:

$ yarn install
$ yarn examples:install

示例项目中包含了各种不同框架的实现,比如 VueVue 3React 15React 16Angular 9 以及使用 jQuery 实现的纯 HTML 项目,Yarn 会依次安装各个示例项目的依赖包,整个过程会比较长,安装完成之后,使用下面的命令运行示例项目:

$ yarn examples:start

然后打开浏览器,访问 http://localhost:7099/

example.gif

或者使用下面的命令运行 multiple demo

$ yarn examples:start-multiple

qiankun-multiple-demo.png

开发实战

这一节我们将从零开始,使用 qiankun 搭建一个简单的微前端项目,这个项目包括一个主应用和两个微应用。这里为了简单起见,两个微应用都是使用 Vue 开发,但是实际上,微前端对微应用的技术栈是不限的,微应用完全可以独立开发。

准备主应用

我们直接使用 vue-cli 创建一个 Vue 脚手架项目,首先确保已安装 Node.js 环境:

$ node -v
v16.14.2

$ npm -v
8.5.0

然后安装最新版本的 vue-cli

$ npm install -g @vue/cli

$ vue -V
@vue/cli 5.0.8

使用 vue-cli 创建 demo 项目:

$ vue create demo

?  Your connection to the default npm registry seems to be slow.  
   Use https://registry.npmmirror.com for faster installation? Yes

Vue CLI v5.0.8
? Please pick a preset: Default ([Vue 3] babel, eslint)

Vue CLI v5.0.8
✨  Creating project in D:\code\weekly-practice\notes\week017-qiankun-micro-frontends\demo.
⚙️  Installing CLI plugins. This might take a while...

added 849 packages in 36s
🚀  Invoking generators...
📦  Installing additional dependencies...

added 95 packages in 11s
⚓  Running completion hooks...

📄  Generating README.md...

🎉  Successfully created project demo.      
👉  Get started with the following commands:

 $ cd demo
 $ npm run serve

使用 npm run serve 即可启动项目,启动成功后在浏览器中访问 http://localhost:8080/

vue-demo.png

准备微应用

然后照葫芦画瓢,使用 vue-cli 创建 app1 和 app2 项目:

$ vue create app1

Vue CLI v5.0.8
? Please pick a preset: Default ([Vue 3] babel, eslint)
? Pick the package manager to use when installing dependencies: Yarn

Vue CLI v5.0.8
✨  Creating project in D:\code\weekly-practice\notes\week017-qiankun-micro-frontends\app1.
⚙️  Installing CLI plugins. This might take a while...

yarn install v1.22.19
info No lockfile found.
[1/4] Resolving packages...
[2/4] Fetching packages...
[3/4] Linking dependencies...

success Saved lockfile.
Done in 22.33s.
🚀  Invoking generators...
📦  Installing additional dependencies...

yarn install v1.22.19
[1/4] Resolving packages...
[2/4] Fetching packages...
[3/4] Linking dependencies...
[4/4] Building fresh packages...
success Saved lockfile.
Done in 7.88s.
⚓  Running completion hooks...

📄  Generating README.md...

🎉  Successfully created project app1.
👉  Get started with the following commands:

 $ cd app1
 $ yarn serve

使用 vue-cli 创建的项目默认端口是 8080,为了不和主应用冲突,需要修改 vue.config.js 配置文件,将微应用的端口修改为 8081 和 8082:

const { defineConfig } = require('@vue/cli-service')
module.exports = defineConfig({
  transpileDependencies: true,
  devServer: {
    port: 8081
  }
})

改造主应用

一切准备就绪后,接下来我们就开始将主应用改造成微前端架构。首先在主应用安装 qiankun 依赖:

$ npm i qiankun -S

然后在 main.js 文件中注册微应用:

import { registerMicroApps, start } from 'qiankun';

registerMicroApps([{
  name: 'app1',
  entry: '//localhost:8081',
  container: '#app1',
  activeRule: '/app1'
}, {
  name: 'app2',
  entry: '//localhost:8082',
  container: '#app2',
  activeRule: '/app2'
}]);

start();

只需这几行代码,微应用就注册好了。当 url 发生变化时,qiankun 会根据 activeRule 规则自动匹配相应的微应用,并将其插入到指定的 DOM 容器(container)中。我们在 public/index.html 里为每个微应用准备一个容器:

    <div id="app"></div>
    <div id="app1"></div>
    <div id="app2"></div>

改造微应用

不过此时主应用还无法加载微应用,我们需要对微应用做两处改造。首先,微应用需要在自己的入口 js (通常就是你配置的 webpack 的 entry js) 导出 bootstrapmountunmount 三个生命周期钩子,以供主应用在适当的时机调用。打开文件 main.js,添加如下代码:

let instance = null
function render() {
  instance = createApp(App).mount('#app')
}

if (!window.__POWERED_BY_QIANKUN__) { // 默认独立运行
  render();
}

export async function bootstrap(props) {
  console.log('bootstrap app1', props)
}
export async function mount(props) {
  console.log('mount app1', props)
  render()
}
export async function unmount(props) {
  console.log('unmount app1', props)
  console.log(instance)
}

其中我们可以通过 window.__POWERED_BY_QIANKUN__ 来区分微应用是自启动的还是由 qiankun 加载的,这样可以让微应用在两种模式下都兼容。

注意,网上有很多示例在 unmount 中会调用 instance.$destroy() 来销毁实例,但是在 Vue 3 中 instance.$destroy() 方法已经废弃了。

其次,我们需要将微应用改为以 umd 的方式打包,并注意设置 'Access-Control-Allow-Origin':'*' 允许跨域访问:

const { defineConfig } = require('@vue/cli-service')
module.exports = defineConfig({
  transpileDependencies: true,
  devServer: {
    port: 8081,
    headers:{
      'Access-Control-Allow-Origin':'*'
    }
  },
  configureWebpack:{
    output:{
      library: `app1`,
      libraryTarget: 'umd'
    }
  }
})

运行

主应用和微应用都改造完成后,依次运行,然后在浏览器中依次访问,确保每个应用都可独立访问。另外,由于我们在主应用中加载了微应用,使用 http://localhost:8080/app1http://localhost:8080/app2 应该也可以访问微应用:

demo-micro-app1.png

使用 Vue Router 切换微应用

为了更方便地构建单页面应用(SPA),在现代的 Web 框架中,几乎都有 路由 的概念,一般用在左侧菜单或顶部导航上。Vue Router 就是 Vue.js 的官方路由。首先在主应用中安装 vue-routerelement-plus

$ npm i vue-router -S
$ npm i element-plus -S

main.js 中注册路由:

import { createRouter, createWebHistory } from 'vue-router'
import HelloWorld from './components/HelloWorld.vue'
import About from './components/About.vue'

const router = createRouter({
  history: createWebHistory(),
  routes: [
    { path: '/hello', component: HelloWorld },
    { path: '/about', component: About }
  ]
})

import ElementPlus from 'element-plus'
import 'element-plus/dist/index.css'

createApp(App).use(router).use(ElementPlus).mount('#app')

主应用的代码修改如下:

<template>
  <div>
    <h1>Hello qiankun!</h1>
    <el-menu :router="true" mode="horizontal">
      <el-menu-item index="/hello">Hello</el-menu-item>
      <el-menu-item index="/about">About</el-menu-item>
      <el-menu-item index="/app1">App1</el-menu-item>
      <el-menu-item index="/app2">App2</el-menu-item>
    </el-menu>
    <router-view></router-view>
    <div id="app1"></div>
    <div id="app2"></div>
  </div>
</template>

为什么切换微应用时,导航消失了?而不是加载在导航下面的容器中?

这是因为主应用的容器 id 和 微应用的容器 id 都叫 app,所以冲突了,将主应用的 id 修改为 demo 即可。

运行之后,在浏览器里访问主应用,然后就可以通过导航菜单来访问微应用了:

vue-router.png

参考

  1. qiankun 官方文档
  2. qiankun 技术圆桌 | 分享一些 qiankun 开发及微前端实践过程中的心得
  3. 万字长文-落地微前端 qiankun 理论与实践指北
  4. Micro Frontends | extending the microservice idea to frontend development
  5. single-spa
  6. 微前端框架 之 single-spa 从入门到精通
  7. 微前端框架 之 qiankun 从入门到源码分析
  8. 微前端实战 - 基于 qiankun 的最佳实践
扫描二维码,在手机上阅读!

Spring Boot 生产就绪特性 Actuator

Spring Boot 官网将 Actuator 称为 生产就绪特性(Production-ready features),它提供了诸如健康检查、审计、指标收集、HTTP 跟踪等功能,帮助我们监控和管理 Spring Boot 应用。

快速开始

使用 Spring Initializr 创建一个项目,依赖项选择 Web 和 Actuator,或者在已有项目中添加依赖:

<dependency>
    <groupId>org.springframework.boot</groupId>
    <artifactId>spring-boot-starter-web</artifactId>
</dependency>
<dependency>
    <groupId>org.springframework.boot</groupId>
    <artifactId>spring-boot-starter-actuator</artifactId>
</dependency>

启动程序后,就能访问 /actuator 接口了:

$ curl -s http://localhost:8080/actuator | jq
{
  "_links": {
    "self": {
      "href": "http://localhost:8080/actuator",
      "templated": false
    },
    "health": {
      "href": "http://localhost:8080/actuator/health",
      "templated": false
    },
    "health-path": {
      "href": "http://localhost:8080/actuator/health/{*path}",
      "templated": true
    }
  }
}

Spring Boot Actuator 提供了很多有用的接口,被称为端点(Endpoints),访问 /actuator 就可以看出程序当前暴露了哪些端点。端点的访问路径可以通过下面的配置修改:

management.endpoints.web.base-path=/management

从上面的命令结果可以看出在最新版本中,Actuator 只暴露一个 /health 端点,这个端点提供了关于应用健康情况的一些基础信息。

如果要开启所有端点,可以打开配置文件 application.properties,添加如下配置项:

management.endpoints.web.exposure.include=*

现在看看暴露了哪些端点:

$ curl -s http://localhost:8080/actuator | jq
{
  "_links": {
    "self": {
      "href": "http://localhost:8080/actuator",
      "templated": false
    },
    "beans": {
      "href": "http://localhost:8080/actuator/beans",
      "templated": false
    },
    "caches-cache": {
      "href": "http://localhost:8080/actuator/caches/{cache}",
      "templated": true
    },
    "caches": {
      "href": "http://localhost:8080/actuator/caches",
      "templated": false
    },
    "health": {
      "href": "http://localhost:8080/actuator/health",
      "templated": false
    },
    "health-path": {
      "href": "http://localhost:8080/actuator/health/{*path}",
      "templated": true
    },
    "info": {
      "href": "http://localhost:8080/actuator/info",
      "templated": false
    },
    "conditions": {
      "href": "http://localhost:8080/actuator/conditions",
      "templated": false
    },
    "configprops": {
      "href": "http://localhost:8080/actuator/configprops",
      "templated": false
    },
    "configprops-prefix": {
      "href": "http://localhost:8080/actuator/configprops/{prefix}",
      "templated": true
    },
    "env": {
      "href": "http://localhost:8080/actuator/env",
      "templated": false
    },
    "env-toMatch": {
      "href": "http://localhost:8080/actuator/env/{toMatch}",
      "templated": true
    },
    "loggers": {
      "href": "http://localhost:8080/actuator/loggers",
      "templated": false
    },
    "loggers-name": {
      "href": "http://localhost:8080/actuator/loggers/{name}",
      "templated": true
    },
    "heapdump": {
      "href": "http://localhost:8080/actuator/heapdump",
      "templated": false
    },
    "threaddump": {
      "href": "http://localhost:8080/actuator/threaddump",
      "templated": false
    },
    "metrics-requiredMetricName": {
      "href": "http://localhost:8080/actuator/metrics/{requiredMetricName}",
      "templated": true
    },
    "metrics": {
      "href": "http://localhost:8080/actuator/metrics",
      "templated": false
    },
    "scheduledtasks": {
      "href": "http://localhost:8080/actuator/scheduledtasks",
      "templated": false
    },
    "mappings": {
      "href": "http://localhost:8080/actuator/mappings",
      "templated": false
    }
  }
}

其中 * 表示开启所有端点,也可以只开启部分端点:

management.endpoints.web.exposure.include=beans,health,info

或者选择性的关闭部分端点:

management.endpoints.web.exposure.exclude=beans,info

原生端点解析

Spring Boot Actuator 暴露的原生端点大概可以分成三大类:

  • 应用配置类:获取应用程序中加载的应用配置、环境变量、自动化配置报告等与Spring Boot应用密切相关的配置类信息。
  • 度量指标类:获取应用程序运行过程中用于监控的度量指标,比如:内存信息、线程池信息、HTTP请求统计等。
  • 操作控制类:提供了对应用的关闭等操作类功能。

下面对 Actuator 暴露的原生端点依次体验和学习。

Beans (beans)

端点 /beans 列出了应用程序中所有 Bean 的信息,包括 Bean 的名称、别名、类型、是否单例、依赖等等。

$ curl -s http://localhost:8080/actuator/beans | jq
{
  "contexts": {
    "application": {
      "beans": {
        "endpointCachingOperationInvokerAdvisor": {
          "aliases": [],
          "scope": "singleton",
          "type": "org.springframework.boot.actuate.endpoint.invoker.cache.CachingOperationInvokerAdvisor",
          "resource": "class path resource [org/springframework/boot/actuate/autoconfigure/endpoint/EndpointAutoConfiguration.class]",
          "dependencies": [
            "org.springframework.boot.actuate.autoconfigure.endpoint.EndpointAutoConfiguration",
            "environment"
          ]
        },
        "defaultServletHandlerMapping": {
          "aliases": [],
          "scope": "singleton",
          "type": "org.springframework.web.servlet.HandlerMapping",
          "resource": "class path resource [org/springframework/boot/autoconfigure/web/servlet/WebMvcAutoConfiguration$EnableWebMvcConfiguration.class]",
          "dependencies": [
            "org.springframework.boot.autoconfigure.web.servlet.WebMvcAutoConfiguration$EnableWebMvcConfiguration"
          ]
        },
        ...
      },
      "parentId": null
    }
  }
}

Spring Boot 自身会创建很多个 Bean,这里是完整的结果

Health (health)

/health 端点用来检查应用程序的健康情况,默认情况下它只会显示应用程序的状态为 UPDOWN

$ curl -s http://localhost:8080/actuator/health | jq
{
  "status": "UP"
}

通过 management.endpoint.health.show-details 配置可以控制接口返回的内容:

配置值描述
never不展示详情信息,只显示 UPDOWN 状态,默认配置
always对所有用户展示详情信息
when-authorized只对通过认证的用户展示详情信息,授权的角色可以通过management.endpoint.health.roles 配置

我们将其设置为 always

management.endpoint.health.show-details=always

此时接口返回内容如下:

$ curl -s http://localhost:8080/actuator/health | jq
{
  "status": "UP",
  "components": {
    "diskSpace": {
      "status": "UP",
      "details": {
        "total": 174500155392,
        "free": 34697940992,
        "threshold": 10485760,
        "exists": true
      }
    },
    "ping": {
      "status": "UP"
    }
  }
}

由于我这个只是一个 Demo 项目,没有其他的依赖组件,所以健康状态的详情信息有点少。可以在 pom.xml 中添加一个 Mongo 的依赖:

<dependency>
    <groupId>org.springframework.boot</groupId>
    <artifactId>spring-boot-starter-data-mongodb</artifactId>
</dependency>

此时再查看 /health 端点,详情里就多个 Mongo 的信息了:

$ curl -s http://localhost:8080/actuator/health | jq
{
  "status": "UP",
  "components": {
    "diskSpace": {
      "status": "UP",
      "details": {
        "total": 174500155392,
        "free": 34691891200,
        "threshold": 10485760,
        "exists": true
      }
    },
    "mongo": {
      "status": "UP",
      "details": {
        "version": "4.0.27"
      }
    },
    "ping": {
      "status": "UP"
    }
  }
}

我们将 Mongo 服务手工停掉,再访问 /health 端点,可以看出,尽管我们的服务还是运行着的,但是我们服务的健康状态已经是 DOWN 了:

$ curl -s http://localhost:8080/actuator/health | jq
{
  "status": "DOWN",
  "components": {
    "diskSpace": {
      "status": "UP",
      "details": {
        "total": 174500155392,
        "free": 34691891200,
        "threshold": 10485760,
        "exists": true
      }
    },
    "mongo": {
      "status": "DOWN",
      "details": {
        "error": "org.springframework.dao.DataAccessResourceFailureException: Timed out after 30000 ms while waiting to connect. Client view of cluster state is {type=UNKNOWN, servers=[{address=localhost:27017, type=UNKNOWN, state=CONNECTING, exception={com.mongodb.MongoSocketOpenException: Exception opening socket}, caused by {java.net.ConnectException: Connection refused: connect}}]; nested exception is com.mongodb.MongoTimeoutException: Timed out after 30000 ms while waiting to connect. Client view of cluster state is {type=UNKNOWN, servers=[{address=localhost:27017, type=UNKNOWN, state=CONNECTING, exception={com.mongodb.MongoSocketOpenException: Exception opening socket}, caused by {java.net.ConnectException: Connection refused: connect}}]"
      }
    },
    "ping": {
      "status": "UP"
    }
  }
}

健康指示器(HealthIndicator

Spring Boot Actuator 提供了很多自动配置的 健康指示器(HealthIndicator),当你的项目依赖某个组件的时候,该组件对应的健康指示器就会被自动装配,继而采集对应的信息。比如上面我们添加 Mongo 依赖后,MongoHealthIndicator 就会自动被用来采集 Mongo 的信息。

每个健康指示器都有一个 key,默认是指示器的 Bean 名称去掉 HealthIndicator 后缀,比如 Mongo 的健康指示器就是 mongo。可以使用 management.health.<key>.enabled 配置关闭某个指示器。可以通过下面这个配置关闭 Mongo 的健康检查:

management.health.mongo.enabled=false

常见的健康指示器和对应的 key 如下:

KeyHealthIndicator
cassandraCassandraDriverHealthIndicator
couchbaseCouchbaseHealthIndicator
dbDataSourceHealthIndicator
diskspaceDiskSpaceHealthIndicator
elasticsearchElasticsearchRestHealthIndicator
hazelcastHazelcastHealthIndicator
influxdbInfluxDbHealthIndicator
jmsJmsHealthIndicator
ldapLdapHealthIndicator
mailMailHealthIndicator
mongoMongoHealthIndicator
neo4jNeo4jHealthIndicator
pingPingHealthIndicator
rabbitRabbitHealthIndicator
redisRedisHealthIndicator
solrSolrHealthIndicator

可以通过下面这个配置关闭上面列表中的所有健康检查:

management.health.defaults.enabled=false

为了适应 Kubernetes 环境,Spring Boot Actuator 还提供了下面两个健康指示器,默认关闭。分别对应 Kubernetes 里的 LivenessReadiness 探针,参考 Kubernetes 官方文档

KeyHealthIndicator
livenessstateLivenessStateHealthIndicator
readinessstateReadinessStateHealthIndicator

自定义健康指示器

当 Actuator 自带的健康指示器不能满足我们需求时,我们也可以自定义一个健康指示器,只需要实现 HealthIndicator 接口或者继承AbstractHealthIndicator 类即可,下面是一个简单的示例:

/**
 * 自定义健康指示器
 */
@Component
public class TestHealthIndicator extends AbstractHealthIndicator {

    @Override
    protected void doHealthCheck(Builder builder) throws Exception {
        builder.up()
            .withDetail("app", "test")
            .withDetail("error", 0);
    }

}

withDetail 用于显示健康详情,如果要显示状态 DOWN,就抛出一个异常即可。此时的健康详情接口返回如下:

$ curl -s http://localhost:8080/actuator/health | jq
{
  "status": "UP",
  "components": {
    "diskSpace": {
      "status": "UP",
      "details": {
        "total": 174500155392,
        "free": 34691883008,
        "threshold": 10485760,
        "exists": true
      }
    },
    "ping": {
      "status": "UP"
    },
    "test": {
      "status": "UP",
      "details": {
        "app": "test",
        "error": 0
      }
    }
  }
}

Info (info)

/info 端点用于展示应用程序的一些基本信息,默认情况下 /info 返回的是一个空 JSON。

$ curl -s http://localhost:8080/actuator/info | jq
{}

Actuator 支持多种信息的收集方式,不过默认都是关闭的,需要使用 management.info.<id>.enabled 手动开启。支持的信息有如下几种:

ID说明
build显示项目的构建信息,需要在项目中生成 META-INF/build-info.properties 文件
env显示所有以 info. 开头的配置
git显示 Git 信息,需要在项目中生成 git.properties 文件
java显示 Java 运行时信息
os显示操作系统信息

显示构建信息

如果想在 /info 端点中显示项目的构建信息,我们需要在项目中生成 META-INF/build-info.properties 文件。这个文件可以使用 spring-boot-maven-plugin 自动生成,只需要在插件配置中添加一个 build-infogoal 即可:

<build>
  <plugins>
    <plugin>
      <groupId>org.springframework.boot</groupId>
      <artifactId>spring-boot-maven-plugin</artifactId>
      <executions>
        <execution>
          <goals>
            <goal>build-info</goal>
          </goals>
        </execution>
      </executions>
    </plugin>
  </plugins>
</build>

重新构建并运行程序,再访问 /info 端点:

$ curl -s http://localhost:8080/actuator/info | jq
{
  "build": {
    "artifact": "demo",
    "name": "demo",
    "time": "2022-07-04T23:04:34.085Z",
    "version": "0.0.1-SNAPSHOT",
    "group": "com.example"
  }
}

显示环境配置

这个配置默认是关闭的,需要在配置文件中开启:

management.info.env.enabled=true

开启之后就可以在配置文件中添加 info. 开头的配置了。如果你使用的是 Maven 构建工具,你还可以在配置中使用 @...@ 来引用 Maven 的配置,这被称为 Maven 的自动配置展开

info.env.app.name=demo
info.env.app.encoding=@project.build.sourceEncoding@
info.env.app.java.source=@java.version@
info.env.app.java.target=@java.version@

你还可以在程序启动时,使用 -- 动态地注入配置:

$ java -jar .\target\demo-0.0.1-SNAPSHOT.jar --info.env.app.name=demo

查看 /info 端点的结果如下:

$ curl -s http://localhost:8080/actuator/info | jq
{
  "env": {
    "app": {
      "name": "demo",
      "encoding": "UTF-8",
      "java": {
        "source": "17.0.3",
        "target": "17.0.3"
      }
    }
  }
}

显示 Git 信息

/info 端点还可以显示 Git 的一些基本信息,只要在你的项目中包含了 git.properties 文件即可。这个文件可以通过 git-commit-id-maven-plugin 插件生成:

<build>
    <plugins>
        <plugin>
            <groupId>pl.project13.maven</groupId>
            <artifactId>git-commit-id-plugin</artifactId>
        </plugin>
    </plugins>
</build>

使用 /info 端点查看 Git 信息如下:

$ curl -s http://localhost:8080/actuator/info | jq
{
  "git": {
    "branch": "main",
    "commit": {
      "id": "61e8bd9",
      "time": "2022-07-04T00:12:32Z"
    }
  }
}

显示 Java 运行时信息

这个配置默认是关闭的,通过下面的配置开启:

management.info.java.enabled=true

查看 /info 端点的结果如下:

$ curl -s http://localhost:8080/actuator/info | jq
{
  "java": {
    "version": "11.0.8",
    "vendor": {
      "name": "Oracle Corporation",
      "version": "18.9"
    },
    "runtime": {
      "name": "Java(TM) SE Runtime Environment",
      "version": "11.0.8+10-LTS"
    },
    "jvm": {
      "name": "Java HotSpot(TM) 64-Bit Server VM",
      "vendor": "Oracle Corporation",
      "version": "11.0.8+10-LTS"
    }
  }
}

显示操作系统信息

这个配置默认是关闭的,通过下面的配置开启:

management.info.os.enabled=true

查看 /info 端点的结果如下:

$ curl -s http://localhost:8080/actuator/info | jq
{
  "os": {
    "name": "Windows 10",
    "version": "10.0",
    "arch": "amd64"
  }
}

自定义信息

Spring Boot Actuator 通过在 ApplicationContext 中查找所有实现了 InfoContributor 接口的 Bean 来收集应用信息,譬如上面介绍的几种应用信息分别是通过 BuildInfoContributorEnvironmentInfoContributorGitInfoContributorJavaInfoContributorOsInfoContributor 实现的。我们也可以自己实现 InfoContributor 接口,来暴露自定义的应用信息。下面是一个简单的示例:

@Component
public class TestInfoContributor implements InfoContributor {

    @Override
    public void contribute(Builder builder) {
        builder.withDetail("hello", "world");
    }
    
}

此时查看 /info 端点,可以看到下面的结果:

$ curl -s http://localhost:8080/actuator/info | jq
{
  "hello": "world"
}

Conditions Evaluation Report (conditions)

Spring Boot 使用 约定优于配置 的理念,采用包扫描和自动化配置的机制来加载依赖程序中的 Spring Bean。虽然这样做能让我们的代码变得非常简洁,但是整个应用的实例创建和依赖关系等信息都被离散到了各个配置类的注解上,这使得我们分析整个应用中资源和实例的各种关系变得非常的困难。

/conditions 端点可以用于排查程序中的配置类(@Configuration)或自动化配置类(@AutoConfiguration)是否生效的情况:

$ curl -s http://localhost:8080/actuator/conditions | jq
{
  "contexts": {
    "application": {
      "positiveMatches": {
        "AuditEventsEndpointAutoConfiguration": [
          {
            "condition": "OnAvailableEndpointCondition",
            "message": "@ConditionalOnAvailableEndpoint marked as exposed by a 'management.endpoints.jmx.exposure' property"
          }
        ],
        ...
      },
      "negativeMatches": {
        "RabbitHealthContributorAutoConfiguration": {
          "notMatched": [
            {
              "condition": "OnClassCondition",
              "message": "@ConditionalOnClass did not find required class 'org.springframework.amqp.rabbit.core.RabbitTemplate'"
            }
          ],
          "matched": []
        },
        ...
      },
      "unconditionalClasses": [
        "org.springframework.boot.autoconfigure.context.ConfigurationPropertiesAutoConfiguration",
        "org.springframework.boot.actuate.autoconfigure.availability.AvailabilityHealthContributorAutoConfiguration",
        "org.springframework.boot.actuate.autoconfigure.info.InfoContributorAutoConfiguration",
        "org.springframework.boot.autoconfigure.context.PropertyPlaceholderAutoConfiguration",
        "org.springframework.boot.autoconfigure.context.LifecycleAutoConfiguration",
        "org.springframework.boot.actuate.autoconfigure.health.HealthContributorAutoConfiguration",
        "org.springframework.boot.actuate.autoconfigure.metrics.integration.IntegrationMetricsAutoConfiguration",
        "org.springframework.boot.actuate.autoconfigure.endpoint.EndpointAutoConfiguration",
        "org.springframework.boot.autoconfigure.availability.ApplicationAvailabilityAutoConfiguration",
        "org.springframework.boot.autoconfigure.info.ProjectInfoAutoConfiguration",
        "org.springframework.boot.actuate.autoconfigure.web.server.ManagementContextAutoConfiguration"
      ]
    }
  }
}

返回结果较大,完整的返回结果在这里

返回结果里包括三大部分:positiveMatches 表示哪些配置条件是满足的,negativeMatches 表示哪些配置条件是不满足的,而 unconditionalClasses 表示无条件的配置类,这些配置无需满足什么条件就会自动加载。

Configuration Properties (configprops)

@ConfigurationProperties 是 Spring Boot 提供的读取配置文件的一个注解,它可以将 application.properties 配置文件中的值注入到 Bean 对象上。/configprops 端点用于显示程序中所有的 @ConfigurationProperties Bean 以及配置值(包括默认值):

$ curl -s http://localhost:8080/actuator/configprops | jq
{
  "contexts": {
    "application": {
      "beans": {
        "management.endpoints.web-org.springframework.boot.actuate.autoconfigure.endpoint.web.WebEndpointProperties": {
          "prefix": "management.endpoints.web",
          "properties": {
            "pathMapping": {},
            "exposure": {
              "include": [
                "*"
              ],
              "exclude": []
            },
            "basePath": "/actuator",
            "discovery": {
              "enabled": true
            }
          },
          "inputs": {
            "pathMapping": {},
            "exposure": {
              "include": [
                {
                  "value": "*",
                  "origin": "class path resource [application.properties] - 2:43"
                }
              ],
              "exclude": []
            },
            "basePath": {},
            "discovery": {
              "enabled": {}
            }
          }
        },
        ...
      },
      "parentId": null
    }
  }
}

返回结果较大,完整的返回结果在这里

从上面的结果可以看出,我们在配置文件中配置的 management.endpoints.web.exposure.include=* 实际上就对应的 org.springframework.boot.actuate.autoconfigure.endpoint.web.WebEndpointProperties 这个配置类里的属性。

Environment (env)

/env 端点用于展示应用程序的环境变量配置。Spring Boot 中的环境变量配置不仅包括了操作系统中的环境变量,而且还包括了配置文件中的配置,以及命令行中配置等。返回结果较大,这里是完整结果

$ curl -s http://localhost:8080/actuator/env | jq
{
  "activeProfiles": [],
  "propertySources": [
    {
      "name": "server.ports",
      "properties": {
        "local.server.port": {
          "value": 8080
        }
      }
    },
    {
      "name": "servletContextInitParams",
      "properties": {}
    },
    {
      "name": "systemProperties",
      "properties": {
        "sun.desktop": {
          "value": "windows"
        },
        ...
      }
    },
    {
      "name": "systemEnvironment",
      "properties": {
        "USERDOMAIN_ROAMINGPROFILE": {
          "value": "DESKTOP-CH85E4K",
          "origin": "System Environment Property \"USERDOMAIN_ROAMINGPROFILE\""
        },
        ...
      }
    },
    {
      "name": "Config resource 'class path resource [application.properties]' via location 'optional:classpath:/'",
      "properties": {
        "management.endpoints.web.exposure.include": {
          "value": "*",
          "origin": "class path resource [application.properties] - 2:43"
        },
        ...
      }
    }
  ]
}

Loggers (loggers)

/loggers 端点不仅可以查询我们在应用程序中所设置的日志等级,而且可以通过接口动态地进行修改,这在排查问题时非常有用。

下面是 /loggers 端点返回的部分结果:

$ curl -s http://localhost:8080/actuator/loggers | jq
{
  "levels": [
    "OFF",
    "ERROR",
    "WARN",
    "INFO",
    "DEBUG",
    "TRACE"
  ],
  "loggers": {
    "ROOT": {
      "configuredLevel": "INFO",
      "effectiveLevel": "INFO"
    },
    "com": {
      "configuredLevel": null,
      "effectiveLevel": "INFO"
    },
    "com.example": {
      "configuredLevel": null,
      "effectiveLevel": "INFO"
    },
    "com.example.demo": {
      "configuredLevel": null,
      "effectiveLevel": "INFO"
    },
    "com.example.demo.DemoApplication": {
      "configuredLevel": null,
      "effectiveLevel": "INFO"
    },
    "com.example.demo.TestHealthIndicator": {
      "configuredLevel": null,
      "effectiveLevel": "INFO"
    },
    ...
  },
  "groups": {
    "web": {
      "configuredLevel": null,
      "members": [
        "org.springframework.core.codec",
        "org.springframework.http",
        "org.springframework.web",
        "org.springframework.boot.actuate.endpoint.web",
        "org.springframework.boot.web.servlet.ServletContextInitializerBeans"
      ]
    },
    "sql": {
      "configuredLevel": null,
      "members": [
        "org.springframework.jdbc.core",
        "org.hibernate.SQL",
        "org.jooq.tools.LoggerListener"
      ]
    }
  }
}

也可以单独访问一个 logger:

$ curl -s http://localhost:8080/actuator/loggers/com.example.demo | jq
{
  "configuredLevel": null,
  "effectiveLevel": "INFO"
}

还可以使用 POST 请求来修改这个 logger 的日志等级,比如下面是一个例子,将 com.example.demo 的日志等级改为 DEBUG

$ curl -s -X POST -d '{"configuredLevel": "DEBUG"}' \
  -H "Content-Type: application/json" \
  http://localhost:8080/actuator/loggers/com.example.demo

如果在生产环境中,你想要打印一些 DEBUG 信息用于诊断程序的一些异常情况,你只需要使用这个方法修改日志等级,而不需要重启应用。如果想重置日志等级,将 configuredLevel 设置为 null 即可:

$ curl -s -X POST -d '{"configuredLevel": null}' \
  -H "Content-Type: application/json" \
  http://localhost:8080/actuator/loggers/com.example.demo

Heap Dump (heapdump)

访问 /heapdump 端点会自动生成一个 JVM 堆文件。

$ curl -O http://localhost:8080/actuator/heapdump
  % Total    % Received % Xferd  Average Speed   Time    Time     Time  Current
                                 Dload  Upload   Total   Spent    Left  Speed
100 30.9M  100 30.9M    0     0  85.5M      0 --:--:-- --:--:-- --:--:-- 85.5M

这个堆文件的格式取决于你所使用的 JVM,比如 HotSpot JVM 的 HPROF 格式,或者 OpenJ9 的 PHD 格式。我们可以使用 VisualVMMemory Analyzer(MAT) 等工具打开这个文件对内存进行分析。

visualvm.png

mat.png

Thread Dump (threaddump)

/threaddump 端点用于查看应用程序的所有线程情况,方便我们在日常工作中定位问题。主要展示了线程名、线程ID、线程状态、是否等待锁资源、线程堆栈等信息。

$ curl -s http://localhost:8080/actuator/threaddump | jq
{
  "threads": [
    {
      "threadName": "Reference Handler",
      "threadId": 2,
      "blockedTime": -1,
      "blockedCount": 3,
      "waitedTime": -1,
      "waitedCount": 0,
      "lockName": null,
      "lockOwnerId": -1,
      "lockOwnerName": null,
      "daemon": true,
      "inNative": false,
      "suspended": false,
      "threadState": "RUNNABLE",
      "priority": 10,
      "stackTrace": [
        {
          "classLoaderName": null,
          "moduleName": "java.base",
          "moduleVersion": "11.0.8",
          "methodName": "waitForReferencePendingList",
          "fileName": "Reference.java",
          "lineNumber": -2,
          "className": "java.lang.ref.Reference",
          "nativeMethod": true
        },
        {
          "classLoaderName": null,
          "moduleName": "java.base",
          "moduleVersion": "11.0.8",
          "methodName": "processPendingReferences",
          "fileName": "Reference.java",
          "lineNumber": 241,
          "className": "java.lang.ref.Reference",
          "nativeMethod": false
        },
        {
          "classLoaderName": null,
          "moduleName": "java.base",
          "moduleVersion": "11.0.8",
          "methodName": "run",
          "fileName": "Reference.java",
          "lineNumber": 213,
          "className": "java.lang.ref.Reference$ReferenceHandler",
          "nativeMethod": false
        }
      ],
      "lockedMonitors": [],
      "lockedSynchronizers": [],
      "lockInfo": null
    },
    ...
  ]
}

这里只显示了部分结果,完整的结果在这里

默认情况下,该端点的返回结果是 JSON 格式的,这对于程序来说比较友好,比如我们想开发一个线程分析程序,通过调用该接口就能拿到结构化的线程信息。不过这个格式看起来不太直观,如果返回的结果能和 jstack 的输出格式一样就好了,当然 Actuator 的开发人员也想到了这一点,实现起来也非常简单,只要在请求中加上 Accept: text/plain 头即可:

$ curl -s http://localhost:8080/actuator/threaddump -H 'Accept: text/plain'

Metrics (metrics)

Spring Boot Actuator 使用 Micrometer 来收集指标,收集的指标可以通过 /metrics 端点来查询,比如:JVM 内存、线程、垃圾回收、Tomcat 会话、CPU、进程等信息。

$ curl -s http://localhost:8080/actuator/metrics | jq
{
  "names": [
    "application.ready.time",
    "application.started.time",
    "disk.free",
    "disk.total",
    "executor.active",
    "executor.completed",
    "executor.pool.core",
    "executor.pool.max",
    "executor.pool.size",
    "executor.queue.remaining",
    "executor.queued",
    "http.server.requests",
    "jvm.buffer.count",
    "jvm.buffer.memory.used",
    "jvm.buffer.total.capacity",
    "jvm.classes.loaded",
    "jvm.classes.unloaded",
    "jvm.gc.live.data.size",
    "jvm.gc.max.data.size",
    "jvm.gc.memory.allocated",
    "jvm.gc.memory.promoted",
    "jvm.gc.overhead",
    "jvm.gc.pause",
    "jvm.memory.committed",
    "jvm.memory.max",
    "jvm.memory.usage.after.gc",
    "jvm.memory.used",
    "jvm.threads.daemon",
    "jvm.threads.live",
    "jvm.threads.peak",
    "jvm.threads.states",
    "logback.events",
    "process.cpu.usage",
    "process.start.time",
    "process.uptime",
    "system.cpu.count",
    "system.cpu.usage",
    "tomcat.sessions.active.current",
    "tomcat.sessions.active.max",
    "tomcat.sessions.alive.max",
    "tomcat.sessions.created",
    "tomcat.sessions.expired",
    "tomcat.sessions.rejected"
  ]
}

直接访问地址 /actuator/metrics 时,返回的只有指标名称,为了获取指标详情,需要在地址后面再加上指标名称,比如下面是查看应用的 process.cpu.usage 指标:

$ curl -s http://localhost:8080/actuator/metrics/process.cpu.usage | jq
{
  "name": "process.cpu.usage",
  "description": "The \"recent cpu usage\" for the Java Virtual Machine process",
  "baseUnit": null,
  "measurements": [
    {
      "statistic": "VALUE",
      "value": 0.151430864178387
    }
  ],
  "availableTags": []
}

监控系统一览

Actuator 不仅可以将指标通过 /metrics 端点暴露出来,而且还可以将指标转换成各种不同的监控系统的格式,集成不同的监控系统,实现监控和告警功能。集成方式很简单,只需要在 pom.xml 中添加 micrometer-registry-{system} 依赖即可,比如要集成 Promethues 监控,我们可以添加如下依赖:

<dependency>
    <groupId>io.micrometer</groupId>
    <artifactId>micrometer-registry-prometheus</artifactId>
</dependency>

Actuator 支持的监控系统如下:

具体配置可以参考 MicrometerActuator 的官方文档。

自定义指标

Micrometer 提供了一个 MeterRegistry 类,用于实现自定义指标。下面的例子定义了一个名叫 hello.counter 的计数器指标,并带有 app=demoTag,每当访问一次 /hello 页面,计数器就会加一:

@RestController
public class DemoController {

    private final MeterRegistry registry;
    public DemoController(MeterRegistry registry) {
        this.registry = registry;
    }

    @GetMapping("/hello")
    public String hello() {
        this.registry.counter("hello.counter", Tags.of("app", "demo")).increment();
        return "hello";
    }
}

访问一次 /hello 接口之后,然后再访问 /actuator/metrics/hello.counter,可以看到这个指标的信息:

$ curl -GET http://localhost:8080/actuator/metrics/hello.counter | jq
{
  "name": "hello.counter",
  "description": null,
  "baseUnit": null,
  "measurements": [
    {
      "statistic": "COUNT",
      "value": 1
    }
  ],
  "availableTags": [
    {
      "tag": "app",
      "values": [
        "demo"
      ]
    }
  ]
}

另外,如果你的指标依赖于另一个 Bean,推荐使用 MeterBinder 来构建指标:

@Configuration
public class DemoListConfiguration {
    
    @Bean
    public List<String> demoList() {
        return new ArrayList<>();
    }

    @Bean
    public MeterBinder demoListSize(List<String> demoList) {
        return (registry) -> Gauge.builder("list.size", demoList::size).register(registry);
    }
}

Mappings (mappings)

/mappings 端点用来返回应用中的所有 URI 路径,以及它们和控制器的映射关系:

$ curl -s http://localhost:8080/actuator/mappings | jq
{
  "contexts": {
    "application": {
      "mappings": {
        "dispatcherServlets": {
          "dispatcherServlet": [
            {
              "handler": "com.example.demo.DemoController#hello()",
              "predicate": "{GET [/hello]}",
              "details": {
                "handlerMethod": {
                  "className": "com.example.demo.DemoController",
                  "name": "hello",
                  "descriptor": "()Ljava/lang/String;"
                },
                "requestMappingConditions": {
                  "consumes": [],
                  "headers": [],
                  "methods": [
                    "GET"
                  ],
                  "params": [],
                  "patterns": [
                    "/hello"
                  ],
                  "produces": []
                }
              }
            },
            ...
          ]
        },
        "servletFilters": [
          {
            "servletNameMappings": [],
            "urlPatternMappings": [
              "/*"
            ],
            "name": "webMvcMetricsFilter",
            "className": "org.springframework.boot.actuate.metrics.web.servlet.WebMvcMetricsFilter"
          },
          {
            "servletNameMappings": [],
            "urlPatternMappings": [
              "/*"
            ],
            "name": "requestContextFilter",
            "className": "org.springframework.boot.web.servlet.filter.OrderedRequestContextFilter"
          },
          ...
        ],
        "servlets": [
          {
            "mappings": [
              "/"
            ],
            "name": "dispatcherServlet",
            "className": "org.springframework.web.servlet.DispatcherServlet"
          }
        ]
      },
      "parentId": null
    }
  }
}

从结果中可以看到应用程序都定义了哪些接口(包含了每个接口的地址,处理器,匹配条件等等),包括 Actuator 接口,列表有点长,这里是完整的结果

除此之外,还可以看到应用中定义了哪些 servlets,默认就只有一个 dispatcherServlet,以及有哪些 servletFilters,比如 requestContextFilterwebMvcMetricsFilter 等。

Shutdown (shutdown)

/shutdown 端点用于关闭程序,默认是不开放的,需要通过下面的配置打开:

management.endpoint.shutdown.enabled=true

开启后就可以向该端点发送 POST 请求来关闭程序了:

$ curl -s -X POST http://localhost:8080/actuator/shutdown
{"message":"Shutting down, bye..."}

自定义端点

有时候我们希望将应用程序的内部状态暴露出来,或对内部状态进行修改,这时我们就可以使用 Actuator 的自定义端点功能,通过 @Endpoint 注解即可以注册一个新端点:

@Endpoint(id = "test")
@Configuration
public class TestEndpoint {
    
    private final List<String> demoList;
    public TestEndpoint(List<String> demoList) {
        this.demoList = demoList;
    }

    @ReadOperation
    public List<String> getDemoList() {
        return this.demoList;
    }
}

可以看到我们在上面的方法上加了一个 @ReadOperation 注解,表示这个端点可以通过 GET 访问:

$ curl -s http://localhost:8080/actuator/test | jq

除此之外,也可以使用 @WriteOperation@DeleteOperation 注解,分别表示 POSTDELETE 请求。

使用 Spring Security 对端点进行安全保护

由于 Actuator 端点暴露出来的信息较为敏感,存在一定的安全风险,所以我们必须防止未经授权的外部访问。首先添加 Spring Security 依赖:

<dependency>
  <groupId>org.springframework.boot</groupId>
  <artifactId>spring-boot-starter-security</artifactId>
</dependency>

然后定义一个 SecurityFilterChain bean,对所有的 Actuator 端点开启认证,必须是 ACTUATOR_ADMIN 角色的用户才能访问,认证方式使用简单的 HTTP Basic 认证:

@Configuration
public class DemoSecurityConfiguration {
    
    @Bean
    public SecurityFilterChain securityFilterChain(HttpSecurity http) throws Exception {
        http.requestMatcher(EndpointRequest.toAnyEndpoint());
        http.authorizeRequests((requests) -> requests.anyRequest().hasRole("ACTUATOR_ADMIN"));
        http.httpBasic(withDefaults());
        return http.build();
    }
}

在配置文件中添加一个 ACTUATOR_ADMIN 角色的用户:

spring.security.user.name=admin
spring.security.user.password=admin
spring.security.user.roles=ACTUATOR_ADMIN

这样我们在访问 Actuator 端点时,必须输入用户名和密码(admin/admin)。

注意上面的代码中我们使用 http.requestMatcher(EndpointRequest.toAnyEndpoint()) 只对 Actuator 端点开启认证,应用程序的其他接口不受影响。如果要对其他接口开启认证,可以再定义一个 SecurityFilterChain bean 对其他接口进行配置。

通过 JMX 访问 Actuator 端点

Spring Boot Actuator 端点不仅可以通过 HTTP 接口访问,而且还可以通过 JMX 访问,我们运行 jconsole 连接我们的应用程序:

jconsole.png

在选项卡中选择 MBean,左侧会以树形显示应用程序中的所有 MBean,我们找到 org.springframework.boot 就可以看到暴露的 Endpoint 列表了:

jconsole-mbean.png

随便选择一个 Endpoint,再打开操作界面,然后就可以像调用方法一样访问端点了。

参考

  1. Production-ready Features
  2. Spring Boot Actuator Web API Documentation
  3. Spring Boot Actuator 模块 详解:健康检查,度量,指标收集和监控
  4. Spring Boot (十九):使用 Spring Boot Actuator 监控应用
  5. Spring Boot Actuator
  6. Building a RESTful Web Service with Spring Boot Actuator

更多

其他端点

除了 Actuator 的原生端点,还有一些特殊的端点,需要在特定的条件下才会有。

端点名称端点地址用途满足条件
Audit Events/auditeventsExposes audit events information for the current application.Requires an AuditEventRepository bean.
Caches/cachesExposes available caches.-
Flyway/flywayShows any Flyway database migrations that have been applied.Requires one or more Flyway beans.
HTTP Trace/httptraceDisplays HTTP trace information (by default, the last 100 HTTP request-response exchanges).Requires an HttpTraceRepository bean.
Spring Integration graph/integrationgraphShows the Spring Integration graph.Requires a dependency on spring-integration-core.
Liquibase/liquibaseShows any Liquibase database migrations that have been applied.Requires one or more Liquibase beans.
Log File/logfileProvides access to the contents of the application’s log file.Requires logging.file.name or logging.file.path to be set.
Prometheus/prometheusProvides Spring Boot application’s metrics in the format required for scraping by a Prometheus server.Requires a dependency on micrometer-registry-prometheus
Quartz/quartzProvides information about jobs and triggers that are managed by the Quartz Scheduler.Requires Quartz beans.
Scheduled Tasks/scheduledtasksDisplays the scheduled tasks in your application.-
Sessions/sessionsAllows retrieval and deletion of user sessions from a Spring Session-backed session store.Requires a servlet-based web application that uses Spring Session.
Application Startup/startupShows the startup steps data collected by the ApplicationStartup.Requires the SpringApplication to be configured with a BufferingApplicationStartup.
扫描二维码,在手机上阅读!

使用 Spring 项目脚手架

在我们的日常工作中,经常需要从头开始创建一个 Spring 项目,很多人的做法是,复制一份已有的项目,然后改目录名,改项目名,改包名,然后再把一些不要的文件删掉,只保留项目的基本框架。

实际上,这样操作后保留下来的基本框架代码就是 脚手架 代码,有很多的工具可以帮我们自动生成脚手架代码。

Maven Archetype

说起项目脚手架,我们最先想到的肯定是 Maven Archetype,在命令行中输入 mvn archetype:generate 进入交互模式,默认情况下会列出所有的 Archetype,这个清单可能非常长,让你不知道选哪个,可以通过 -Dfilter 参数进行过滤:

> mvn archetype:generate -Dfilter=org.apache.maven:
[INFO] Scanning for projects...
[INFO]
[INFO] ------------------< org.apache.maven:standalone-pom >-------------------
[INFO] Building Maven Stub Project (No POM) 1
[INFO] --------------------------------[ pom ]---------------------------------
[INFO]
[INFO] >>> maven-archetype-plugin:3.2.1:generate (default-cli) > generate-sources @ standalone-pom >>>
[INFO]
[INFO] <<< maven-archetype-plugin:3.2.1:generate (default-cli) < generate-sources @ standalone-pom <<<
[INFO]
[INFO]
[INFO] --- maven-archetype-plugin:3.2.1:generate (default-cli) @ standalone-pom ---
[INFO] Generating project in Interactive mode
[INFO] No archetype defined. Using maven-archetype-quickstart (org.apache.maven.archetypes:maven-archetype-quickstart:1.0)
Choose archetype:
1: remote -> org.apache.maven.archetypes:maven-archetype-archetype (An archetype which contains a sample archetype.)
2: remote -> org.apache.maven.archetypes:maven-archetype-j2ee-simple (An archetype which contains a simplified sample J2EE application.)
3: remote -> org.apache.maven.archetypes:maven-archetype-marmalade-mojo (-)
4: remote -> org.apache.maven.archetypes:maven-archetype-mojo (An archetype which contains a sample a sample Maven plugin.)
5: remote -> org.apache.maven.archetypes:maven-archetype-plugin (An archetype which contains a sample Maven plugin.)
6: remote -> org.apache.maven.archetypes:maven-archetype-plugin-site (An archetype which contains a sample Maven plugin site. This archetype can be layered upon an
    existing Maven plugin project.)
7: remote -> org.apache.maven.archetypes:maven-archetype-portlet (An archetype which contains a sample JSR-268 Portlet.)
8: remote -> org.apache.maven.archetypes:maven-archetype-profiles (-)
9: remote -> org.apache.maven.archetypes:maven-archetype-quickstart (An archetype which contains a sample Maven project.)
10: remote -> org.apache.maven.archetypes:maven-archetype-simple (An archetype which contains a simple Maven project.)
11: remote -> org.apache.maven.archetypes:maven-archetype-site (An archetype which contains a sample Maven site which demonstrates some of the supported document types like
    APT, XDoc, and FML and demonstrates how to i18n your site. This archetype can be layered
    upon an existing Maven project.)
12: remote -> org.apache.maven.archetypes:maven-archetype-site-simple (An archetype which contains a sample Maven site.)
13: remote -> org.apache.maven.archetypes:maven-archetype-site-skin (An archetype which contains a sample Maven Site Skin.)
14: remote -> org.apache.maven.archetypes:maven-archetype-webapp (An archetype which contains a sample Maven Webapp project.)
Choose a number or apply filter (format: [groupId:]artifactId, case sensitive contains): 9:

我们这边使用 -Dfilter=org.apache.maven: 过滤条件列出了 Maven 官方的 14 个 Archetype,系统默认会选中 maven-archetype-quickstart,这是官方推荐的 Maven 项目脚手架,然后我们需要选择版本号,并填写项目的 groupIdartifactIdversionpackage

Choose org.apache.maven.archetypes:maven-archetype-quickstart version:
1: 1.0-alpha-1
2: 1.0-alpha-2
3: 1.0-alpha-3
4: 1.0-alpha-4
5: 1.0
6: 1.1
7: 1.3
8: 1.4
Choose a number: 8:

Define value for property 'groupId': com.example
Define value for property 'artifactId': demo
Define value for property 'version' 1.0-SNAPSHOT: :
Define value for property 'package' com.example: :
Confirm properties configuration:
groupId: com.example
artifactId: demo
version: 1.0-SNAPSHOT
package: com.example
 Y: : Y
[INFO] ----------------------------------------------------------------------------
[INFO] Using following parameters for creating project from Archetype: maven-archetype-quickstart:1.4
[INFO] ----------------------------------------------------------------------------
[INFO] Parameter: groupId, Value: com.example
[INFO] Parameter: artifactId, Value: demo
[INFO] Parameter: version, Value: 1.0-SNAPSHOT
[INFO] Parameter: package, Value: com.example
[INFO] Parameter: packageInPathFormat, Value: com/example
[INFO] Parameter: package, Value: com.example
[INFO] Parameter: groupId, Value: com.example
[INFO] Parameter: artifactId, Value: demo
[INFO] Parameter: version, Value: 1.0-SNAPSHOT
[INFO] Project created from Archetype in dir: C:\Users\aneasystone\Desktop\demo
[INFO] ------------------------------------------------------------------------
[INFO] BUILD SUCCESS
[INFO] ------------------------------------------------------------------------
[INFO] Total time:  04:07 min
[INFO] Finished at: 2022-03-17T07:04:14+08:00
[INFO] ------------------------------------------------------------------------

这样,一个简单的 Maven 项目就生成了,生成的项目结构如下:

$ tree demo
demo
├── pom.xml
└── src
    ├── main
    │   └── java
    │       └── com
    │           └── example
    │               └── App.java
    └── test
        └── java
            └── com
                └── example
                    └── AppTest.java

当然,这个示例代码还是太简单了,我们希望能能自动生成一个 Spring Boot 项目的代码框架,好在 Spring 官方也提供了很多种不同的 Maven Archetype,通过 -Dfilter=org.springframework: 参数过滤下看看:

Choose archetype:
1: remote -> org.springframework.boot:spring-boot-sample-actuator-archetype (Spring Boot Actuator Sample)
2: remote -> org.springframework.boot:spring-boot-sample-actuator-log4j-archetype (Spring Boot Actuator Log4J Sample)
3: remote -> org.springframework.boot:spring-boot-sample-actuator-noweb-archetype (Spring Boot Actuator Non-Web Sample)
4: remote -> org.springframework.boot:spring-boot-sample-actuator-ui-archetype (Spring Boot Actuator UI Sample)
5: remote -> org.springframework.boot:spring-boot-sample-amqp-archetype (Spring Boot AMQP Sample)
6: remote -> org.springframework.boot:spring-boot-sample-aop-archetype (Spring Boot AOP Sample)
7: remote -> org.springframework.boot:spring-boot-sample-batch-archetype (Spring Boot Batch Sample)
8: remote -> org.springframework.boot:spring-boot-sample-data-jpa-archetype (Spring Boot Data JPA Sample)
9: remote -> org.springframework.boot:spring-boot-sample-data-mongodb-archetype (Spring Boot Data MongoDB Sample)
10: remote -> org.springframework.boot:spring-boot-sample-data-redis-archetype (Spring Boot Data Redis Sample)
11: remote -> org.springframework.boot:spring-boot-sample-data-rest-archetype (Spring Boot Data REST Sample)
12: remote -> org.springframework.boot:spring-boot-sample-integration-archetype (Spring Boot Integration Sample)
13: remote -> org.springframework.boot:spring-boot-sample-jetty-archetype (Spring Boot Jetty Sample)
14: remote -> org.springframework.boot:spring-boot-sample-profile-archetype (Spring Boot Profile Sample)
15: remote -> org.springframework.boot:spring-boot-sample-secure-archetype (Spring Boot Security Sample)
16: remote -> org.springframework.boot:spring-boot-sample-servlet-archetype (Spring Boot Servlet Sample)
17: remote -> org.springframework.boot:spring-boot-sample-simple-archetype (Spring Boot Simple Sample)
18: remote -> org.springframework.boot:spring-boot-sample-tomcat-archetype (Spring Boot Tomcat Sample)
19: remote -> org.springframework.boot:spring-boot-sample-traditional-archetype (Spring Boot Traditional Sample)
20: remote -> org.springframework.boot:spring-boot-sample-web-jsp-archetype (Spring Boot Web JSP Sample)
21: remote -> org.springframework.boot:spring-boot-sample-web-method-security-archetype (Spring Boot Web Method Security Sample)
22: remote -> org.springframework.boot:spring-boot-sample-web-secure-archetype (Spring Boot Web Secure Sample)
23: remote -> org.springframework.boot:spring-boot-sample-web-static-archetype (Spring Boot Web Static Sample)
24: remote -> org.springframework.boot:spring-boot-sample-web-ui-archetype (Spring Boot Web UI Sample)
25: remote -> org.springframework.boot:spring-boot-sample-websocket-archetype (Spring Boot WebSocket Sample)
26: remote -> org.springframework.boot:spring-boot-sample-xml-archetype (Spring Boot XML Sample)
27: remote -> org.springframework.osgi:spring-osgi-bundle-archetype (Spring OSGi Maven2 Archetype)
28: remote -> org.springframework.ws:spring-ws-archetype (Spring Web Services Maven2 Archetype.)

我们选择 spring-boot-sample-simple-archetype 就可以生成一个简单的 Spring Boot 项目,生成的项目结构如下:

$ tree demo
demo
├── build.gradle
├── pom.xml
└── src
    ├── main
    │   ├── java
    │   │   └── com
    │   │       └── example
    │   │           └── simple
    │   │               ├── SampleSimpleApplication.java
    │   │               └── service
    │   │                   └── HelloWorldService.java
    │   └── resources
    │       └── application.properties
    └── test
        ├── java
        │   └── com
        │       └── example
        │           └── simple
        │               ├── SampleSimpleApplicationTests.java
        │               └── SpringTestSampleSimpleApplicationTests.java
        └── resources
            └── application.properties

我们也可以不用交互模式,直接一行命令生成:

$ mvn archetype:generate \
     -DarchetypeGroupId=org.springframework.boot \
     -DarchetypeArtifactId=spring-boot-sample-simple-archetype \
     -DarchetypeVersion=1.0.2.RELEASE \
     -DgroupId=com.example \
     -DartifactId=demo \
     -Dversion=1.0.0-SNAPSHOT \
     -DinteractiveMode=false

除了官方的 Maven Archetype,网上还有很多人自己写的 Archetype,集成了一些常用的框架和工具,也值得尝试:

Spring Initializr

虽然使用 Maven Archetype 创建 Spring 项目非常简单,但是通过 Maven Archetype 生成的代码比较死板,如果想在生成的时候动态添加一些依赖,就需要手工去修改 pom.xml 文件了。Spring 官方提供了另一种创建项目的方式:Spring Initializr,下图是使用 Spring Initializr 生成项目脚手架代码的一个示例:

spring-initializr.png

在这个页面中,我们需要填写这些信息:

  • 项目类型

    • Maven
    • Gradle
  • 语言类型

    • Java
    • Kotlin
    • Groovy
  • Spring Boot 版本
  • 项目基本信息

    • Group
    • Artifact
    • Name
    • Description
    • Package name
    • Packaging
    • Java
  • 项目依赖

这里我选择的是 Maven 项目,语言类型为 Java,Spring Boot 版本为 2.6.4,项目基本信息为默认的 demo,打包方式为 jar,并添加了一个 Spring Web 依赖。生成的项目代码结构如下:

demo
├── HELP.md
├── mvnw
├── mvnw.cmd
├── pom.xml
└── src
    ├── main
    │   ├── java
    │   │   └── com
    │   │       └── example
    │   │           └── demo
    │   │               └── DemoApplication.java
    │   └── resources
    │       ├── application.properties
    │       ├── static
    │       └── templates
    └── test
        └── java
            └── com
                └── example
                    └── demo
                        └── DemoApplicationTests.java

按照 Spring Boot 快速入门教程,我们在 DemoApplication.java 里加几行代码:

package com.example.demo;

import org.springframework.boot.SpringApplication;
import org.springframework.boot.autoconfigure.SpringBootApplication;
import org.springframework.web.bind.annotation.GetMapping;
import org.springframework.web.bind.annotation.RequestParam;
import org.springframework.web.bind.annotation.RestController;

@SpringBootApplication
@RestController
public class DemoApplication {

    public static void main(String[] args) {
        SpringApplication.run(DemoApplication.class, args);
    }

    @GetMapping("/hello")
    public String hello(@RequestParam(value = "name", defaultValue = "World") String name) {
        return String.format("Hello %s!", name);
    }
}

至此一个简单的 Web 项目就完成了,然后执行 ./mvnw spring-boot:run 命令,第一次执行可能比较慢,这是在下载程序所需要的依赖,等启动结束后打开浏览器,访问 http://localhost:8080/hello 页面,就可以看到我们熟悉的 Hello World 了。

Spring Tool Suite

Spring Tool Suite 被简称为 STS,是 Spring 官方推出的一套用于方便开发 Spring 项目的工具集,它可以集成到几乎所有的 IDE 中,比如:Eclipse、VS Code 或 Theia IDE 等。

这里以 VS Code 为例,体验下使用 STS 快速创建 Spring 项目脚手架代码。首先在 VS Code 的插件市场搜索 Spring Boot Extension Pack

vscode-sts.png

可以看到 STS 是一套工具集,包含了:

  • Spring Boot Tools
  • Spring Boot Dashboard
  • Spring Initializr Java Support

如果我们只想体验 Spring Initializr 的功能,也可以只安装 Spring Initializr Java Support 这个插件即可。安装完成后,通过 Ctrl + Shift + P 打开命令面板,输入 Spring Initializr 按提示就可以快速创建一个 Spring 项目,放一张官方的动图:

Spring Boot CLI

Spring Boot CLI 的安装非常方便,我们可以直接从 Spring 仓库中下载 spring-boot-cli-2.6.4-bin.zip,将其解压到某个目录中,然后将 bin 目录添加到 PATH 环境变量。

使用 spring --version 验证 Spring Boot CLI 是否安装成功:

> spring --version
Spring CLI v2.6.4

Spring Boot CLI 可以用来执行 Groovy 脚本,也可以用来初始化新的 Spring 项目。下面是一个执行 Groovy 脚本的例子,首先创建一个文件 hello.groovy

@RestController
class ThisWillActuallyRun {
    @RequestMapping("/")
    String home() {
        "Hello World!"
    }
}

然后执行命令:

> spring run hello.groovy

这样,一个简单的 Web 项目就启动好了,Spring Boot CLI 会自动解析 Groovy 脚本中的依赖并运行,打开浏览器访问 http://localhost:8080 就看见我们熟悉的 Hello World 了。

下面是通过 Spring Boot CLI 初始化项目的例子:

> spring init --name demo \
    --artifact-id demo \
    --group-id com.example \
    --language java \
    --java-version 11 \
    --boot-version 2.6.4 \
    --type maven-project \
    --dependencies web \
    demo

这个命令和从 start.spring.io 上生成项目是完全一样的。可以通过 spring help init 了解各个参数的含义,每个参数都有默认值,所以你也可以直接使用 spring init demo 生成一个默认的示例项目。

参考

  1. Introduction to Archetypes
  2. Spring Quickstart Guide
  3. Spring Initializr Reference Guide
  4. Spring Boot Reference Documentation

更多

1. 创建自己的 Maven Archetype

2. Spring Initializr 支持的依赖一览

在 Spring Initializr 上创建项目时,可以手工添加项目依赖,支持的依赖列表如下(记住这些依赖,大多是 Spring 生态中必学必会的技术):

Developer Tools

  • Spring Native

    • Incubating support for compiling Spring applications to native executables using the GraalVM native-image compiler.
  • Spring Boot DevTools

    • Provides fast application restarts, LiveReload, and configurations for enhanced development experience.
  • Lombok

    • Java annotation library which helps to reduce boilerplate code.
  • Spring Configuration Processor

    • Generate metadata for developers to offer contextual help and "code completion" when working with custom configuration keys (ex.application.properties/.yml files).

Web

  • Spring Web

    • Build web, including RESTful, applications using Spring MVC. Uses Apache Tomcat as the default embedded container.
  • Spring Reactive Web

    • Build reactive web applications with Spring WebFlux and Netty.
  • Spring GraphQL

    • Build GraphQL applications with Spring GraphQL and GraphQL Java.
  • Rest Repositories

    • Exposing Spring Data repositories over REST via Spring Data REST.
  • Spring Session

    • Provides an API and implementations for managing user session information.
  • Rest Repositories HAL Explorer

    • Browsing Spring Data REST repositories in your browser.
  • Spring HATEOAS

    • Eases the creation of RESTful APIs that follow the HATEOAS principle when working with Spring / Spring MVC.
  • Spring Web Services

    • Facilitates contract-first SOAP development. Allows for the creation of flexible web services using one of the many ways to manipulate XML payloads.
  • Jersey

    • Framework for developing RESTful Web Services in Java that provides support for JAX-RS APIs.
  • Vaadin

    • A web framework that allows you to write UI in pure Java without getting bogged down in JS, HTML, and CSS.

Template Engines

  • Thymeleaf

    • A modern server-side Java template engine for both web and standalone environments. Allows HTML to be correctly displayed in browsers and as static prototypes.
  • Apache Freemarker

    • Java library to generate text output (HTML web pages, e-mails, configuration files, source code, etc.) based on templates and changing data.
  • Mustache

    • Logic-less Templates. There are no if statements, else clauses, or for loops. Instead there are only tags.
  • Groovy Templates

    • Groovy templating engine.

Security

  • Spring Security

    • Highly customizable authentication and access-control framework for Spring applications.
  • OAuth2 Client

    • Spring Boot integration for Spring Security's OAuth2/OpenID Connect client features.
  • OAuth2 Resource Server

    • Spring Boot integration for Spring Security's OAuth2 resource server features.
  • Spring LDAP

    • Makes it easier to build Spring based applications that use the Lightweight Directory Access Protocol.
  • Okta

    • Okta specific configuration for Spring Security/Spring Boot OAuth2 features. Enable your Spring Boot application to work with Okta via OAuth 2.0/OIDC.

SQL

  • JDBC API

    • Database Connectivity API that defines how a client may connect and query a database.
  • Spring Data JPA

    • Persist data in SQL stores with Java Persistence API using Spring Data and Hibernate.
  • Spring Data JDBC

    • Persist data in SQL stores with plain JDBC using Spring Data.
  • Spring Data R2DBC

    • Provides Reactive Relational Database Connectivity to persist data in SQL stores using Spring Data in reactive applications.
  • MyBatis Framework

    • Persistence framework with support for custom SQL, stored procedures and advanced mappings. MyBatis couples objects with stored procedures or SQL statements using a XML descriptor or annotations.
  • Liquibase Migration

    • Liquibase database migration and source control library.
  • Flyway Migration

    • Version control for your database so you can migrate from any version (incl. an empty database) to the latest version of the schema.
  • JOOQ Access Layer

    • Generate Java code from your database and build type safe SQL queries through a fluent API.
  • IBM DB2 Driver

    • A JDBC driver that provides access to IBM DB2.
  • Apache Derby Database

    • An open source relational database implemented entirely in Java.
  • H2 Database

    • Provides a fast in-memory database that supports JDBC API and R2DBC access, with a small (2mb) footprint. Supports embedded and server modes as well as a browser based console application.
  • HyperSQL Database

    • Lightweight 100% Java SQL Database Engine.
  • MariaDB Driver

    • MariaDB JDBC and R2DBC driver.
  • MS SQL Server Driver

    • A JDBC and R2DBC driver that provides access to Microsoft SQL Server and Azure SQL Database from any Java application.
  • MySQL Driver

    • MySQL JDBC and R2DBC driver.
  • Oracle Driver

    • A JDBC driver that provides access to Oracle.
  • PostgreSQL Driver

    • A JDBC and R2DBC driver that allows Java programs to connect to a PostgreSQL database using standard, database independent Java code.

NoSQL

  • Spring Data Redis (Access+Driver)

    • Advanced and thread-safe Java Redis client for synchronous, asynchronous, and reactive usage. Supports Cluster, Sentinel, Pipelining, Auto-Reconnect, Codecs and much more.
  • Spring Data Reactive Redis

    • Access Redis key-value data stores in a reactive fashion with Spring Data Redis.
  • Spring Data MongoDB

    • Store data in flexible, JSON-like documents, meaning fields can vary from document to document and data structure can be changed over time.
  • Spring Data Reactive MongoDB

    • Provides asynchronous stream processing with non-blocking back pressure for MongoDB.
  • Spring Data Elasticsearch (Access+Driver)

    • A distributed, RESTful search and analytics engine with Spring Data Elasticsearch.
  • Spring Data for Apache Cassandra

    • A free and open-source, distributed, NoSQL database management system that offers high-scalability and high-performance.
  • Spring Data Reactive for Apache Cassandra

    • Access Cassandra NoSQL Database in a reactive fashion.
  • Spring for Apache Geode

    • Apache Geode is a data management platform that helps users build real-time, highly concurrent, highly performant and reliable Spring Boot applications at scale that is compatible with Pivotal Cloud Cache.
  • Spring Data Couchbase

    • NoSQL document-oriented database that offers in memory-first architecture, geo-distributed deployments, and workload isolation.
  • Spring Data Reactive Couchbase

    • Access Couchbase NoSQL database in a reactive fashion with Spring Data Couchbase.
  • Spring Data Neo4j

    • An open source NoSQL database that stores data structured as graphs consisting of nodes, connected by relationships.

Messaging

  • Spring Integration

    • Adds support for Enterprise Integration Patterns. Enables lightweight messaging and supports integration with external systems via declarative adapters.
  • Spring for RabbitMQ

    • Gives your applications a common platform to send and receive messages, and your messages a safe place to live until received.
  • Spring for Apache Kafka

    • Publish, subscribe, store, and process streams of records.
  • Spring for Apache Kafka Streams

    • Building stream processing applications with Apache Kafka Streams.
  • Spring for Apache ActiveMQ 5

    • Spring JMS support with Apache ActiveMQ 'Classic'.
  • Spring for Apache ActiveMQ Artemis

    • Spring JMS support with Apache ActiveMQ Artemis.
  • WebSocket

    • Build WebSocket applications with SockJS and STOMP.
  • RSocket

    • RSocket.io applications with Spring Messaging and Netty.
  • Apache Camel

    • Apache Camel is an open source integration framework that empowers you to quickly and easily integrate various systems consuming or producing data.
  • Solace PubSub+

    • Connect to a Solace PubSub+ Advanced Event Broker to publish, subscribe, request/reply and store/replay messages

I/O

  • Spring Batch

    • Batch applications with transactions, retry/skip and chunk based processing.
  • Validation

    • Bean Validation with Hibernate validator.
  • Java Mail Sender

    • Send email using Java Mail and Spring Framework's JavaMailSender.
  • Quartz Scheduler

    • Schedule jobs using Quartz.
  • Spring cache abstraction

    • Provides cache-related operations, such as the ability to update the content of the cache, but does not provide the actual data store.
  • Picocli

    • Build command line applications with picocli.

Ops

  • Spring Boot Actuator

    • Supports built in (or custom) endpoints that let you monitor and manage your application - such as application health, metrics, sessions, etc.
  • Codecentric's Spring Boot Admin (Client)

    • Required for your application to register with a Codecentric's Spring Boot Admin Server instance.
  • Codecentric's Spring Boot Admin (Server)

    • A community project to manage and monitor your Spring Boot applications. Provides a UI on top of the Spring Boot Actuator endpoints.

Observability

  • Datadog

    • Publish Micrometer metrics to Datadog, a dimensional time-series SaaS with built-in dashboarding and alerting.
  • Influx

    • Publish Micrometer metrics to InfluxDB, a dimensional time-series server that support real-time stream processing of data.
  • Graphite

    • Publish Micrometer metrics to Graphite, a hierarchical metrics system backed by a fixed-size database.
  • New Relic

    • Publish Micrometer metrics to New Relic, a SaaS offering with a full UI and a query language called NRQL.
  • Prometheus

    • Expose Micrometer metrics in Prometheus format, an in-memory dimensional time series database with a simple built-in UI, a custom query language, and math operations.
  • Sleuth

    • Distributed tracing via logs with Spring Cloud Sleuth.
  • Wavefront

    • Publish Micrometer metrics to Tanzu Observability by Wavefront, a SaaS-based metrics monitoring and analytics platform that lets you visualize, query, and alert over data from across your entire stack.
  • Zipkin Client

    • Distributed tracing with an existing Zipkin installation and Spring Cloud Sleuth Zipkin.

Testing

  • Spring REST Docs

    • Document RESTful services by combining hand-written with Asciidoctor and auto-generated snippets produced with Spring MVC Test.
  • Testcontainers

    • Provide lightweight, throwaway instances of common databases, Selenium web browsers, or anything else that can run in a Docker container.
  • Contract Verifier

    • Moves TDD to the level of software architecture by enabling Consumer Driven Contract (CDC) development.
  • Contract Stub Runner

    • Stub Runner for HTTP/Messaging based communication. Allows creating WireMock stubs from RestDocs tests.
  • Embedded LDAP Server

    • Provides a platform neutral way for running a LDAP server in unit tests.
  • Embedded MongoDB Database

    • Provides a platform neutral way for running MongoDB in unit tests.

Spring Cloud

  • Cloud Bootstrap

    • Non-specific Spring Cloud features, unrelated to external libraries or integrations (e.g. Bootstrap context and @RefreshScope).
  • Function

    • Promotes the implementation of business logic via functions and supports a uniform programming model across serverless providers, as well as the ability to run standalone (locally or in a PaaS).
  • Task

    • Allows a user to develop and run short lived microservices using Spring Cloud. Run them locally, in the cloud, and on Spring Cloud Data Flow.

Spring Cloud Tools

  • Open Service Broker

    • Framework for building Spring Boot apps that implement the Open Service Broker API, which can deliver services to applications running within cloud native platforms such as Cloud Foundry, Kubernetes and OpenShift.

Spring Cloud Config

  • Config Client

    • Client that connects to a Spring Cloud Config Server to fetch the application's configuration.
  • Config Server

    • Central management for configuration via Git, SVN, or HashiCorp Vault.
  • Vault Configuration

    • Provides client-side support for externalized configuration in a distributed system. Using HashiCorp's Vault you have a central place to manage external secret properties for applications across all environments.
  • Apache Zookeeper Configuration

    • Enable and configure common patterns inside your application and build large distributed systems with Apache Zookeeper based components. The provided patterns include Service Discovery and Configuration.
  • Consul Configuration

    • Enable and configure the common patterns inside your application and build large distributed systems with Hashicorp’s Consul. The patterns provided include Service Discovery, Distributed Configuration and Control Bus.

Spring Cloud Discovery

  • Eureka Discovery Client

    • A REST based service for locating services for the purpose of load balancing and failover of middle-tier servers.
  • Eureka Server

    • spring-cloud-netflix Eureka Server.
  • Apache Zookeeper Discovery

    • Service discovery with Apache Zookeeper.
  • Cloud Foundry Discovery

    • Service discovery with Cloud Foundry.
  • Consul Discovery

    • Service discovery with Hashicorp Consul.

Spring Cloud Routing

  • Gateway

    • Provides a simple, yet effective way to route to APIs and provide cross cutting concerns to them such as security, monitoring/metrics, and resiliency.
  • OpenFeign

    • Declarative REST Client. OpenFeign creates a dynamic implementation of an interface decorated with JAX-RS or Spring MVC annotations.
  • Cloud LoadBalancer

    • Client-side load-balancing with Spring Cloud LoadBalancer.

Spring Cloud Circuit Breaker

  • Resilience4J

    • Spring Cloud Circuit breaker with Resilience4j as the underlying implementation.

Spring Cloud Messaging

  • Cloud Bus

    • Links nodes of a distributed system with a lightweight message broker which can used to broadcast state changes or other management instructions (requires a binder, e.g. Apache Kafka or RabbitMQ).
  • Cloud Stream

    • Framework for building highly scalable event-driven microservices connected with shared messaging systems (requires a binder, e.g. Apache Kafka, RabbitMQ or Solace PubSub+).

VMware Tanzu Application Service

  • Config Client (TAS)

    • Config client on VMware Tanzu Application Service.
  • Service Registry (TAS)

    • Eureka service discovery client on VMware Tanzu Application Service.

Microsoft Azure

  • Azure Support

    • Auto-configuration for Azure Services (Service Bus, Storage, Active Directory, Key Vault, and more).
  • Azure Active Directory

    • Spring Security integration with Azure Active Directory for authentication.
  • Azure Cosmos DB

    • Fully managed NoSQL database service for modern app development, including Spring Data support.
  • Azure Key Vault

    • Manage application secrets.
  • Azure Storage

    • Azure Storage service integration.

Google Cloud Platform

  • GCP Support

    • Contains auto-configuration support for every Spring Cloud GCP integration. Most of the auto-configuration code is only enabled if other dependencies are added to the classpath.
  • GCP Messaging

    • Adds the GCP Support entry and all the required dependencies so that the Google Cloud Pub/Sub integration work out of the box.
  • GCP Storage

    • Adds the GCP Support entry and all the required dependencies so that the Google Cloud Storage integration work out of the box.

3. 实现自己的 Spring Initializr

Spring Initializr 是一个完全开源的项目,我们可以通过它实现自己的代码脚手架。上面所介绍的 start.spring.io、STS 和 Spring Boot CLI 其实都是通过 Spring Initializr 来实现的,源码如下:

# git clone https://github.com/spring-io/initializr
# git clone https://github.com/spring-io/start.spring.io

另外,阿里的知行动手实验室也基于 Spring Initializr 做了一个类似于 start.spring.io 的脚手架生成站点 start.aliyun.com,在依赖列表中新增了阿里的一些开源项目,而且还提供了常见的几种应用架构的代码示例,有兴趣的同学可以体验下。

4. mvnw 设置代理

直接使用 mvn 命令构建项目时,可以通过 Maven 的配置文件 ~/.m2/settings.xml 来配置代理服务器,如下:

  <proxies>
    <proxy>
      <id>optional</id>
      <active>true</active>
      <protocol>http</protocol>
      <host>localhost</host>
      <port>10809</port>
    </proxy>
  </proxies>

但是使用 mvnw 时,它会自动下载 Maven 并执行而不会使用 settings.xml 中的 Maven 配置。这时我们可以通过 MAVEN_OPTS 环境变量来设置代理:

export MAVEN_OPTS="-Dhttp.proxyHost=127.0.0.1 -Dhttp.proxyPort=10809 -Dhttps.proxyHost=127.0.0.1 -Dhttps.proxyPort=10809"

或者在 .mvn 目录下新建一个 jvm.config 文件:

-Dhttp.proxyHost=127.0.0.1
-Dhttp.proxyPort=10809
-Dhttps.proxyHost=127.0.0.1
-Dhttps.proxyPort=10809
扫描二维码,在手机上阅读!