Fork me on GitHub

2023年9月

使用 Arthas 排查线上问题

Arthas 是阿里开源的一款 Java 应用诊断工具,可以在线排查问题,动态跟踪 Java 代码,以及实时监控 JVM 状态。这个工具的大名我早有耳闻,之前一直听别人推荐,却没有使用过。最近在线上遇到了一个问题,由于开发人员在异常处理时没有将线程堆栈打印出来,只是简单地抛出了一个系统错误,导致无法确定异常的具体来源;因为是线上环境,如果要修改代码重新发布,流程会非常漫长,所以只能通过分析代码来定位,正当我看着繁复的代码一筹莫展的时候,突然想到了 Arthas 这个神器,于是尝试着使用 Arthas 来排查这个问题,没想到轻松几步就定位到了原因,上手非常简单,着实让我很吃惊。正所谓 “工欲善其事,必先利其器”,这话果真不假,于是事后花了点时间对 Arthas 的各种用法学习了一番,此为总结。

快速入门

如果你处于联网环境,可以直接使用下面的命令下载并运行 Arthas:

$ wget https://arthas.aliyun.com/arthas-boot.jar
$ java -jar arthas-boot.jar

程序会显示出系统中所有正在运行的 Java 进程,Arthas 为每个进程分配了一个序号:

[INFO] JAVA_HOME: C:\Program Files\Java\jdk1.8.0_351\jre
[INFO] arthas-boot version: 3.7.1
[INFO] Found existing java process, please choose one and input the serial number of the process, eg : 1. Then hit ENTER.
* [1]: 9400 .\target\demo-0.0.1-SNAPSHOT.jar
  [2]: 13964 org.eclipse.equinox.launcher_1.6.500.v20230717-2134.jar
  [3]: 6796 org.springframework.ide.vscode.boot.app.BootLanguageServerBootApp

从这个列表中找到出问题的那个 Java 进程,并输入相应的序号,比如这里我输入 1,然后按下回车,Arthas 就会自动下载完整的包,并 Attach 到目标进程,输出如下:

[INFO] Start download arthas from remote server: https://arthas.aliyun.com/download/3.7.1?mirror=aliyun
[INFO] Download arthas success.
[INFO] arthas home: C:\Users\aneasystone\.arthas\lib\3.7.1\arthas
[INFO] Try to attach process 9400
[INFO] Attach process 9400 success.
[INFO] arthas-client connect 127.0.0.1 3658
  ,---.  ,------. ,--------.,--.  ,--.  ,---.   ,---.  
 /  O  \ |  .--. ''--.  .--'|  '--'  | /  O  \ '   .-' 
|  .-.  ||  '--'.'   |  |   |  .--.  ||  .-.  |`.  `-. 
|  | |  ||  |\  \    |  |   |  |  |  ||  | |  |.-'    |
`--' `--'`--' '--'   `--'   `--'  `--'`--' `--'`-----' 

wiki       https://arthas.aliyun.com/doc
tutorials  https://arthas.aliyun.com/doc/arthas-tutorials.html
version    3.7.1
main_class
pid        9400                                                                 
time       2023-09-06 07:16:31

[arthas@9400]$

下载的 Arthas 包位于 ~/.arthas 目录,如果你没有联网,需要提前下载完整的包。

Arthas 偶尔会出现 Attach 不上目标进程的情况,可以查看 ~/logs/arthas 目录下的日志进行排查。

查看所有命令

使用 help 可以查看 Arthas 支持的 所有子命令

[arthas@9400]$ help
 NAME         DESCRIPTION
 help         Display Arthas Help
 auth         Authenticates the current session
 keymap       Display all the available keymap for the specified connection.
 sc           Search all the classes loaded by JVM
 sm           Search the method of classes loaded by JVM
 classloader  Show classloader info
 jad          Decompile class
 getstatic    Show the static field of a class
 monitor      Monitor method execution statistics, e.g. total/success/failure count, average rt, fail rate, etc.
 stack        Display the stack trace for the specified class and method
 thread       Display thread info, thread stack
 trace        Trace the execution time of specified method invocation.
 watch        Display the input/output parameter, return object, and thrown exception of specified method invocation
 tt           Time Tunnel
 jvm          Display the target JVM information
 memory       Display jvm memory info.
 perfcounter  Display the perf counter information.
 ognl         Execute ognl expression.
 mc           Memory compiler, compiles java files into bytecode and class files in memory.
 redefine     Redefine classes. @see Instrumentation#redefineClasses(ClassDefinition...)
 retransform  Retransform classes. @see Instrumentation#retransformClasses(Class...)
 dashboard    Overview of target jvm's thread, memory, gc, vm, tomcat info.
 dump         Dump class byte array from JVM
 heapdump     Heap dump
 options      View and change various Arthas options
 cls          Clear the screen
 reset        Reset all the enhanced classes
 version      Display Arthas version
 session      Display current session information
 sysprop      Display and change the system properties.
 sysenv       Display the system env.
 vmoption     Display, and update the vm diagnostic options.
 logger       Print logger info, and update the logger level
 history      Display command history
 cat          Concatenate and print files
 base64       Encode and decode using Base64 representation
 echo         write arguments to the standard output
 pwd          Return working directory name
 mbean        Display the mbean information
 grep         grep command for pipes.
 tee          tee command for pipes.
 profiler     Async Profiler. https://github.com/jvm-profiling-tools/async-profiler
 vmtool       jvm tool
 stop         Stop/Shutdown Arthas server and exit the console.

这些命令根据功能大抵可以分为以下几类:

  • 与 JVM 相关的命令
  • 与类加载、类、方法相关的命令
  • 统计和观测命令
  • 类 Linux 命令
  • 其他命令

与 JVM 相关的命令

这些命令主要与 JVM 相关,用于查看或修改 JVM 的相关属性,查看 JVM 线程、内存、CPU、GC 等信息:

  • jvm - 查看当前 JVM 的信息;
  • sysenv - 查看 JVM 的环境变量;
  • sysprop - 查看 JVM 的系统属性;
  • vmoption - 查看或修改 JVM 诊断相关的参数;
  • memory - 查看 JVM 的内存信息;
  • heapdump - 将 Java 进程的堆快照导出到某个文件中,方便我们对堆内存进行分析;
  • thread - 查看所有线程的信息,包括线程名称、线程组、优先级、线程状态、CPU 使用率、堆栈信息等;
  • dashboard - 查看当前系统的实时数据面板,包括了线程、内存、GC 和 Runtime 等信息;可以把它看成是 threadmemoryjvmsysenvsysprop 几个命令的综合体;
  • perfcounter - 查看当前 JVM 的 Perf Counter 信息;
  • logger - 查看应用日志信息,支持动态更新日志级别;
  • mbean - 查看或实时监控 Mbean 的信息;
  • vmtool - 利用 JVMTI 接口,实现查询内存对象,强制 GC 等功能;

与类加载、类、方法相关的命令

这些命令主要与类加载、类或方法相关,比如在 JVM 中搜索类或类的方法,查看类的静态属性,编译或反编译,对类进行热更新等:

  • classloader - 查看 JVM 中所有的 Classloader 信息;
  • dump - 将指定类导出成 .class 字节码文件;
  • jad - 将指定类反编译成 Java 源码;
  • mc - 内存编译器,将 Java 源码编译成 .class 字节码文件;
  • redefine / retransform - 这两个命令都可以对已加载的类进行热更新,但是 redefinejad / watch / trace / monitor / tt 等命令会冲突,而且 redefine 后的原来的类不能恢复,所以推荐使用 retransform 命令,关于 JDK 中 Redefine 和 Retransform 机制的区别可以参考 这里
  • sc - Search Class,搜索 JVM 中的类;
  • sm - Search Method,搜索 JVM 中的类的方法;
  • getstatic - 查看类的静态属性;
  • ognl - 执行 ognl 表达式;ognl 非常灵活,可以实现很多功能,比如上面的查看或修改系统属性,查看类的静态属性都可以通过 ognl 实现;

统计和观测

这些命令可以对类方法的执行情况进行统计和监控,是排查线上问题的利器:

  • monitor - 对给定的类方法进行监控,统计其调用次数,调用耗时以及成功率等;
  • stack - 查看一个方法的执行调用堆栈;
  • trace - 对给定的类方法进行监控,输出该方法的调用耗时,和 monitor 的区别在于,它还能跟踪一级方法的调用链路和耗时,帮助快速定位性能问题;
  • watch - 观测指定方法的执行数据,包括方法的入参、返回值、抛出的异常等;
  • tt - 和 watch 命令一样,tt 也可以观测指定方法的执行数据,但 tt 是将每次的执行情况都记录下来,然后再针对每次调用进行排查和分析,所以叫做 Time Tunnel;
  • reset - 上面这些与统计观测相关的命令都是通过 字节码增强技术 来实现的,会在指定类的方法中插入一些切面代码,因此在生产环境诊断结束后,记得执行 reset 命令重置增强过的类(或执行 stop 命令);
  • profiler - 使用 async-profiler 对应用采样,并将采样结果生成火焰图;
  • jfr - 动态开启关闭 JFR 记录,生成的 jfr 文件可以通过 JDK Mission Control 进行分析;

Arthas 命令与 JDK 工具的对比

细数 JDK 自带的那些调试和诊断工具 这篇笔记中我总结了很多 JDK 自带的诊断工具,其实有很多 Arthas 命令和那些 JDK 工具的功能是类似的,只是 Arthas 在输出格式上做了优化,让输出的内容更加美观和易读,而且在功能上做了增强。

Arthas 命令JDK 工具对比
syspropjinfo -sysprops都可以查看 JVM 的系统属性,但是 syspropjinfo 强的是,它还能修改系统属性
vmoptionjinfo -flag都可以查看 JVM 参数,但是 vmoption 只显示诊断相关的参数,比如 HeapDumpOnOutOfMemoryErrorPrintGC
memoryjmap -heap都可以查看 JVM 的内存信息,但是 memory 以表格形式显示,方便用户阅读
heapdumpjmap -dump都可以导出进程的堆内存,只是它在使用上更加简洁
threadjstack都可以列出 JVM 的所有线程,但是 thread 以表格形式显示,方便用户阅读,而且增加了 CPU 使用率的功能,可以方便我们快速找出当前最忙的线程
perfcounterjcmd PerfCounter.print都可以查看 JVM 进程的性能统计信息
classloaderjmap -clstats都可以查看 JVM 的 Classloader 统计信息,但是 classloader 命令还支持以树的形式查看,另外它还支持查看每个 Classloader 实际的 URL,通过 Classloader 查找资源等
jfrjcmd JFR.start都可以开启或关闭 JFR 记录,并生成的 jfr 文件

类 Linux 命令

除了上面那些用于问题诊断的命令,Arthas 还提供了一些类 Linux 命令,方便我们在 Arthas 终端中使用,比如:

  • base64 - 执行 base64 编码和解码;
  • cat - 打印文件内容;
  • cls - 清空当前屏幕区域;
  • echo - 打印参数;
  • grep - 使用字符串或正则表达式搜索文本,并输出匹配的行;
  • history - 输出历史命令;
  • pwd - 输出当前的工作目录;
  • tee - 从 stdin 读取数据,并同时输出到 stdout 和文件;
  • wc - 暂时只支持 wc -l,统计输出的行数;

此外,Arthas 还支持在后台运行任务,仿照 Linux 中的相关命令,我们可以使用 & 在后台运行任务,使用 jobs 列出所有后台任务,使用 Ctrl + Z 暂停任务,使用 bgfg 将暂停的任务转到后台或前台继续运行,使用 kill 终止任务。具体内容可以参考 Arthas 后台异步任务

其他命令

还有一些与 Arthas 本身相关的命令,比如查看 Arthas 的版本号、配置、会话等信息:

  • version - 查看 Arthas 版本号;
  • options - 查看或修改 Arthas 全局配置;
  • keymap - 查看当前所有绑定的快捷键,可以通过 ~/.arthas/conf/inputrc 文件自定义快捷键;
  • session - 查看当前会话信息;
  • auth - 验证当前会话;
  • quit - 退出当前 Arthas 客户端,其他 Arthas 客户端不受影响;
  • stop - 关闭 Arthas 服务端,所有 Arthas 客户端全部退出;这个命令会重置掉所有的增强类(除了 redefine 的类);

线上问题排查

了解了 Arthas 的命令之后,接下来总结一些使用 Arthas 对常见问题的排查思路。

使用 watch 监听方法出入参和异常

相信不少人见过类似下面这样的代码,在遇到异常情况时直接返回系统错误,而没有将异常信息和堆栈打印出来:

@PostMapping("/add")
public String add(@RequestBody DemoAdd demoAdd) {
  try {
    Integer result = demoService.add(demoAdd);
    return String.valueOf(result);
  } catch (Exception e) {
    return "系统错误!";
  }
}

有时候只打印了异常信息 e.getMessage(),但是一看日志全是 NullPointerException,一旦出现异常,根本不知道是哪行代码出了问题。这时,Arthas 的 watch 命令就可以派上用场了:

$ watch com.example.demo.service.DemoService add -x 2
Press Q or Ctrl+C to abort.
Affect(class count: 1 , method count: 1) cost in 143 ms, listenerId: 1

我们对 demoService.add() 方法进行监听,当遇到正常请求时:

$ curl -X POST -H "Content-Type: application/json" -d '{"x":1,"y":2}' http://localhost:8080/add
3

watch 的输出如下:

method=com.example.demo.service.DemoService.add location=AtExit
ts=2023-09-11 08:00:46; [cost=1.4054ms] result=@ArrayList[
    @Object[][
        @DemoAdd[DemoAdd(x=1, y=2)],
    ],
    @DemoService[
    ],
    @Integer[3],
]

location=AtExit 表示这个方法正常结束,result 表示方法在结束时的变量值,默认只监听方法的入参、方法所在的实例对象、以及方法的返回值。

当遇到异常请求时:

$ curl -X POST -H "Content-Type: application/json" -d '{"x":1}' http://localhost:8080/add
系统错误!

watch 的输出如下:

method=com.example.demo.service.DemoService.add location=AtExceptionExit
ts=2023-09-11 08:05:20; [cost=0.1402ms] result=@ArrayList[
    @Object[][
        @DemoAdd[DemoAdd(x=1, y=null)],
    ],
    @DemoService[
    ],
    null,
]

可以看到 location=AtExceptionExit 表示这个方法抛出了异常,同样地,result 默认只监听方法的入参、方法所在的实例对象、以及方法的返回值。那么能不能拿到具体的异常信息呢?当然可以,通过自定义观察表达式可以轻松实现。

默认情况下,watch 命令使用的观察表达式为 {params, target, returnObj},所以输出结果里并没有异常信息,我们将观察表达式改为 {params, target, returnObj, throwExp} 重新监听:

$ watch com.example.demo.service.DemoService add "{params, target, returnObj, throwExp}" -x 2

此时就可以输出具体的异常信息了:

method=com.example.demo.service.DemoService.add location=AtExceptionExit
ts=2023-09-11 08:11:19; [cost=0.0961ms] result=@ArrayList[
    @Object[][
        @DemoAdd[DemoAdd(x=1, y=null)],
    ],
    @DemoService[
    ],
    null,
    java.lang.NullPointerException
        at com.example.demo.service.DemoService.add(DemoService.java:11)
        at com.example.demo.controller.DemoController.add(DemoController.java:20)
    ,
]

观察表达式其实是一个 ognl 表达式,可以观察的维度也比较多,参考 表达式核心变量

从上面的例子可以看到,使用 watch 命令有一个很不方便的地方,我们需要提前写好观察表达式,当忘记写表达式或表达式写得不对时,就有可能没有监听到我们的调用,或者虽然监听到调用却没有得到我们想要的内容,这样我们就得反复调试。所以 Arthas 又推出了一个 tt 命令,名为 时空隧道(Time Tunnel)

使用 tt 命令时大多数情况下不用太关注观察表达式,直接监听类方法即可:

$ tt -t com.example.demo.service.DemoService add

tt 会自动地将所有调用都保存下来,直到用户按下 Ctrl+C 结束监听;注意如果方法的调用非常频繁,记得用 -n 参数限制记录的次数,防止记录太多导致内存爆炸:

$ tt -t com.example.demo.service.DemoService add -n 10

当监听结束后,使用 -l 参数查看记录列表:

$ tt -l
 INDEX  TIMESTAMP            COST(ms)  IS-RET  IS-EXP  OBJECT       CLASS                    METHOD                   
------------------------------------------------------------------------------------------------------------
 1000   2023-09-15 07:51:10  0.8111     true   false  0x62726348   DemoService              add
 1001   2023-09-15 07:51:16  0.1017     false  true   0x62726348   DemoService              add

其中 INDEX 列非常重要,我们可以使用 -i 参数指定某条记录查看它的详情:

$ tt -i 1000
 INDEX          1000
 GMT-CREATE     2023-09-15 07:51:10
 COST(ms)       0.8111
 OBJECT         0x62726348
 CLASS          com.example.demo.service.DemoService
 METHOD         add
 IS-RETURN      true
 IS-EXCEPTION   false
 PARAMETERS[0]  @DemoAdd[
                    x=@Integer[1],
                    y=@Integer[2],
                ]
 RETURN-OBJ     @Integer[3]
Affect(row-cnt:1) cost in 0 ms.

从输出中可以看到方法的入参和返回值,如果方法有异常,异常信息也不会丢了:

$ tt -i 1001
 INDEX            1001                                                                                      
 GMT-CREATE       2023-09-15 07:51:16
 COST(ms)         0.1017
 OBJECT           0x62726348
 CLASS            com.example.demo.service.DemoService                                                      
 METHOD           add
 IS-RETURN        false
 IS-EXCEPTION     true
 PARAMETERS[0]    @DemoAdd[
                      x=@Integer[1],                                                                        
                      y=null,
                  ]
                        at com.example.demo.service.DemoService.add(DemoService.java:21)
                        at com.example.demo.controller.DemoController.add(DemoController.java:21)
                        ...
Affect(row-cnt:1) cost in 13 ms.

tt 命令记录了所有的方法调用,方便我们回溯,所以被称为时空隧道,而且,由于它保存了当时调用的所有现场信息,所以我们还可以主动地对一条历史记录进行重做,这在复现某些不常见的 BUG 时非常有用:

$ tt -i 1000 -p
 RE-INDEX       1000
 GMT-REPLAY     2023-09-15 07:52:31
 OBJECT         0x62726348
 CLASS          com.example.demo.service.DemoService
 METHOD         add
 PARAMETERS[0]  @DemoAdd[
                    x=@Integer[1],
                    y=@Integer[2],
                ]
 IS-RETURN      true
 IS-EXCEPTION   false
 COST(ms)       0.1341
 RETURN-OBJ     @Integer[3]
Time fragment[1000] successfully replayed 1 times.

另外,由于 tt 保存了当前环境的对象引用,所以我们甚至可以通过这个对象引用来调用它的方法:

$ tt -i 1000 -w 'target.properties()' -x 2
@DemoProperties[
    title=@String[demo title],
]
Affect(row-cnt:1) cost in 148 ms.

使用 logger 动态更新日志级别

Spring Boot 生产就绪特性 Actuator 这篇笔记中,我们学习过 Spring Boot Actuator 内置了一个 /loggers 端点,可以查看或修改 logger 的日志等级,比如下面这个 POST 请求将 com.example.demo 的日志等级改为 DEBUG

$ curl -s -X POST -d '{"configuredLevel": "DEBUG"}' \
  -H "Content-Type: application/json" \
  http://localhost:8080/actuator/loggers/com.example.demo

使用这种方法修改日志级别可以不重启目标程序,这在线上问题排查时非常有用,但是有时候我们会遇到一些没有开启 Actuator 功能的 Java 程序,这时就可以使用 Arthas 的 logger 命令,实现类似的效果。

直接输入 logger 命令,查看程序所有的 logger 信息:

$ logger
 name                    ROOT
 class                   ch.qos.logback.classic.Logger
 classLoader             org.springframework.boot.loader.LaunchedURLClassLoader@6433a2
 classLoaderHash         6433a2
 level                   INFO
 effectiveLevel          INFO
 additivity              true
 codeSource              jar:file:/D:/demo/target/demo-0.0.1-SNAPSHOT.jar!/BOOT
                         -INF/lib/logback-classic-1.2.10.jar!/
 appenders               name            CONSOLE
                         class           ch.qos.logback.core.ConsoleAppender
                         classLoader     org.springframework.boot.loader.LaunchedURLClassLoader@6433a2
                         classLoaderHash 6433a2
                         target          System.out

默认情况下只会打印有 appender 的 logger 信息,可以加上 --include-no-appender 参数打印所有的 logger 信息,不过这个输出会很长,通常使用 -n 参数打印指定 logger 的信息:

$ logger -n com.example.demo
 name                    com.example.demo
 class                   ch.qos.logback.classic.Logger
 classLoader             org.springframework.boot.loader.LaunchedURLClassLoader@6433a2
 classLoaderHash         6433a2
 level                   null
 effectiveLevel          INFO
 additivity              true
 codeSource              jar:file:/D:/demo/target/demo-0.0.1-SNAPSHOT.jar!/BOOT 
                         -INF/lib/logback-classic-1.2.10.jar!/

可以看到 com.example.demo 的日志级别是 null,说明并没有设置,我们可以使用 -l 参数来修改它:

$ logger -n com.example.demo -l debug
Update logger level fail. Try to specify the classloader with the -c option. 
Use `sc -d CLASSNAME` to find out the classloader hashcode.

需要注意的是,默认情况下,logger 命令会在 SystemClassloader 下执行,如果应用是传统的 war 应用,或者是 Spring Boot 的 fat jar 应用,那么需要指定 classloader。在上面执行 logger -n 时,输出中的 classLoader 和 classLoaderHash 这两行很重要,我们可以使用 -c <classLoaderHash> 来指定 classloader:

$ logger -n com.example.demo -l debug -c 6433a2
Update logger level success.

也可以直接使用 --classLoaderClass <classLoader> 来指定 classloader:

$ logger -n com.example.demo -l debug --classLoaderClass org.springframework.boot.loader.LaunchedURLClassLoader
Update logger level success.

使用 ognl 查看系统属性和应用配置

有时候我们会在线上环境遇到一些莫名奇妙的问题:比如明明数据库地址配置得好好的,但是程序却报数据库连接错误;又或者明明在配置中心对配置进行了修改,但是程序中却似乎始终不生效;这时我们不确定到底是程序本身逻辑的问题,还是程序没有加载到正确的配置,如果能将程序加载的配置信息打印出来,这个问题就很容易排查了。

如果程序使用了 System.getenv() 来获取环境变量,我们可以使用 sysenv 来进行确认:

$ sysenv JAVA_HOME
 KEY                          VALUE 
---------------------------------------------------------------
 JAVA_HOME                    C:\Program Files\Java\jdk1.8.0_351

如果程序使用了 System.getProperties() 来获取系统属性,我们可以使用 sysprop 来进行确认:

$ sysprop file.encoding
 KEY                          VALUE  
-----------------------------------
 file.encoding                GBK

如果发现系统属性的值有问题,可以使用 sysprop 对其动态修改:

$ sysprop file.encoding UTF-8
Successfully changed the system property.
 KEY                          VALUE  
-----------------------------------
 file.encoding                UTF-8

实际上,无论是 sysenv 还是 sysprop,我们都可以使用 ognl 命令实现:

$ ognl '@System@getenv("JAVA_HOME")'
@String[C:\Program Files\Java\jdk1.8.0_351]
$ 
$ ognl '@System@getProperty("file.encoding")'
@String[UTF-8]

OGNL 是 Object Graphic Navigation Language 的缩写,表示对象图导航语言,它是一种表达式语言,用于访问对象属性、调用对象方法等,它被广泛集成在各大框架中,如 Struts2、MyBatis、Thymeleaf、Spring Web Flow 等。

除了环境变量和系统属性,应用程序本身的配置文件也常常需要排查,在 Spring Boot 程序中,应用配置非常灵活,当存在多个配置文件时,往往搞不清配置是否生效了。这时我们也可以通过 ognl 命令来查看配置,不过使用 ognl 有一个限制,它只能访问静态方法,所以我们在代码中要实现一个 SpringUtils.getBean() 静态方法,这个方法通过 ApplicationContext 来获取 Spring Bean:

@Component
public class SpringUtils implements ApplicationContextAware {

    private static ApplicationContext CONTEXT;

    @Override
    public void setApplicationContext(ApplicationContext applicationContext) throws BeansException {
        CONTEXT = applicationContext;
    }
    
    public static Object getBean(String beanName) {
        return CONTEXT.getBean(beanName);
    }
}

这样我们就可以通过 ognl 来查看应用程序的配置类了:

$ ognl '@com.example.demo.utils.SpringUtils@getBean("demoProperties")'
@DemoProperties[
    title=@String[demo title],
]

那么如果我们的代码中没有 SpringUtils.getBean() 这样的静态方法怎么办呢?

在上面我们学到 Arthas 里有一个 tt 命令,可以记录方法调用的所有现场信息,并可以使用 ognl 表达式对现场信息进行查看;这也就意味着我们可以调用监听目标对象的方法,如果监听目标对象有类似于 getBean()getApplicationContext() 这样的方法,那么我们就可以间接地获取到 Spring Bean。在 Spring MVC 程序中,RequestMappingHandlerAdapter 就是这样绝佳的一个监听对象,每次处理请求时都会调用它的 invokeHandlerMethod() 方法,我们对这个方法进行监听:

$ tt -t org.springframework.web.servlet.mvc.method.annotation.RequestMappingHandlerAdapter invokeHandlerMethod
Press Q or Ctrl+C to abort.
Affect(class count: 1 , method count: 1) cost in 43 ms, listenerId: 2
 INDEX  TIMESTAMP            COST(ms)  IS-RET  IS-EXP  OBJECT       CLASS                    METHOD
------------------------------------------------------------------------------------------------------------
 1002   2023-09-15 07:59:27  3.5448     true   false   0x57023e7    RequestMappingHandlerAd  invokeHandlerMethod

因为这个对象有 getApplicationContext() 方法,所以可以通过 tt -w 来调用它,从而获取配置 Bean 的内容:

$ tt -i 1002 -w 'target.getApplicationContext().getBean("demoProperties")'
@DemoProperties[
    title=@String[demo title],
]
Affect(row-cnt:1) cost in 3 ms.

使用 jad/sc/retransform 热更新代码

有时候我们排查出问题原因后,发现只需一个小小的改动就可以修复问题,可能是加一行判空处理,或者是修复一处逻辑错误;又或者问题太复杂一时排查不出结果,需要加几行调试代码来方便问题的定位;如果修改代码,再重新发布到生产环境,耗时会非常长,而且重启服务也可能会影响到当前的用户。在比较紧急的情况下,热更新功能就可以排上用场了,不用重启服务就能在线修改代码逻辑。

热更新代码一般分为下面四个步骤:

第一步,使用 jad 命令将要修改的类反编译成 .java 文件:

$ jad --source-only com.example.demo.service.DemoService > /tmp/DemoService.java

第二步,修改代码:

$ vi /tmp/DemoService.java

比如我们在 add() 方法中加入判空处理:

           public Integer add(DemoAdd demoAdd) {
                if (demoAdd.getX() == null) {
                    demoAdd.setX(0);
                }
                if (demoAdd.getY() == null) {
                    demoAdd.setY(0);
                }
/*20*/         log.debug("x = {}, y = {}", (Object)demoAdd.getX(), (Object)demoAdd.getY());
/*21*/         return demoAdd.getX() + demoAdd.getY();
           }

第三步,使用 mc 命令将修改后的 .java 文件编译成 .class 字节码文件:

$ mc /tmp/DemoService.java -d /tmp
Memory compiler output:
D:\tmp\com\example\demo\service\DemoService.class
Affect(row-cnt:1) cost in 1312 ms.

mc 命令有时会失败,这时我们可以在本地开发环境修改代码,并编译成 .class 文件,再上传到服务器上。

最后一步,使用 redefineretransform 对类进行热更新:

$ retransform /tmp/com/example/demo/service/DemoService.class
retransform success, size: 1, classes:
com.example.demo.service.DemoService

redefineretransform 都可以热更新,但是 redefinejad / watch / trace / monitor / tt 等命令冲突,所以推荐使用 retransform 命令。热更新成功后,使用异常请求再请求一次,现在不会报系统错误了:

$ curl -X POST -H "Content-Type: application/json" -d '{"x":1}' http://localhost:8080/add
1

如果要还原所做的修改,那么只需要删除这个类对应的 retransform entry,然后再重新触发 retransform 即可:

$ retransform --deleteAll
$ retransform --classPattern com.example.demo.service.DemoService

不过要注意的是,Arthas 的热更新也并非无所不能,它也有一些限制,比如不能修改、添加、删除类的字段和方法,只能在原来的方法上修改逻辑。

另外,在生产环境热更新代码并不是很好的行为,而且还非常危险,一定要严格地控制,上线规范也同样重要。

其他使用场景

Arthas 的使用非常灵活,有时候甚至还会有一些意想不到的功能,除了上面这些使用场景,Arthas 的 Issues 中还收集了一些 用户案例,其中有几个案例对我印象很深,非常有启发性,可供参考。

参考

更多

深入 Arthas 实现原理

扫描二维码,在手机上阅读!

大模型应用开发框架 LangChain 学习笔记(二)

上一篇笔记 中,我们学习了 LangChain 中的一些基础概念:使用 LLMsChatModels 实现基本的聊天功能,使用 PromptTemplate 组装提示语,使用 Document loadersDocument transformersText embedding modelsVector storesRetrievers 实现文档问答;然后,我们又学习了 LangChain 的精髓 Chain,以及 Chain 的三大特性:使用 Memory 实现 Chain 的记忆功能,使用 RetrievalQA 组合多个 Chain 再次实现文档问答,使用 Callbacks 对 Chain 进行调试;最后,我们学习了四个基础 Chain:LLMChainTransformChainSequentialChainRouterChain,使用这四个 Chain 可以组装出更复杂的流程,其中 RouterChainMultiPromptChain 为我们提出了一种新的思路,使用大模型来决策 Chain 的调用链路,可以动态地解决用户问题;更进一步我们想到,大模型不仅可以动态地选择调用 Chain,也可以动态地选择调用外部的函数,而且使用一些提示语技巧,可以让大模型变成一个推理引擎,这便是 Agent

OpenAI 的插件功能

在学习 LangChain 的 Agent 之前,我们先来学习一下 OpenAI 的插件功能,这可以让我们对 Agent 的基本概念和工作原理有一个更深入的了解。

ChatGPT Plugins

2023 年 3 月 23 日,OpenAI 重磅推出 ChatGPT Plugins 功能,引起了全球用户的热议。众所周知,GPT-3.5 是使用 2021 年之前的历史数据训练出来的大模型,所以它无法回答关于最新新闻和事件的问题,比如你问它今天是星期几,它只能让你自己去查日历:

day-of-the-week.png

不仅如此,ChatGPT 在处理数学问题时也表现不佳,而且在回答问题时可能会捏造事实,胡说八道;另一方面,虽然 ChatGPT 非常强大,但它终究只是一个聊天机器,如果要让它成为真正的私人助理,它还得帮助用户去做一些事情,解放用户的双手。引入插件功能后,就使得 ChatGPT 具备了这两个重要的能力:

  • 访问互联网:可以实时检索最新的信息以回答用户问题,比如调用搜索引擎接口,获取和用户问题相关的新闻和事件;也可以访问用户的私有数据,比如公司内部的文档,个人笔记等,这样通过插件也可以实现文档问答;
  • 执行任务:可以了解用户的意图,代替用户去执行任务,比如调用一些三方服务的接口订机票订酒店等;

暂时只有 GPT-4 才支持插件功能,所以要体验插件功能得有个 ChatGPT Plus 账号。截止目前为止,OpenAI 的插件市场中已经开放了近千个插件,如果我们想让 ChatGPT 回答今天是星期几,可以开启其中的 Wolfram 插件:

chatgpt-4-plugins.png

Wolfram|Alpha 是一个神奇的网站,建立于 2009 年,它是一个智能搜索引擎,它上知天文下知地理,可以回答关于数学、物理、化学、生命科学、计算机科学、历史、地理、音乐、文化、天气、时间等等方面的问题,它的愿景是 Making the world's knowledge computable,让世界的知识皆可计算。Wolfram 插件就是通过调用 Wolfram|Alpha 的接口来实现的,开启 Wolfram 插件后,ChatGPT 就能准确回答我们的问题了:

day-of-the-week-with-plugins.png

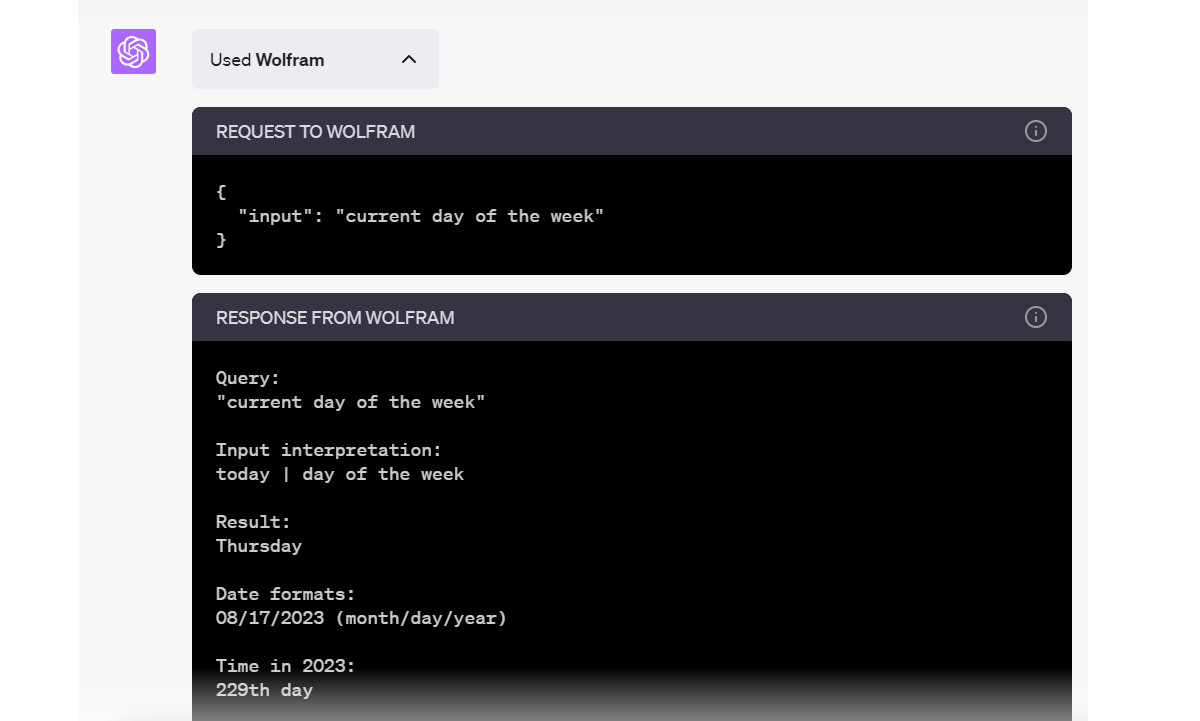
从对话的结果中可以看到 ChatGPT 使用了 Wolfram 插件,展开插件的调用详情还可以看到调用的请求和响应:

wolfram-detail.png

结合插件功能,ChatGPT 不再是一个简单的聊天对话框了,它有了一个真正的生态环境,网上有这样一个比喻,如果说 ChatGPT 是 AI 时代的 iPhone,那么插件就是 ChatGPT 的 App Store,我觉得这个比喻非常贴切。通过插件机制,ChatGPT 可以连接成千上万的第三方应用,向各个行业渗透,带给我们无限的想象力。

开发自己的插件

目前 ChatGPT 的插件功能仍然处于 beta 版本,OpenAI 还没有完全开放插件的开发功能,如果想要体验开发 ChatGPT 插件的流程,需要先 加入等待列表

开发插件的步骤大致如下:

  1. ChatGPT 插件其实就是标准的 Web 服务,可以使用任意的编程语言开发,开发好插件服务之后,将其部署到你的域名下;
  2. 准备一个清单文件 .well-known/ai-plugin.json 放在你的域名下,清单文件中包含了插件的名称、描述、认证信息、以及所有插件接口的信息等;
  3. 在 ChatGPT 的插件中心选择 Develop your own plugin,并填上你的插件地址;
  4. 开启新会话时,先选择并激活你的插件,然后就可以聊天了;如果 ChatGPT 认为用户问题需要调用你的插件(取决于插件和接口的描述),就会调用你在插件中定义的接口;

其中前两步应该是开发者最为关心的部分,官网提供了一个入门示例供我们参考,这个示例是一个简单的 TODO List 插件,可以让 ChatGPT 访问并操作我们的 TODO List 服务,我们就以这个例子来学习如何开发一个 ChatGPT 插件。

首先我们使用 Python 语言开发好 TODO List 服务,支持 TODO List 的增删改查。

然后准备一个插件的清单文件,对我们的插件进行一番描述,这个清单文件的名字必须是 ai-plugin.json,并放在你的域名的 .well-known 路径下,比如 https://your-domain.com/.well-known/ai-plugin.json。文件的内容如下:

{
    "schema_version": "v1",
    "name_for_human": "TODO List",
    "name_for_model": "todo",
    "description_for_human": "Manage your TODO list. You can add, remove and view your TODOs.",
    "description_for_model": "Help the user with managing a TODO list. You can add, remove and view your TODOs.",
    "auth": {
        "type": "none"
    },
    "api": {
        "type": "openapi",
        "url": "http://localhost:3333/openapi.yaml"
    },
    "logo_url": "http://localhost:3333/logo.png",
    "contact_email": "support@example.com",
    "legal_info_url": "http://www.example.com/legal"
}

清单中有些信息是用于展示在 OpenAI 的插件市场的,比如 name_for_humandescription_for_humanlogo_urlcontact_emaillegal_info_url 等,有些信息是要送给 ChatGPT 的,比如 name_for_modeldescription_for_modelapi 等;送给 ChatGPT 的信息需要仔细填写,确保 ChatGPT 能理解你这个插件的用途,这样 ChatGPT 才会在对话过程中根据需要调用你的插件。

然后我们还需要准备插件的接口定义文件,要让 ChatGPT 知道你的插件都有哪些接口,每个接口的作用是什么,以及每个接口的入参和出参是什么。一般使用 OpenAPI 规范 来定义插件的接口,下面是一个简单的示例,定义了一个 getTodos 接口用于获取所有的 TODO List:

openapi: 3.0.1
info:
  title: TODO Plugin
  description: A plugin that allows the user to create and manage a TODO list using ChatGPT.
  version: 'v1'
servers:
  - url: http://localhost:3333
paths:
  /todos:
    get:
      operationId: getTodos
      summary: Get the list of todos
      responses:
        "200":
          description: OK
          content:
            application/json:
              schema:
                $ref: '#/components/schemas/getTodosResponse'
components:
  schemas:
    getTodosResponse:
      type: object
      properties:
        todos:
          type: array
          items:
            type: string
          description: The list of todos.

一切准备就绪后,就可以在 ChatGPT 的插件中心填上你的插件地址并调试了。

除了入门示例,官网还提供了一些其他的 插件示例,其中 Chatgpt Retrieval Plugin 是一个完整而复杂的例子,对我们开发真实的插件非常有参考价值。

当然,还有很多插件的内容没有介绍,比如 插件的最佳实践用户认证 等,更多信息可以参考 OpenAI 的插件手册

Function Calling

尽管 ChatGPT 的插件功能非常强大,但是它只能在 ChatGPT 页面中使用,这可能是出于 OpenAI 的私心,OpenAI 的野心很大,它对 ChatGPT 的定位,就是希望将其做成整个互联网的入口,其他的应用都对接到 ChatGPT 的生态中来。不过很显然,这种脑洞大开的想法有点太过超前了,其他的互联网厂商也不傻,谁都知道流量入口的重要性,怎么会轻易将自己的应用入口交给其他人呢?对于其他的互联网厂商来说,他们更希望将 ChatGPT 的能力(包括插件能力)集成到自己的应用中来。

2023 年 6 月 13 日,这种想法变成了可能,这一天,OpenAI 对 GPT 模型进行了一项重大更新,推出了 Function Calling 功能,在 Chat Completions API 中添加了新的函数调用能力,帮助开发者通过 API 的方式实现类似于 ChatGPT 插件的数据交互能力。

基于 ChatGPT 实现一个划词翻译 Chrome 插件 这篇笔记中,我们已经学习过 OpenAI 的 Chat Completions API,感兴趣的同学可以复习下。

使用 Function Calling 回答日期问题

更新后的 Chat Completions API 中添加了一个 functions 参数,用于定义可用的函数,就像在 ChatGPT 中开启插件一样,这里的函数就相当于插件,对于每一个函数,我们需要定义它的名称、描述以及参数信息,如下:

completion = openai.ChatCompletion.create(
    temperature=0.7,
    model="gpt-3.5-turbo",
    messages=[
        {'role': 'user', 'content': "今天是星期几?"},
    ],
    functions=[
        {
          "name": "get_current_date",
          "description": "获取今天的日期信息,包括几月几号和星期几",
          "parameters": {
              "type": "object",
              "properties": {}
          }
        }
    ],
    function_call="auto",
)
print(completion)

在上面的例子中,我们定义了一个名为 get_current_date() 的函数,用于获取今天的日期和星期信息,这个函数我们要提前实现好:

def get_current_date(args):
    import datetime
    today = datetime.date.today()
    weekday = today.weekday()
    weeekdays = ['一','二','三','四','五','六','日']
    return '今天是' + str(today) + ', ' + '星期' + weeekdays[weekday]

当 GPT 无法回答关于日期的问题时,就会自动地选择调用这个函数来进一步获取信息,Chat Completions API 的响应结果如下:

{
  "id": "chatcmpl-7pQO7iJ3WeggIYZ5CnLc88ZxMgMMV",
  "object": "chat.completion",
  "created": 1692490519,
  "model": "gpt-3.5-turbo-0613",
  "choices": [
    {
      "index": 0,
      "message": {
        "role": "assistant",
        "content": null,
        "function_call": {
          "name": "get_current_date",
          "arguments": "{}"
        }
      },
      "finish_reason": "function_call"
    }
  ],
  "usage": {
    "prompt_tokens": 63,
    "completion_tokens": 8,
    "total_tokens": 71
  }
}

可以看到接口返回的 message.content 是空,反而多了一个 function_call 字段,这就说明 GPT 无法回答我们的问题,希望调用某个外部函数。为了方便我们调用外部函数,GPT 非常贴心地将函数名和参数都准备好了,我们只需要使用 globals().get() 拿到函数,再使用 json.loads() 拿到参数,然后直接调用即可:

function_call = completion.choices[0].message.function_call
function = globals().get(function_call.name)
args = json.loads(function_call.arguments)
result = function(args)
print(result)

拿到函数调用的结果之后,我们再一次调用 Chat Completions API,这一次我们将函数调用的结果和用户的问题一起放在 messages 中,注意将它的 role 设置为 function

completion = openai.ChatCompletion.create(
    temperature=0.7,
    model="gpt-3.5-turbo",
    messages=[
        {'role': 'user', 'content': "今天是星期几?"},
        {'role': 'function', 'name': 'get_current_date', 'content': "今天是2023-08-20, 星期日"},
    ],
)
print(completion)

这样 GPT 就能成功回答我们的问题了:

{
  "id": "chatcmpl-7pQklbWnMyVFvK73YbWXMybVsOTJe",
  "object": "chat.completion",
  "created": 1692491923,
  "model": "gpt-3.5-turbo-0613",
  "choices": [
    {
      "index": 0,
      "message": {
        "role": "assistant",
        "content": "今天是星期日。"
      },
      "finish_reason": "stop"
    }
  ],
  "usage": {
    "prompt_tokens": 83,
    "completion_tokens": 8,
    "total_tokens": 91
  }
}

多轮 Function Calling

有时候,只靠一个函数解决不了用户的问题,比如用户问 明天合肥的天气怎么样?,那么 GPT 首先需要知道明天的日期,然后再根据日期查询合肥的天气,所以我们要定义两个函数:

functions = [
    {
        "name": "get_current_date",
        "description": "获取今天的日期信息,包括几月几号和星期几",
        "parameters": {
            "type": "object",
            "properties": {}
        }
    },
    {
        "name": "get_weather_info",
        "description": "获取某个城市某一天的天气信息",
        "parameters": {
            "type": "object",
            "properties": {
                "city": {
                    "type": "string",
                    "description": "城市名",
                },
                "date": {
                    "type": "string",
                    "description": "日期,格式为 yyyy-MM-dd",
                },
            },
            "required": ["city", "date"],
        }
    }
]

第一次调用 Chat Completions API 时,传入用户的问题:

messages=[
    {'role': 'user', 'content': "明天合肥的天气怎么样?"},
],

接口返回了一个 function_call,希望我们去调用 get_current_date() 函数:

"function_call": {
    "name": "get_current_date",
    "arguments": "{}"
}

然后我们调用 get_current_date() 函数得到今天的日期,再次调用 Chat Completions API 时,传入函数的调用结果:

messages=[
    {'role': 'user', 'content': "明天合肥的天气怎么样?"},
    {'role': 'function', 'name': 'get_current_date', 'content': "今天是2023-08-20, 星期日"},
],

接口再次返回了一个 function_call,希望我们去调用 get_weather_info() 函数:

"function_call": {
    "name": "get_weather_info",
    "arguments": "{\n  \"city\": \"合肥\",\n  \"date\": \"2023-08-21\"\n}"
}

注意这里的 date 参数,上面我们通过 get_current_date() 得到今天的日期是 2023-08-20,而用户问的是明天合肥的天气,GPT 非常聪明地推导出明天的日期是 2023-08-21,可以说是非常优秀了,我们直接使用 GPT 准备好的参数调用 get_weather_info() 即可获得明天合肥的天气,再次调用 Chat Completions API:

messages=[
    {'role': 'user', 'content': "明天合肥的天气怎么样?"},
    {'role': 'function', 'name': 'get_current_date', 'content': "今天是2023-08-20, 星期日"},
    {'role': 'function', 'name': 'get_weather_info', 'content': "雷阵雨,33/24℃,北风转西北风"},
],

通过不断的调用 Function Calling,最后准确地对用户的问题作出了回答:

明天合肥的天气预报为雷阵雨,最高温度为33℃,最低温度为24℃,风向将从北风转为西北风。请注意防雷阵雨的天气情况。

除了能不断地返回 function_call 并调用函数外,GPT 还会主动尝试补充函数的参数。有时候,用户的问题不完整,缺少了函数的某个参数,比如用户问 明天的天气怎么样?,这时 GPT 并不知道用户所在的城市,它就会问 请问您所在的城市是哪里?,等待用户回答之后,才返回 get_weather_info() 函数以及对应的参数。

学习 LangChain Agent

学习完 OpenAI 的插件机制之后,我们再来学习 LangChain 的 Agent 就会发现有很多概念是相通的。我们从官方文档中的一个入门示例开始。

快速入门

我们知道,大模型虽然擅长推理,但是却不擅长算术和计数,比如问它单词 hello 是由几个字母组成的,它就有可能胡编乱造,我们可以定义一个函数 get_word_length() 帮助大模型来回答关于单词长度的问题。

入门示例的代码如下:

from langchain.chat_models import ChatOpenAI
from langchain.agents import tool
from langchain.schema import SystemMessage
from langchain.agents import OpenAIFunctionsAgent
from langchain.agents import AgentExecutor

# llm
llm = ChatOpenAI(temperature=0)

# tools
@tool
def get_word_length(word: str) -> int:
    """Returns the length of a word."""
    return len(word)

tools = [get_word_length]

# prompt
system_message = SystemMessage(
    content="You are very powerful assistant, but bad at calculating lengths of words."
)
prompt = OpenAIFunctionsAgent.create_prompt(system_message=system_message)

# create an agent
agent = OpenAIFunctionsAgent(llm=llm, tools=tools, prompt=prompt)

# create an agent executor
agent_executor = AgentExecutor(agent=agent, tools=tools)

# run the agent executor
result = agent_executor.run("how many letters in the word 'hello'?")
print(result)

从上面的代码中我们可以注意到 Agent 有这么几个重要的概念:

  • Tools - 希望被 Agent 执行的函数,被称为 工具,类似于 OpenAI 的插件,我们需要尽可能地描述清楚每个工具的功能,以便 Agent 能选择合适的工具;
  • Agent - 经常被翻译成 代理,类似于 OpenAI 的 Function Calling 机制,可以帮我们理解用户的问题,然后从给定的工具集中选择能解决用户问题的工具,并交给 Agent Executor 执行;
  • Agent Executor - Agent 执行器,它本质上是一个 Chain,所以可以和其他的 Chain 或 Agent Executor 进行组合;它会递归地调用 Agent 获取下一步的动作,并执行 Agent 中定义的工具,直到 Agent 认为问题已经解决,则递归结束,下面是整个过程的伪代码:
next_action = agent.get_action(...)
while next_action != AgentFinish:
    observation = run(next_action)
    next_action = agent.get_action(..., next_action, observation)
return next_action

LangChain Agent 进阶

下面深入学习 LangChain Agent 的这几个概念。

使用工具

在入门示例中,我们使用 @tool 装饰器定义了一个工具:

@tool
def get_word_length(word: str) -> int:
    """Returns the length of a word."""
    return len(word)

工具的名称默认为方法名,工具的描述为方法的 doc_string,工具方法支持多个参数:

@tool
def get_word_length(word: str, excluding_hyphen: bool) -> int:
    """Returns the length of a word."""
    if excluding_hyphen:
        return len(word.replace('-', ''))
    else:
        return len(word)

当工具方法有多个参数时,参数的描述就很重要,我们可以通过 args_schema 来传入一个 BaseModel,这是 Pydantic 中用于定义数据模型的基类:

class WordLengthSchema(BaseModel):
    word: str = Field(description = "the word to be calculating")
    excluding_hyphen: bool = Field(description = "excluding the hyphen or not, default to false")

@tool(args_schema = WordLengthSchema)
def get_word_length(word: str, excluding_hyphen: bool) -> int:
    """Returns the length of a word."""
    if excluding_hyphen:
        return len(word.replace('-', ''))
    else:
        return len(word)

LangChain 的代码中大量使用了 Pydantic 库,它提供了一种简单而强大的方式来验证和解析输入数据,并将其转换为类型安全的 Python 对象。

除了使用 @tool 装饰器,官方还提供了另外两种方式来定义工具。第一种是使用 Tool.from_function()

Tool.from_function(
    func=get_word_length,
    name="get_word_length",
    description="Returns the length of a word."
)

不过这个方法只支持接受一个字符串输入和一个字符串输出,如果工具方法有多个参数,必须得使用 StructuredTool.from_function()

StructuredTool.from_function(
    func=get_word_length,
    name="get_word_length",
    description="Returns the length of a word."
)

同样,我们可以通过 args_schema 来传入一个 BaseModel 对方法的参数进行描述:

StructuredTool.from_function(
    func=get_word_length,
    name="get_word_length",
    description="Returns the length of a word.",
    args_schema=WordLengthSchema
)

实际上查看 LangChain 的源码你就会发现,@tool 装饰器就是通过 Tool.from_function()StructuredTool.from_function() 来实现的。

第二种定义工具的方法是直接继承 BaseTool 类:

class WordLengthTool(BaseTool):
    name = "get_word_length"
    description = "Returns the length of a word."

    def _run(
        self, word: str, run_manager: Optional[CallbackManagerForToolRun] = None
    ) -> str:
        """Use the tool."""
        return len(word)

    async def _arun(
        self, word: str, run_manager: Optional[AsyncCallbackManagerForToolRun] = None
    ) -> str:
        """Use the tool asynchronously."""
        raise NotImplementedError("get_word_length does not support async")

当工具方法有多个参数时,我们就在 _run 方法上定义多个参数,同时使用 args_schema 对多个参数进行描述:

class WordLengthTool(BaseTool):
    name = "get_word_length"
    description = "Returns the length of a word."
    args_schema: Type[WordLengthSchema] = WordLengthSchema

    def _run(
        self, word: str, excluding_hyphen: bool = False, run_manager: Optional[CallbackManagerForToolRun] = None
    ) -> str:
        """Use the tool."""
        if excluding_hyphen:
            return len(word.replace('-', ''))
        else:
            return len(word)

除了自己定义工具,LangChain 还内置了一些常用的工具,我们可以直接使用 load_tools() 来加载:

from langchain.agents import load_tools

tools = load_tools(["serpapi"])

可以从 load_tools.py 源码中找到支持的工具列表。

Agent 类型

有些同学可能已经注意到,在示例代码中我们使用了 OpenAIFunctionsAgent,我们也可以使用 initialize_agent() 方法简化 OpenAIFunctionsAgent 的创建过程:

from langchain.chat_models import ChatOpenAI
from langchain.agents import tool
from langchain.agents import initialize_agent
from langchain.agents import AgentType

# llm
llm = ChatOpenAI(temperature=0)

# tools
@tool
def get_word_length(word: str) -> int:
    """Returns the length of a word."""
    return len(word)

tools = [get_word_length]

# create an agent executor
agent_executor = initialize_agent(tools, llm, agent=AgentType.OPENAI_FUNCTIONS, verbose=True)

# run the agent executor
result = agent_executor.run("how many letters in the word 'weekly-practice'?")
print(result)

很显然,这个 Agent 是基于 OpenAI 的 Function Calling 实现的,它通过 format_tool_to_openai_function() 将 LangChain 的工具转换为 OpenAI 的 functions 参数。但是 Function Calling 机制只有 OpenAI 的接口才支持,而 LangChain 面对的是各种大模型,并不是所有的大模型都支持 Function Calling 机制,这是要专门训练的,所以 LangChain 的 Agent 还需要支持一种更通用的实现机制。根据所使用的策略,LangChain 支持 多种不同的 Agent 类型,其中最通用,也是目前最流行的 Agent 是基于 ReAct 的 Agent。

Zero-shot ReAct Agent

ReAct 这个词出自一篇论文 ReAct: Synergizing Reasoning and Acting in Language Models,它是由 ReasonAct 两个词组合而成,表示一种将 推理行动 与大模型相结合的通用范式:

react.png

传统的 Reason Only 型应用(如 Chain-of-Thought Prompting)具备很强的语言能力,擅长通用文本的逻辑推断,但由于不会和外部环境交互,因此它的认知非常受限;而传统的 Act Only 型应用(如 WebGPTSayCanACT-1)能和外界进行交互,解决某类特定问题,但它的行为逻辑较简单,不具备通用的推理能力。

ReAct 的思想,旨在将这两种应用的优势结合起来。针对一个复杂问题,首先使用大模型的推理能力制定出解决该问题的行动计划,这好比人的大脑,可以对问题进行分析思考;然后使用行动能力与外部源(例如知识库或环境)进行交互,以获取额外信息,这好比人的五官和手脚,可以感知世界,并执行动作;大模型对行动的结果进行跟踪,并不断地更新行动计划,直到问题被解决。通过这种模式,我们能基于大模型构建更为强大的 AI 应用,大名鼎鼎的 Auto-GPT 项目就是基于 ReAct 模式实现的。

LangChain 基于 ReAct 思想实现了一些 Agent,其中最简单的就是 Zero-shot ReAct Agent,我们将上面的 AgentType.OPENAI_FUNCTIONS 替换成 AgentType.ZERO_SHOT_REACT_DESCRIPTION 即可:

agent_executor = initialize_agent(tools, llm, agent=AgentType.ZERO_SHOT_REACT_DESCRIPTION, verbose=True)

执行结果如下:

> Entering new AgentExecutor chain...
I should use the get_word_length tool to find the length of the word.
Action: get_word_length
Action Input: 'weekly-practice'
Observation: 17
Thought:The word 'weekly-practice' has 17 letters.
Final Answer: 17

> Finished chain.
17

从输出结果可以一窥 Agent 的思考过程,包括三个部分:Thought 是由大模型生成的想法,是执行行动的依据;Action 是指大模型判断本次需要执行的具体动作;Observation 是执行动作后从外部获取的信息。

可以看到这个 Agent 没有 OpenAI 那么智能,它在计算单词长度时没有去掉左右的引号。

为了展示 Agent 思维链的强大之处,我们可以输入一个更复杂的问题:

Calculate the length of the word 'weekly-practice' times the word 'aneasystone'?

要回答这个问题,Agent 必须先计算两个单词的长度,然后将两个长度相乘得到乘积,所以我们要在工具箱中加一个用于计算的工具,可以直接使用 LangChain 内置的 llm-math 工具:

@tool
def get_word_length(word: str) -> int:
    """Returns the length of a word."""
    return len(word)

tools = load_tools(["llm-math"], llm=llm)
tools.append(get_word_length)

运行结果如下:

> Entering new AgentExecutor chain...
We need to calculate the length of the word 'weekly-practice' and the length of the word 'aneasystone', and then multiply them together.
Action: get_word_length
Action Input: 'weekly-practice'
Observation: 17
Thought:We have the length of the word 'weekly-practice'. Now we need to find the length of the word 'aneasystone'.
Action: get_word_length
Action Input: 'aneasystone'
Observation: 13
Thought:We have the lengths of both words. Now we can multiply them together to get the final answer.
Action: Calculator
Action Input: 17 * 13
Observation: Answer: 221
Thought:I now know the final answer.
Final Answer: The length of the word 'weekly-practice' times the word 'aneasystone' is 221.

> Finished chain.
The length of the word 'weekly-practice' times the word 'aneasystone' is 221.

针对最简单的 Zero-shot ReAct Agent,LangChain 提供了三个实现:

  • ZERO_SHOT_REACT_DESCRIPTION - 使用 LLMs 实现;
  • CHAT_ZERO_SHOT_REACT_DESCRIPTION - 使用 ChatModels 实现;
  • STRUCTURED_CHAT_ZERO_SHOT_REACT_DESCRIPTION - 上面两种 Agent 使用的工具都只支持输入简单的字符串,而这种 Agent 通过 args_schema 来生成工具的输入,支持在工具中使用多个参数;

Conversational ReAct Agent

和 Chain 一样,也可以给 Agent 增加记忆功能,默认情况下,Zero-shot ReAct Agent 是不具有记忆功能的,不过我们可以通过 agent_kwargs 参数修改 Agent 让其具备记忆功能。我们可以使用下面的技巧将 Agent 所使用的 Prompt 打印出来看看:

print(agent_executor.agent.llm_chain.prompt.template)

输出结果如下:

Answer the following questions as best you can. You have access to the following tools:

Calculator: Useful for when you need to answer questions about math.
get_word_length: get_word_length(word: str) -> int - Returns the length of a word.

Use the following format:

Question: the input question you must answer
Thought: you should always think about what to do
Action: the action to take, should be one of [Calculator, get_word_length]
Action Input: the input to the action
Observation: the result of the action
... (this Thought/Action/Action Input/Observation can repeat N times)
Thought: I now know the final answer
Final Answer: the final answer to the original input question

Begin!

Question: {input}
Thought:{agent_scratchpad}

这个 Prompt 就是实现 ReAct 的核心,它实际上包括了三个部分。第一部分称为前缀(prefix),可以在这里加一些通用的提示语,并列出大模型可以使用的工具名称和描述:

Answer the following questions as best you can. You have access to the following tools:

Calculator: Useful for when you need to answer questions about math.
get_word_length: get_word_length(word: str) -> int - Returns the length of a word.

第二部分称为格式化指令(format_instructions),内容如下:

Use the following format:

Question: the input question you must answer
Thought: you should always think about what to do
Action: the action to take, should be one of [Calculator, get_word_length]
Action Input: the input to the action
Observation: the result of the action
... (this Thought/Action/Action Input/Observation can repeat N times)
Thought: I now know the final answer
Final Answer: the final answer to the original input question

这段指令让大模型必须按照 Thought/Action/Action Input/Observation 这种特定的格式来回答我们的问题,然后我们将 Observation 设置为停止词(Stop Word)。如果大模型返回的结果中有 ActionAction Input,就说明大模型需要调用外部工具获取进一步的信息,于是我们就去执行该工具,并将执行结果放在 Observation 中,接着再次调用大模型,这样我们每执行一次,就能得到大模型的一次思考过程,直到大模型返回 Final Answer 为止,此时我们就得到了最终结果。

第三部分称为后缀(suffix),包括两个占位符,{input} 表示用户输入的问题,{agent_scratchpad} 表示 Agent 每一步思考的过程,可以让 Agent 继续思考下去:

Begin!

Question: {input}
Thought:{agent_scratchpad}

可以看到上面的 Prompt 中并没有考虑历史会话,如果要让 Agent 具备记忆功能,我们必须在 Prompt 中加上历史会话内容,我们将 prefix 修改成下面这样:

Have a conversation with a human, answering the following questions as best you can. You have access to the following tools:

明确地指出这是一次和人类的会话。然后将 suffix 修改为:


Begin!"

{chat_history}
Question: {input}
{agent_scratchpad}

我们在里面加上了 {chat_history} 占位符表示历史会话记录。由于引入了新的占位符,所以在 input_variables 中也需要加上 chat_history 变量,这个变量的内容会被 ConversationBufferMemory 自动替换,修改后的代码如下:

from langchain.memory import ConversationBufferMemory

memory = ConversationBufferMemory(memory_key="chat_history")

# create an agent executor
agent_executor = initialize_agent(
    tools, 
    llm, 
    agent=AgentType.ZERO_SHOT_REACT_DESCRIPTION, 
    verbose=True,
    memory=memory,
    agent_kwargs={
        "prefix": prefix,
        "suffix": suffix,
        "input_variables": ["input", "chat_history", "agent_scratchpad"],
    }
)

至此我们这个 Agent 就具备记忆功能了,可以将上面那个复杂问题拆分成三个小问题分别问它:

result = agent_executor.run("how many letters in the word 'weekly-practice'?")
print(result)
result = agent_executor.run("how many letters in the word 'hello-world'?")
print(result)
result = agent_executor.run("what is the product of results above?")
print(result)

执行结果如下,可以看出在回答第三个问题时它记住了上面两轮对话的内容:

> Entering new AgentExecutor chain...
Thought: I can use the get_word_length tool to find the length of the word 'weekly-practice'.
Action: get_word_length
Action Input: 'weekly-practice'
Observation: 17
Thought:I now know the final answer
Final Answer: The word 'weekly-practice' has 17 letters.

> Finished chain.
The word 'weekly-practice' has 17 letters.


> Entering new AgentExecutor chain...
Thought: I need to find the length of the word 'hello-world'.
Action: get_word_length
Action Input: 'hello-world'
Observation: 13
Thought:The word 'hello-world' has 13 letters.
Final Answer: The word 'hello-world' has 13 letters.

> Finished chain.
The word 'hello-world' has 13 letters.


> Entering new AgentExecutor chain...
Thought: I need to calculate the product of the results above.
Action: Calculator
Action Input: 17 * 13
Observation: Answer: 221
Thought:I now know the final answer.
Final Answer: The product of the results above is 221.

> Finished chain.
The product of the results above is 221.

像上面这样给 Agent 增加记忆实在是太繁琐了,LangChain 于是内置了两种 Conversational ReAct Agent 来简化这个过程:

  • CONVERSATIONAL_REACT_DESCRIPTION - 使用 LLMs 实现;
  • CHAT_CONVERSATIONAL_REACT_DESCRIPTION - 使用 ChatModels 实现;

使用 Conversational ReAct Agent 要简单得多,我们只需要准备一个 memory 参数即可:

# memory
memory = ConversationBufferMemory(memory_key="chat_history", return_messages=True)

# create an agent executor
agent_executor = initialize_agent(
    tools, 
    llm, 
    agent=AgentType.CHAT_CONVERSATIONAL_REACT_DESCRIPTION, 
    verbose=True,
    memory=memory,
)

ReAct DocStore Agent

和 Zero-shot ReAct Agent 一样,ReAct DocStore Agent 也是一个基于 ReAct 框架实现的 Agent。事实上,ReAct DocStore Agent 才是 ReAct 这篇论文 的标准实现,这个 Agent 必须包含两个指定工具:Search 用于调用 DocStore 搜索相关文档,Lookup 用于从搜索的文档中查询关键词信息。

Zero-shot ReAct Agent 更像是一个通用的 MRKL 系统,MRKL 的全称是模块化推理、知识和语言系统,它是一种模块化的神经符号架构,结合了大型语言模型、外部知识源和离散推理,它最初 由 AI21 Labs 提出,并实现了 Jurassic-X,对 MRKL 感兴趣的同学可以参考 这篇博客

LangChain 目前貌似只实现了 Wikipedia 和 InMemory 两个 DocStore,下面的例子中我们使用 Wikipedia 来进行搜索:

from langchain import Wikipedia
from langchain.agents import Tool
from langchain.agents.react.base import DocstoreExplorer

docstore = DocstoreExplorer(Wikipedia())
tools = [
    Tool(
        name="Search",
        func=docstore.search,
        description="useful for when you need to ask with search",
    ),
    Tool(
        name="Lookup",
        func=docstore.lookup,
        description="useful for when you need to ask with lookup",
    ),
]

然后创建一个类型为 AgentType.REACT_DOCSTORE 的 Agent,并提出一个问题:谁是当今美国总统?

agent_executor = initialize_agent(tools, llm, agent=AgentType.REACT_DOCSTORE, verbose=True)

result = agent_executor.run("Who is the current president of the United States?")
print(result)

运行结果如下:

> Entering new AgentExecutor chain...
Thought: I need to find out who the current president of the United States is.
Action: Search[current president of the United States]
Observation: The president of the United States (POTUS) is the head of state and head of government of the United States... 
Joe Biden is the 46th and current president of the United States, having assumed office on January 20, 2021.
Thought:Joe Biden is the current president of the United States.
Action: Finish[Joe Biden]

> Finished chain.
Joe Biden

Self-Ask Agent

Self-Ask Agent 是另一种基于 ReAct 框架的 Agent,它直接使用搜索引擎作为唯一的工具,工具名称必须叫做 Intermediate Answer,一般使用 Google 搜索来实现;Self-Ask 的原理来自于 这篇论文,通过下面的提示语技巧让大模型以 Follow up/Intermediate answer 这种固定的格式回答用户问题:

Question: Who lived longer, Muhammad Ali or Alan Turing?
Are follow up questions needed here: Yes.
Follow up: How old was Muhammad Ali when he died?
Intermediate answer: Muhammad Ali was 74 years old when he died.
Follow up: How old was Alan Turing when he died?
Intermediate answer: Alan Turing was 41 years old when he died.
So the final answer is: Muhammad Ali

其中 Follow up 是我们需要搜索的内容,它类似于 Zero-shot ReAct Agent 里的 Action/Action Input,由于直接使用搜索引擎,所以不需要让大模型决定使用哪个工具和参数;Intermediate answer 是搜索的结果,它类似于 Zero-shot ReAct Agent 里的 Observation;经过不断的搜索,大模型最终得到问题的答案。

下面是使用 Self-Ask Agent 的示例,首先通过 SerpAPI 定义一个名为 Intermediate Answer 的工具:

search = SerpAPIWrapper()
tools = [
    Tool(
        name="Intermediate Answer",
        func=search.run,
        description="useful for when you need to ask with search",
    )
]

然后创建一个类型为 AgentType.SELF_ASK_WITH_SEARCH 的 Agent,并提出一个问题:当今美国总统的出生日期是什么时候?

agent_executor = initialize_agent(tools, llm, agent=AgentType.SELF_ASK_WITH_SEARCH, verbose=True)

result = agent_executor.run("When is the current president of the United States born?")
print(result)

运行结果如下:

> Entering new AgentExecutor chain...
Yes.
Follow up: Who is the current president of the United States?
Intermediate answer: Joe Biden
Follow up: When was Joe Biden born?
Intermediate answer: November 20, 1942
So the final answer is: November 20, 1942

> Finished chain.
November 20, 1942

OpenAI Functions Agent

上面的几种 Agent 都是基于 ReAct 框架实现的,这虽然是一种比较通用的解决方案,但是当我们使用 OpenAI 时,OpenAI Functions Agent 才是我们的最佳选择,因为 ReAct 归根结底是基于提示工程的,执行结果有着很大的不确定性,OpenAI 的 Function Calling 机制相对来说要更加可靠。

在入门示例中,我们已经用到了 OpenAI Functions Agent 类型,这一节我们将学习另一种类型 OpenAI Multi Functions Agent

OpenAI Functions Agent 的缺点是每次只能返回一个工具,比如我们的问题是 合肥和上海今天的天气怎么样?,OpenAI Functions Agent 第一次会返回一个函数调用 get_weather_info(city='合肥'),然后我们需要再调用一次,第二次又会返回一个函数调用 get_weather_info(city='上海'),最后 OpenAI 对两个结果进行总结得到最终答案。

很显然,这两次调用是可以并行处理的,如果 Agent 能一次性返回两次调用,这将大大提高我们的执行效率,这就是提出 OpenAI Multi Functions Agent 的初衷。

为了对比这两种 Agent 的区别,我们可以使用下面的技巧开启 LangChain 的调试模式:

import langchain

langchain.debug = True

然后使用同一个问题对两个 Agent 进行提问:

Calculate the length of the word 'weekly-practice' and the word 'aneasystone'?

OpenAI Functions Agent 的运行结果如下:

[chain/start] [1:chain:AgentExecutor] Entering Chain run with input:
{
  "input": "Calculate the length of the word 'weekly-practice' and the word 'aneasystone'?"
}
[llm/start] [1:chain:AgentExecutor > 2:llm:ChatOpenAI] Entering LLM run with input:
{
  "prompts": [
    "System: You are a helpful AI assistant.\nHuman: Calculate the length of the word 'weekly-practice' and the word 'aneasystone'?"
  ]
}
[llm/end] [1:chain:AgentExecutor > 2:llm:ChatOpenAI] [1.08s] Exiting LLM run with output:
{
...
          "kwargs": {
            "content": "",
            "additional_kwargs": {
              "function_call": {
                "name": "get_word_length",
                "arguments": "{\n  \"word\": \"weekly-practice\"\n}"
              }
            }
          }
...
}
[tool/start] [1:chain:AgentExecutor > 3:tool:get_word_length] Entering Tool run with input:
"{'word': 'weekly-practice'}"
[tool/end] [1:chain:AgentExecutor > 3:tool:get_word_length] [0.217ms] Exiting Tool run with output:
"15"
[llm/start] [1:chain:AgentExecutor > 4:llm:ChatOpenAI] Entering LLM run with input:
{
  "prompts": [
    "System: You are a helpful AI assistant.\nHuman: Calculate the length of the word 'weekly-practice' and the word 'aneasystone'?\nAI: {'name': 'get_word_length', 'arguments': '{\\n  \"word\": \"weekly-practice\"\\n}'}\nFunction: 15"
  ]
}
[llm/end] [1:chain:AgentExecutor > 4:llm:ChatOpenAI] [649.318ms] Exiting LLM run with output:
{
...
          "kwargs": {
            "content": "",
            "additional_kwargs": {
              "function_call": {
                "name": "get_word_length",
                "arguments": "{\n  \"word\": \"aneasystone\"\n}"
              }
            }
          }
...
}
[tool/start] [1:chain:AgentExecutor > 5:tool:get_word_length] Entering Tool run with input:
"{'word': 'aneasystone'}"
[tool/end] [1:chain:AgentExecutor > 5:tool:get_word_length] [0.148ms] Exiting Tool run with output:
"11"
[llm/start] [1:chain:AgentExecutor > 6:llm:ChatOpenAI] Entering LLM run with input:
{
  "prompts": [
    "System: You are a helpful AI assistant.\nHuman: Calculate the length of the word 'weekly-practice' and the word 'aneasystone'?\nAI: {'name': 'get_word_length', 'arguments': '{\\n  \"word\": \"weekly-practice\"\\n}'}\nFunction: 15\nAI: {'name': 'get_word_length', 'arguments': '{\\n  \"word\": \"aneasystone\"\\n}'}\nFunction: 11"
  ]
}
[llm/end] [1:chain:AgentExecutor > 6:llm:ChatOpenAI] [1.66s] Exiting LLM run with output:
{
...
          "kwargs": {
            "content": "The word 'weekly-practice' has a length of 15 characters, while the word 'aneasystone' has a length of 11 characters.",
            "additional_kwargs": {}
          }
...
}
[chain/end] [1:chain:AgentExecutor] [3.39s] Exiting Chain run with output:
{
  "output": "The word 'weekly-practice' has a length of 15 characters, while the word 'aneasystone' has a length of 11 characters."
}
The word 'weekly-practice' has a length of 15 characters, while the word 'aneasystone' has a length of 11 characters.

可以看到 OpenAI Functions Agent 调了两次大模型,第一次大模型返回 get_word_length 函数计算单词 weekly-practice 的长度,第二次再次返回 get_word_length 函数计算单词 aneasystone 的长度。

而 OpenAI Multi Functions Agent 的执行结果如下:

[chain/start] [1:chain:AgentExecutor] Entering Chain run with input:
{
  "input": "Calculate the length of the word 'weekly-practice' and the word 'aneasystone'?"
}
[llm/start] [1:chain:AgentExecutor > 2:llm:ChatOpenAI] Entering LLM run with input:
{
  "prompts": [
    "System: You are a helpful AI assistant.\nHuman: Calculate the length of the word 'weekly-practice' and the word 'aneasystone'?"
  ]
}
[llm/end] [1:chain:AgentExecutor > 2:llm:ChatOpenAI] [3.26s] Exiting LLM run with output:
{
...
          "kwargs": {
            "content": "",
            "additional_kwargs": {
              "function_call": {
                "name": "tool_selection",
                "arguments": "{\n  \"actions\": [\n    {\n      \"action_name\": \"get_word_length\",\n      \"action\": {\n        \"word\": \"weekly-practice\"\n      }\n    },\n    {\n      \"action_name\": \"get_word_length\",\n      \"action\": {\n        \"word\": \"aneasystone\"\n      }\n    }\n  ]\n}"
              }
            }
          }
...
}
[tool/start] [1:chain:AgentExecutor > 3:tool:get_word_length] Entering Tool run with input:
"{'word': 'weekly-practice'}"
[tool/end] [1:chain:AgentExecutor > 3:tool:get_word_length] [0.303ms] Exiting Tool run with output:
"15"
[tool/start] [1:chain:AgentExecutor > 4:tool:get_word_length] Entering Tool run with input:
"{'word': 'aneasystone'}"
[tool/end] [1:chain:AgentExecutor > 4:tool:get_word_length] [0.229ms] Exiting Tool run with output:
"11"
[llm/start] [1:chain:AgentExecutor > 5:llm:ChatOpenAI] Entering LLM run with input:
{
  "prompts": [
    "System: You are a helpful AI assistant.\nHuman: Calculate the length of the word 'weekly-practice' and the word 'aneasystone'?\nAI: {'name': 'tool_selection', 'arguments': '{\\n  \"actions\": [\\n    {\\n      \"action_name\": \"get_word_length\",\\n      \"action\": {\\n        \"word\": \"weekly-practice\"\\n      }\\n    },\\n    {\\n      \"action_name\": \"get_word_length\",\\n      \"action\": {\\n        \"word\": \"aneasystone\"\\n      }\\n    }\\n  ]\\n}'}\nFunction: 15\nAI: {'name': 'tool_selection', 'arguments': '{\\n  \"actions\": [\\n    {\\n      \"action_name\": \"get_word_length\",\\n      \"action\": {\\n        \"word\": \"weekly-practice\"\\n      }\\n    },\\n    {\\n      \"action_name\": \"get_word_length\",\\n      \"action\": {\\n        \"word\": \"aneasystone\"\\n      }\\n    }\\n  ]\\n}'}\nFunction: 11"
  ]
}
[llm/end] [1:chain:AgentExecutor > 5:llm:ChatOpenAI] [1.02s] Exiting LLM run with output:
{
...
          "kwargs": {
            "content": "The word 'weekly-practice' has a length of 15 characters, and the word 'aneasystone' has a length of 11 characters.",
            "additional_kwargs": {}
          }
...
}
[chain/end] [1:chain:AgentExecutor] [4.29s] Exiting Chain run with output:
{
  "output": "The word 'weekly-practice' has a length of 15 characters, and the word 'aneasystone' has a length of 11 characters."
}
The word 'weekly-practice' has a length of 15 characters, and the word 'aneasystone' has a length of 11 characters.

可以看到 OpenAI Multi Functions Agent 调了一次大模型,返回了一个叫做 tool_selection 的工具,这个函数是 LangChain 特意构造的,它的参数是我们定义的多个工具,这样就使得 OpenAI 一次返回多个工具供我们调用。

Plan and execute Agent

上面所介绍的所有 Agent,本质上其实都是一样的:给定一组工具,然后大模型根据用户的输入一步一步地选择工具来执行,每一步的结果都用于决定下一步操作,直到问题被解决,像这种逐步执行的 Agent 被称为 Action Agent,它比较适合小型任务;如果要处理需要保持长期目标的复杂任务,使用 Action Agent 经常会出现推理跑偏的问题,这时就轮到 Plan and execute Agent 上场了。

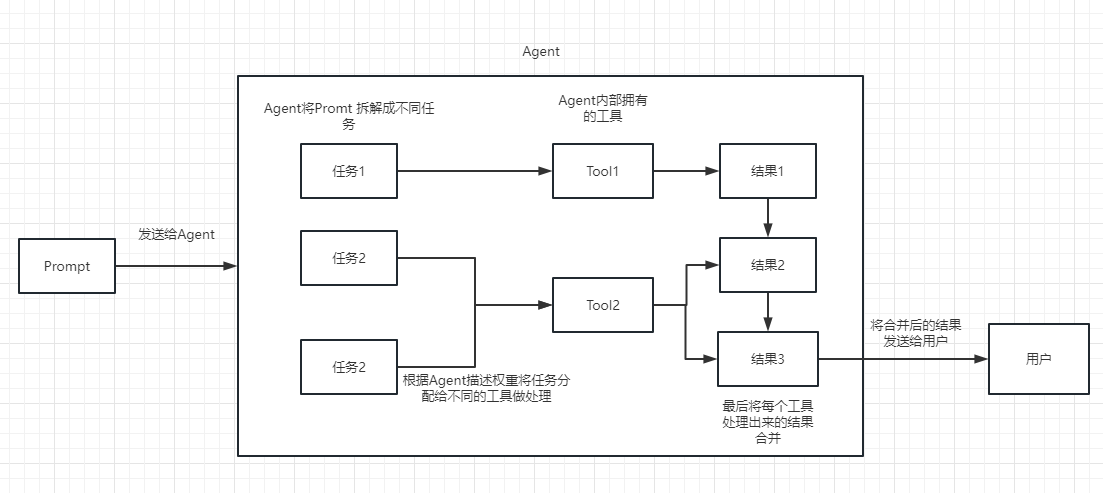
Plan and execute Agent 会提前对问题制定好完整的执行计划,然后在不更新计划的情况下逐步执行,即先把用户的问题拆解成多个子任务,然后再执行各个子任务,直到用户的问题完全被解决:

agent.png

我们可以动态的选择工具或 Chain 来解决这些子任务,但更好的做法是使用 Action Agent,这样我们可以将 Action Agent 的动态性和 Plan and execute Agent 的计划能力相结合,对复杂问题的解决效果更好。

Plan and execute Agent 的思想来自开源项目 BabyAGI,相比于 Action Agent 所使用的 Chain-of-Thought Prompting,它所使用的是 Plan-and-Solve Prompting,感兴趣的同学可以阅读 Plan-and-Solve Prompting 的论文

和之前的 Action Agent 一样,在使用 Plan and execute Agent 之前我们需要提前准备好工具列表,这里我们准备两个工具,一个搜索,一个计算:

from langchain.llms import OpenAI
from langchain import SerpAPIWrapper
from langchain.agents.tools import Tool
from langchain import LLMMathChain

search = SerpAPIWrapper()
llm_math_chain = LLMMathChain.from_llm(llm=OpenAI(temperature=0), verbose=True)
tools = [
    Tool(
        name = "Search",
        func=search.run,
        description="useful for when you need to answer questions about current events"
    ),
    Tool(
        name="Calculator",
        func=llm_math_chain.run,
        description="useful for when you need to answer questions about math"
    ),
]

接下来创建 Plan and execute Agent,它主要包括两个部分:plannerexecutorplanner 用于制定计划,将任务划分成若干个子任务,executor 用于执行计划,处理子任务,其中 executor 可以使用 Chain 或上面的任意 Action Agent 来实现。Plan and execute Agent 目前还是 LangChain 的实验功能,相应的实现在 langchain.experimental 模块下:

from langchain.chat_models import ChatOpenAI
from langchain.experimental.plan_and_execute import PlanAndExecute, load_agent_executor, load_chat_planner

model = ChatOpenAI(temperature=0)
planner = load_chat_planner(model)
executor = load_agent_executor(model, tools, verbose=True)
agent = PlanAndExecute(planner=planner, executor=executor, verbose=True)
agent.run("Who is Leo DiCaprio's girlfriend? What is her current age raised to the 0.43 power?")

运行结果的第一步可以看到整个任务的执行计划:

> Entering new PlanAndExecute chain...
steps=[
  Step(value="Search for information about Leo DiCaprio's girlfriend."), 
  Step(value='Find her current age.'), 
  Step(value='Calculate her current age raised to the 0.43 power.'), 
  Step(value="Given the above steps taken, respond to the user's original question.\n\n")]

然后是每个子任务的执行结果,首先是搜索 Leo DiCaprio's girlfriend

> Entering new AgentExecutor chain...
Thought: I can use the Search tool to find information about Leo DiCaprio's girlfriend.

Action:
```{"action": "Search", "action_input": "Leo DiCaprio girlfriend"}```
Observation: Blake Lively and DiCaprio are believed to have enjoyed a whirlwind five-month romance in 2011. The pair were seen on a yacht together in Cannes, ...
Thought:Based on my search, it seems that Blake Lively was one of Leo DiCaprio's girlfriends. They were believed to have had a five-month romance in 2011 and were seen together on a yacht in Cannes.

> Finished chain.
*****

Step: Search for information about Leo DiCaprio's girlfriend.

Response: Based on my search, it seems that Blake Lively was one of Leo DiCaprio's girlfriends. They were believed to have had a five-month romance in 2011 and were seen together on a yacht in Cannes.

搜到的这个新闻有点老了,得到结果是 Blake Lively,然后计算她的年龄:

> Entering new AgentExecutor chain...
Thought: To find Blake Lively's current age, I can calculate it based on her birthdate. I will use the Calculator tool to subtract her birth year from the current year.

Action:
{"action": "Calculator", "action_input": "2022 - 1987"}

> Entering new LLMMathChain chain...
2022 - 1987

...numexpr.evaluate("2022 - 1987")...

Answer: 35
> Finished chain.

Observation: Answer: 35
Thought:Blake Lively's current age is 35.

> Finished chain.
*****

Step: Find her current age.

Response: Blake Lively's current age is 35.

然后使用数学工具计算年龄的 0.43 次方:

> Entering new AgentExecutor chain...
Thought: To calculate Blake Lively's current age raised to the 0.43 power, I can use a calculator tool.

Action:
{"action": "Calculator", "action_input": "35^0.43"}

> Entering new LLMMathChain chain...
35**0.43

...numexpr.evaluate("35**0.43")...

Answer: 4.612636795281377
> Finished chain.

Observation: Answer: 4.612636795281377
Thought:To calculate Blake Lively's current age raised to the 0.43 power, I used a calculator tool and the result is 4.612636795281377.

Action:
{"action": "Final Answer", "action_input": "Blake Lively's current age raised to the 0.43 power is approximately 4.6126."}


> Finished chain.
*****

Step: Calculate her current age raised to the 0.43 power.

Response: Blake Lively's current age raised to the 0.43 power is approximately 4.6126.

最后得到结果,润色后输出:

> Entering new AgentExecutor chain...
Action:
{
  "action": "Final Answer",
  "action_input": "Blake Lively's current age raised to the 0.43 power is approximately 4.6126."
}

> Finished chain.
*****

Step: Given the above steps taken, respond to the user's original question.

Response: Action:
{
  "action": "Final Answer",
  "action_input": "Blake Lively's current age raised to the 0.43 power is approximately 4.6126."
}
> Finished chain.

总结

在这篇笔记中,我们首先学习了 OpenAI 的插件和 Function Calling 机制,然后再对 Agent 的基本概念做了一个大概的了解,最后详细地学习了 LangChain 中不同的 Agent 类型,包括 Zero-shot ReAct Agent、Conversational ReAct Agent、ReAct DocStore Agent、Self-Ask Agent、OpenAI Functions Agent 和 Plan and execute Agent,这些 Agent 在使用上虽然大同小异,但每一种 Agent 都代表一种解决问题的思路,它们使用了不同的提示语技术:Chain-of-Thought Prompting 和 Plan-and-Solve Prompting。

从这里我们也可以看出提示语的重要性,由此也诞生了一门新的学科:提示工程(Prompt Engineering),这门学科专门研究如何开发和优化提示词,将大模型用于各种应用场景,提高大模型处理复杂任务的能力。LangChain 中内置了大量的提示词,我们将在下一篇笔记中继续学习它。

参考

更多

AI Agents

OpenAI Functions Chain

自从 OpenAI 推出 Function Calling 功能之后,LangChain 就积极地将其应用到自己的项目中,在 LangChain 的文档中,可以看到很多 OpenAI Functions 的身影。除了这篇笔记所介绍的 OpenAI Functions AgentOpenAI Multi Functions Agent,OpenAI Functions 还可以用在 Chain 中,OpenAI Functions Chain 可以用来生成结构化的输出,在信息提取、文本标注等场景下非常有用。

扫描二维码,在手机上阅读!