读源码剖析 Spring Security 的实现原理
Spring Security 是一个轻量级的安全框架,可以和 Spring 项目很好地集成,提供了丰富的身份认证和授权相关的功能,而且还能防止一些常见的网络攻击。我在工作中有很多项目都使用了 Spring Security 框架,但基本上都是浅尝辄止,按照说明文档配置好就完事了,一直没有时间深入地研究过。最近在 Reflectoring 上看到了一篇文章 Getting started with Spring Security and Spring Boot,写得非常全面仔细,感觉是一篇不错的 Spring Security 入门文章,于是花了一点时间拜读了一番,结合着 官方文档 和 源码 系统地学习一下 Spring Security 的实现原理。
入门示例
我们先从一个简单的例子开始,这里我直接使用了 使用 Spring 项目脚手架 中的 Hello World 示例。为了让这个示例程序开启 Spring Security 功能,我们在 pom.xml 文件中引入 spring-boot-starter-security 依赖即可:
<dependency>
    <groupId>org.springframework.boot</groupId>
    <artifactId>spring-boot-starter-security</artifactId>
</dependency>
启动程序,会在控制台日志中看到类似下面这样的信息:
2023-05-15 06:52:52.418  INFO 8596 --- [           main] .s.s.UserDetailsServiceAutoConfiguration :

Using generated security password: eeb386a9-e16a-4b9b-bbc6-c054c8d263b0
这个是由 Spring Security 随机生成的密码。访问 /hello 页面,可以看到出现了一个登录页面:

输入用户名(默认为 user)和密码(控制台日志)登录成功后我们才能正常访问页面。默认的用户名和密码可以使用下面的配置进行修改:
spring.security.user.name=admin
spring.security.user.password=123456
为了后续更好地对 Spring Security 进行配置,理解 Spring Security 的实现原理,我们需要进一步学习 Spring Security 的三大核心组件:
- 过滤器(Servlet Filters)
- 认证(Authentication)
- 授权(Authorization)
Servlet Filters:Spring Security 的基础
我们知道,在 Spring MVC 框架中,DispatcherServlet 负责对用户的 Web 请求进行分发和处理,在请求到达 DispatcherServlet 之前,会经过一系列的 Servlet Filters,这被称之为过滤器,主要作用是拦截请求并对请求做一些前置或后置处理。这些过滤器串在一起,形成一个过滤器链(FilterChain):

我们可以在配置文件中加上下面的日志配置:
logging.level.org.springframework.boot.web.servlet.ServletContextInitializerBeans=TRACE然后重新启动服务,会在控制台输出类似下面这样的日志(为了方便查看,我做了一点格式化):
2023-05-18 07:08:14.805 TRACE 10020 --- [           main] o.s.b.w.s.ServletContextInitializerBeans :
    Added existing Filter initializer bean 'webMvcMetricsFilter'; order=-2147483647,
    resource=class path resource [org/springframework/boot/actuate/autoconfigure/metrics/web/servlet/WebMvcMetricsAutoConfiguration.class]
2023-05-18 07:08:14.806 TRACE 10020 --- [           main] o.s.b.w.s.ServletContextInitializerBeans :
    Added existing Filter initializer bean 'securityFilterChainRegistration'; order=-100,
    resource=class path resource [org/springframework/boot/autoconfigure/security/servlet/SecurityFilterAutoConfiguration.class]
2023-05-18 07:08:14.808 TRACE 10020 --- [           main] o.s.b.w.s.ServletContextInitializerBeans :
    Added existing Servlet initializer bean 'dispatcherServletRegistration'; order=2147483647,
    resource=class path resource [org/springframework/boot/autoconfigure/web/servlet/DispatcherServletAutoConfiguration$DispatcherServletRegistrationConfiguration.class]
2023-05-18 07:08:14.810 TRACE 10020 --- [           main] o.s.b.w.s.ServletContextInitializerBeans :
    Added existing Filter initializer bean 'errorPageSecurityFilter'; order=2147483647,
    resource=class path resource [org/springframework/boot/autoconfigure/security/servlet/SpringBootWebSecurityConfiguration$ErrorPageSecurityFilterConfiguration.class]
2023-05-18 07:08:14.813 TRACE 10020 --- [           main] o.s.b.w.s.ServletContextInitializerBeans :
    Added existing ServletContextInitializer initializer bean 'servletEndpointRegistrar'; order=2147483647,
    resource=class path resource [org/springframework/boot/actuate/autoconfigure/endpoint/web/ServletEndpointManagementContextConfiguration$WebMvcServletEndpointManagementContextConfiguration.class]
2023-05-18 07:08:14.828 TRACE 10020 --- [           main] o.s.b.w.s.ServletContextInitializerBeans :
    Created Filter initializer for bean 'characterEncodingFilter'; order=-2147483648,
    resource=class path resource [org/springframework/boot/autoconfigure/web/servlet/HttpEncodingAutoConfiguration.class]
2023-05-18 07:08:14.831 TRACE 10020 --- [           main] o.s.b.w.s.ServletContextInitializerBeans :
    Created Filter initializer for bean 'formContentFilter'; order=-9900,
    resource=class path resource [org/springframework/boot/autoconfigure/web/servlet/WebMvcAutoConfiguration.class]
2023-05-18 07:08:14.834 TRACE 10020 --- [           main] o.s.b.w.s.ServletContextInitializerBeans :
    Created Filter initializer for bean 'requestContextFilter'; order=-105,
    resource=class path resource [org/springframework/boot/autoconfigure/web/servlet/WebMvcAutoConfiguration$WebMvcAutoConfigurationAdapter.class]
2023-05-18 07:08:14.842 DEBUG 10020 --- [           main] o.s.b.w.s.ServletContextInitializerBeans :
    Mapping filters:
        filterRegistrationBean urls=[/*] order=-2147483647,
        springSecurityFilterChain urls=[/*] order=-100,
        filterRegistrationBean urls=[/*] order=2147483647,
        characterEncodingFilter urls=[/*] order=-2147483648,
        formContentFilter urls=[/*] order=-9900,
        requestContextFilter urls=[/*] order=-105
2023-05-18 07:08:14.844 DEBUG 10020 --- [           main] o.s.b.w.s.ServletContextInitializerBeans :
    Mapping servlets: dispatcherServlet urls=[/]
这里显示了应用开启的所有 Filter 以及对应的自动配置类,可以看到 Spring Security 自动注入了两个 FilterRegistrationBean:
- 来自配置类
SecurityFilterAutoConfiguration的securityFilterChainRegistration - 来自配置类
ErrorPageSecurityFilterConfiguration的errorPageSecurityFilter
DelegatingFilterProxy:Servlet Filter 与 Spring Bean 的桥梁
注意上面显示的并非 Filter 的名字,而是 FilterRegistrationBean 的名字,这是一种 RegistrationBean,它实现了 ServletContextInitializer 接口,用于在程序启动时,将 Filter 或 Servlet 注入到 ServletContext 中:
public abstract class RegistrationBean implements ServletContextInitializer, Ordered {

    @Override
    public final void onStartup(ServletContext servletContext) throws ServletException {
        ...
        register(description, servletContext);
    }

}
其中 securityFilterChainRegistration 的定义如下:
@Bean
@ConditionalOnBean(name = DEFAULT_FILTER_NAME)
public DelegatingFilterProxyRegistrationBean securityFilterChainRegistration(
        SecurityProperties securityProperties) {
    DelegatingFilterProxyRegistrationBean registration = new DelegatingFilterProxyRegistrationBean(
            DEFAULT_FILTER_NAME);
    registration.setOrder(securityProperties.getFilter().getOrder());
    registration.setDispatcherTypes(getDispatcherTypes(securityProperties));
    return registration;
}
这个 RegistrationBean 的类型为 DelegatingFilterProxyRegistrationBean,由它注入的 Filter 叫 DelegatingFilterProxy:
public class DelegatingFilterProxyRegistrationBean extends AbstractFilterRegistrationBean<DelegatingFilterProxy> {
    ...
}
这是一个非常重要的 Servlet Filter,它充当着 Servlet 容器和 Spring 上下文之间的桥梁,由于 Servlet 容器有着它自己的标准,在注入 Filter 时并不知道 Spring Bean 的存在,所以我们可以通过 DelegatingFilterProxy 来实现 Bean Filter 的延迟加载:
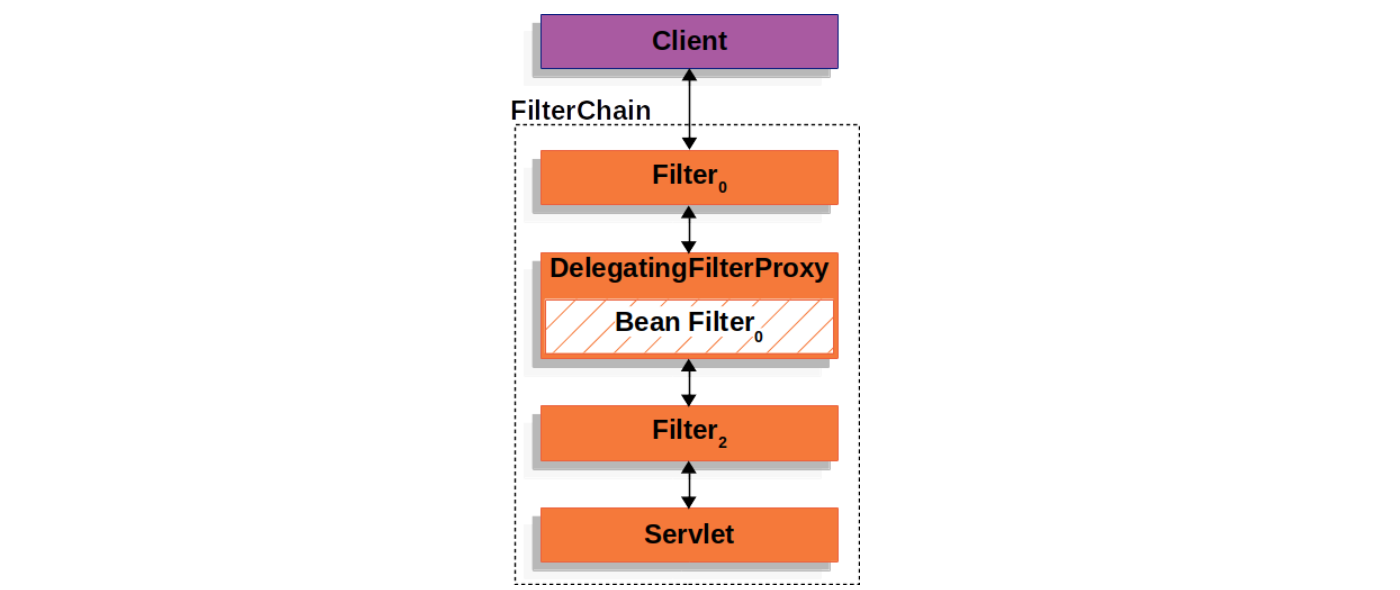
看一下 DelegatingFilterProxy 的实现:
public class DelegatingFilterProxy extends GenericFilterBean {

    @Override
    public void doFilter(ServletRequest request, ServletResponse response, FilterChain filterChain)
            throws ServletException, IOException {

        // Lazily initialize the delegate if necessary.
        Filter delegateToUse = this.delegate;
        if (delegateToUse == null) {
            synchronized (this.delegateMonitor) {
                delegateToUse = this.delegate;
                if (delegateToUse == null) {
                    WebApplicationContext wac = findWebApplicationContext();
                    if (wac == null) {
                        throw new IllegalStateException("No WebApplicationContext found: " +
                                "no ContextLoaderListener or DispatcherServlet registered?");
                    }
                    delegateToUse = initDelegate(wac);
                }
                this.delegate = delegateToUse;
            }
        }

        // Let the delegate perform the actual doFilter operation.
        invokeDelegate(delegateToUse, request, response, filterChain);
    }
}
这段代码很容易理解,首先判断代理的 Bean Filter 是否存在,如果不存在则根据 findWebApplicationContext() 找到 Web 应用上下文,然后从上下文中获取 Bean Filter 并初始化,最后再调用该 Bean Filter。
FilterChainProxy:Spring Security 的统一入口
那么接下来的问题是,这个 DelegatingFilterProxy 代理的 Bean Filter 是什么呢?我们从上面定义 DelegatingFilterProxyRegistrationBean 的地方可以看出,代理的 Bean Filter 叫做 DEFAULT_FILTER_NAME,查看它的定义就知道,实际上就是 springSecurityFilterChain:
public static final String DEFAULT_FILTER_NAME = "springSecurityFilterChain";那么这个 springSecurityFilterChain 是在哪定义的呢?我们可以在 WebSecurityConfiguration 配置类中找到答案:
public class WebSecurityConfiguration {

    @Bean(name = AbstractSecurityWebApplicationInitializer.DEFAULT_FILTER_NAME)
    public Filter springSecurityFilterChain() throws Exception {
        boolean hasConfigurers = this.webSecurityConfigurers != null && !this.webSecurityConfigurers.isEmpty();
        boolean hasFilterChain = !this.securityFilterChains.isEmpty();
        if (!hasConfigurers && !hasFilterChain) {
            WebSecurityConfigurerAdapter adapter = this.objectObjectPostProcessor
                    .postProcess(new WebSecurityConfigurerAdapter() {
                    });
            this.webSecurity.apply(adapter);
        }
        for (SecurityFilterChain securityFilterChain : this.securityFilterChains) {
            this.webSecurity.addSecurityFilterChainBuilder(() -> securityFilterChain);
            for (Filter filter : securityFilterChain.getFilters()) {
                if (filter instanceof FilterSecurityInterceptor) {
                    this.webSecurity.securityInterceptor((FilterSecurityInterceptor) filter);
                    break;
                }
            }
        }
        for (WebSecurityCustomizer customizer : this.webSecurityCustomizers) {
            customizer.customize(this.webSecurity);
        }
        return this.webSecurity.build();
    }
}很显然,springSecurityFilterChain 经过一系列的安全配置,最后通过 this.webSecurity.build() 构建出来的,进一步深入到 webSecurity 的源码我们就可以发现它的类型是 FilterChainProxy:
public final class WebSecurity extends AbstractConfiguredSecurityBuilder<Filter, WebSecurity>
        implements SecurityBuilder<Filter>, ApplicationContextAware, ServletContextAware {

    @Override
    protected Filter performBuild() throws Exception {

        int chainSize = this.ignoredRequests.size() + this.securityFilterChainBuilders.size();
        List<SecurityFilterChain> securityFilterChains = new ArrayList<>(chainSize);
        List<RequestMatcherEntry<List<WebInvocationPrivilegeEvaluator>>> requestMatcherPrivilegeEvaluatorsEntries = new ArrayList<>();
        for (RequestMatcher ignoredRequest : this.ignoredRequests) {
            SecurityFilterChain securityFilterChain = new DefaultSecurityFilterChain(ignoredRequest);
            securityFilterChains.add(securityFilterChain);
            requestMatcherPrivilegeEvaluatorsEntries
                    .add(getRequestMatcherPrivilegeEvaluatorsEntry(securityFilterChain));
        }
        for (SecurityBuilder<? extends SecurityFilterChain> securityFilterChainBuilder : this.securityFilterChainBuilders) {
            SecurityFilterChain securityFilterChain = securityFilterChainBuilder.build();
            securityFilterChains.add(securityFilterChain);
            requestMatcherPrivilegeEvaluatorsEntries
                    .add(getRequestMatcherPrivilegeEvaluatorsEntry(securityFilterChain));
        }

        FilterChainProxy filterChainProxy = new FilterChainProxy(securityFilterChains);
        if (this.httpFirewall != null) {
            filterChainProxy.setFirewall(this.httpFirewall);
        }
        if (this.requestRejectedHandler != null) {
            filterChainProxy.setRequestRejectedHandler(this.requestRejectedHandler);
        }
        filterChainProxy.afterPropertiesSet();

        Filter result = filterChainProxy;

        this.postBuildAction.run();
        return result;
    }
}
从 FilterChainProxy 的名字可以看出来,它也是一个代理类,它代理的类叫做 SecurityFilterChain,它包含了多个 Security Filters 形成一个过滤器链,这和 Servlet Filters 有点类似,只不过这些 Security Filters 都是普通的 Spring Bean:
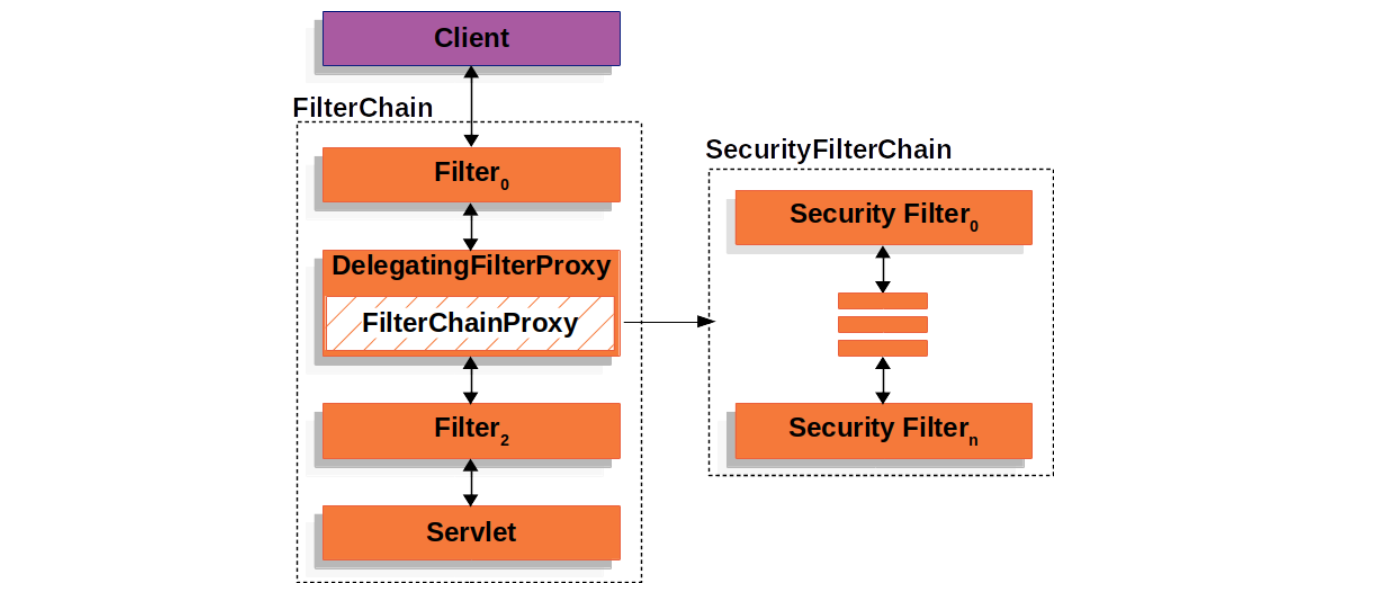
使用 FilterChainProxy 来代理 Security Filters 相比于直接使用 Servlet Filters 或使用 DelegatingFilterProxy 来代理有几个明显的好处:
FilterChainProxy作为 Spring Security 对 Servlet 的支持入口,方便理解和调试;FilterChainProxy可以对 Spring Security 做一些集中处理,比如统一清除SecurityContext防止内存泄漏,以及统一使用HttpFirewall对应用进行保护等;- 支持多个
SecurityFilterChain,传统的Servlet Filters只能通过 URL 来匹配,使用FilterChainProxy可以配合RequestMatcher更灵活地控制调用哪个SecurityFilterChain;
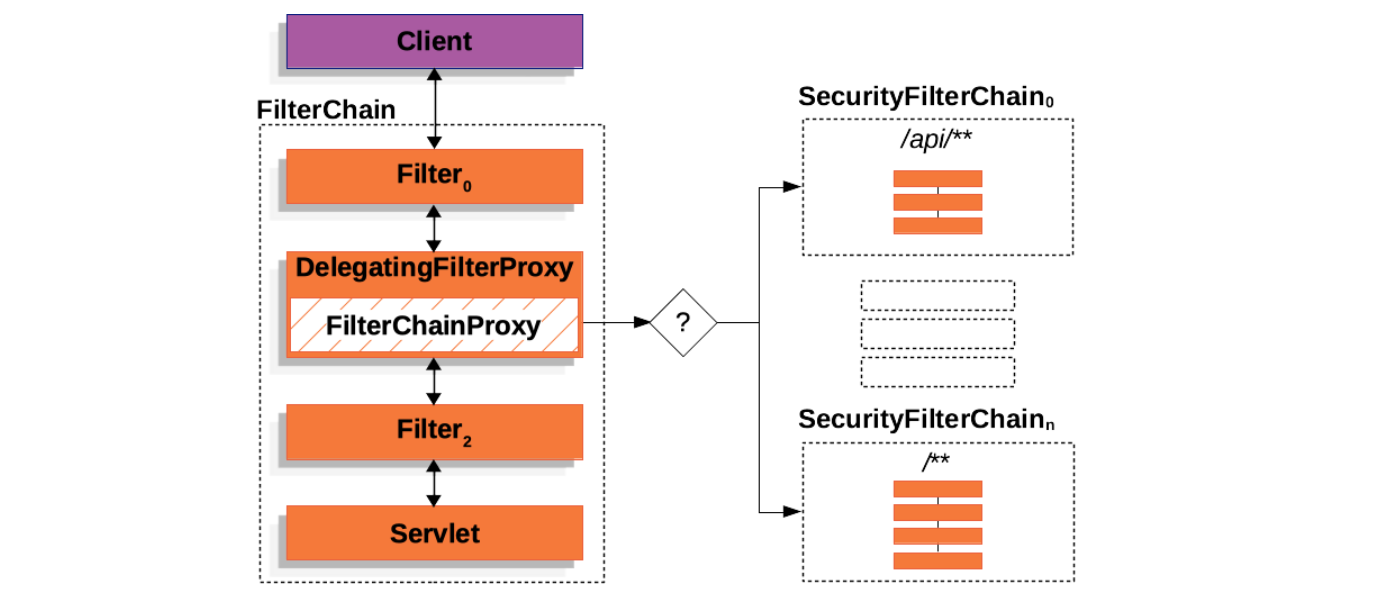
构建 SecurityFilterChain
上面讲到,FilterChainProxy 是通过 webSecurity 构建的,一个 FilterChainProxy 里包含一个或多个 SecurityFilterChain,那么 SecurityFilterChain 是由谁构建的呢?答案是 httpSecurity。我们可以在 SecurityFilterChainConfiguration 配置类中看到 SecurityFilterChain 的构建过程:
@Configuration(proxyBeanMethods = false)
@ConditionalOnDefaultWebSecurity
static class SecurityFilterChainConfiguration {

    @Bean
    @Order(SecurityProperties.BASIC_AUTH_ORDER)
    SecurityFilterChain defaultSecurityFilterChain(HttpSecurity http) throws Exception {
        http.authorizeRequests().anyRequest().authenticated();
        http.formLogin();
        http.httpBasic();
        return http.build();
    }
}
深入到 http.build() 的源码,可以看到过滤器链的默认实现为 DefaultSecurityFilterChain:
public final class HttpSecurity extends AbstractConfiguredSecurityBuilder<DefaultSecurityFilterChain, HttpSecurity>
        implements SecurityBuilder<DefaultSecurityFilterChain>, HttpSecurityBuilder<HttpSecurity> {

    @SuppressWarnings("unchecked")
    @Override
    protected DefaultSecurityFilterChain performBuild() {

        this.filters.sort(OrderComparator.INSTANCE);
        List<Filter> sortedFilters = new ArrayList<>(this.filters.size());
        for (Filter filter : this.filters) {
            sortedFilters.add(((OrderedFilter) filter).filter);
        }
        return new DefaultSecurityFilterChain(this.requestMatcher, sortedFilters);
    }
}
构建 Security Filters
通过上面的梳理,我们大概清楚了 SecurityFilterChain 的构建过程,接下来,我们继续看 Security Filters 的构建过程。我们知道,一个SecurityFilterChain 中包含了多个 Security Filters,那么这些 Security Filters 是从哪里来的呢?
在 HttpSecurity 的代码里可以找到这么几个方法:
public HttpSecurity addFilter(Filter filter)public HttpSecurity addFilterBefore(Filter filter, Class<? extends Filter> beforeFilter)public HttpSecurity addFilterAfter(Filter filter, Class<? extends Filter> afterFilter)public HttpSecurity addFilterAt(Filter filter, Class<? extends Filter> atFilter)
我们不妨在 addFilter 方法内下个断点,然后以调试模式启动程序,每次触发断点时,我们将对应的 Filter 记录下来,并通过堆栈找到该 Filter 是从何处添加的:
| 序号 | Filter | 来源 |
|---|---|---|
| 1 | WebAsyncManagerIntegrationFilter | HttpSecurityConfiguration.httpSecurity() |
| 2 | CsrfFilter | CsrfConfigurer.configure() |
| 3 | ExceptionTranslationFilter | ExceptionHandlingConfigurer.configure() |
| 4 | HeaderWriterFilter | HeadersConfigurer.configure() |
| 5 | SessionManagementFilter | SessionManagementConfigurer.configure() |
| 6 | DisableEncodeUrlFilter | SessionManagementConfigurer.configure() |
| 7 | SecurityContextPersistenceFilter | SecurityContextConfigurer.configure() |
| 8 | RequestCacheAwareFilter | RequestCacheConfigurer.configure() |
| 9 | AnonymousAuthenticationFilter | AnonymousConfigurer.configure() |
| 10 | SecurityContextHolderAwareRequestFilter | ServletApiConfigurer.configure() |
| 11 | DefaultLoginPageGeneratingFilter | DefaultLoginPageConfigurer.configure() |
| 12 | DefaultLogoutPageGeneratingFilter | DefaultLoginPageConfigurer.configure() |
| 13 | LogoutFilter | LogoutConfigurer.configure() |
| 14 | FilterSecurityInterceptor | AbstractInterceptUrlConfigurer.configure() |
| 15 | UsernamePasswordAuthenticationFilter | AbstractAuthenticationFilterConfigurer.configure() |
| 16 | BasicAuthenticationFilter | HttpBasicConfigurer.configure() |
除了第一个 WebAsyncManagerIntegrationFilter 是在创建 HttpSecurity 的时候直接添加的,其他的 Filter 都是通过 XXXConfigurer 这样的配置器添加的。我们继续深挖下去可以发现,生成这些配置器的地方有两个,第一个地方是在 HttpSecurityConfiguration 配置类中创建 HttpSecurity 时,如下所示:
class HttpSecurityConfiguration {

    @Bean(HTTPSECURITY_BEAN_NAME)
    @Scope("prototype")
    HttpSecurity httpSecurity() throws Exception {
        WebSecurityConfigurerAdapter.LazyPasswordEncoder passwordEncoder = new WebSecurityConfigurerAdapter.LazyPasswordEncoder(
                this.context);
        AuthenticationManagerBuilder authenticationBuilder = new WebSecurityConfigurerAdapter.DefaultPasswordEncoderAuthenticationManagerBuilder(
                this.objectPostProcessor, passwordEncoder);
        authenticationBuilder.parentAuthenticationManager(authenticationManager());
        authenticationBuilder.authenticationEventPublisher(getAuthenticationEventPublisher());
        HttpSecurity http = new HttpSecurity(this.objectPostProcessor, authenticationBuilder, createSharedObjects());
        // @formatter:off
        http
            .csrf(withDefaults())
            .addFilter(new WebAsyncManagerIntegrationFilter())
            .exceptionHandling(withDefaults())
            .headers(withDefaults())
            .sessionManagement(withDefaults())
            .securityContext(withDefaults())
            .requestCache(withDefaults())
            .anonymous(withDefaults())
            .servletApi(withDefaults())
            .apply(new DefaultLoginPageConfigurer<>());
        http.logout(withDefaults());
        // @formatter:on
        applyDefaultConfigurers(http);
        return http;
    }
}
另外一个地方则是在上面的 SecurityFilterChainConfiguration 配置类中使用 http.build() 构建 SecurityFilterChain 之前(参见上面 defaultSecurityFilterChain 的代码),至此,我们大概理清了所有的 Security Filters 是如何创建的,下面再以表格的形式重新整理下:
| 序号 | Filter | httpSecurity 配置 |
|---|---|---|
| 1 | WebAsyncManagerIntegrationFilter | http.addFilter(new WebAsyncManagerIntegrationFilter()) |
| 2 | CsrfFilter | http.csrf(withDefaults()) |
| 3 | ExceptionTranslationFilter | http.exceptionHandling(withDefaults()) |
| 4 | HeaderWriterFilter | http.headers(withDefaults()) |
| 5 | SessionManagementFilter | http.sessionManagement(withDefaults()) |
| 6 | DisableEncodeUrlFilter | http.sessionManagement(withDefaults()) |
| 7 | SecurityContextPersistenceFilter | http.securityContext(withDefaults()) |
| 8 | RequestCacheAwareFilter | http.requestCache(withDefaults()) |
| 9 | AnonymousAuthenticationFilter | http.anonymous(withDefaults()) |
| 10 | SecurityContextHolderAwareRequestFilter | http.servletApi(withDefaults()) |
| 11 | DefaultLoginPageGeneratingFilter | http.apply(new DefaultLoginPageConfigurer<>()) |
| 12 | DefaultLogoutPageGeneratingFilter | http.apply(new DefaultLoginPageConfigurer<>()) |
| 13 | LogoutFilter | http.logout(withDefaults()) |
| 14 | FilterSecurityInterceptor | http.authorizeRequests().anyRequest().authenticated() |
| 15 | UsernamePasswordAuthenticationFilter | http.formLogin() |
| 16 | BasicAuthenticationFilter | http.httpBasic() |
其实,如果仔细观察我们的程序输出的日志,也可以看到 Spring Security 默认的过滤器链为 DefaultSecurityFilterChain,以及它注入的所有 Security Filters:
2023-05-17 08:16:18.173  INFO 3936 --- [           main] o.s.s.web.DefaultSecurityFilterChain     : Will secure any request with [
        org.springframework.security.web.session.DisableEncodeUrlFilter@1d6751e3,
        org.springframework.security.web.context.request.async.WebAsyncManagerIntegrationFilter@2d258eff,
        org.springframework.security.web.context.SecurityContextPersistenceFilter@202898d7,
        org.springframework.security.web.header.HeaderWriterFilter@2c26ba07,
        org.springframework.security.web.csrf.CsrfFilter@52d3fafd,
        org.springframework.security.web.authentication.logout.LogoutFilter@235c997d,
        org.springframework.security.web.authentication.UsernamePasswordAuthenticationFilter@5d5c41e5,
        org.springframework.security.web.authentication.ui.DefaultLoginPageGeneratingFilter@50b93353,
        org.springframework.security.web.authentication.ui.DefaultLogoutPageGeneratingFilter@6dca31eb,
        org.springframework.security.web.authentication.www.BasicAuthenticationFilter@22825e1e,
        org.springframework.security.web.savedrequest.RequestCacheAwareFilter@2c719bd4,
        org.springframework.security.web.servletapi.SecurityContextHolderAwareRequestFilter@53aa38be,
        org.springframework.security.web.authentication.AnonymousAuthenticationFilter@4a058df8,
        org.springframework.security.web.session.SessionManagementFilter@42ea7565,
        org.springframework.security.web.access.ExceptionTranslationFilter@77cb452c,
        org.springframework.security.web.access.intercept.FilterSecurityInterceptor@8054fe2]
在某些低版本中,可能会显示
DefaultSecurityFilterChain: Will not secure any request这样的日志,这可能是 Spring Security 的 BUG,升级到最新版本即可。
其中有几个 Security Filters 比较重要,是实现认证和授权的基础:
CsrfFilter:默认开启对所有接口的 CSRF 防护,关于 CSRF 的详细信息,可以参考 Configuring CSRF/XSRF with Spring Security;DefaultLoginPageGeneratingFilter:用于生成/login登录页面;DefaultLogoutPageGeneratingFilter:用于生成/login?logout登出页面;LogoutFilter:当用户退出应用时被调用,它通过注册的LogoutHandler删除会话并清理SecurityContext,然后通过LogoutSuccessHandler将页面重定向到/login?logout;UsernamePasswordAuthenticationFilter:实现基于用户名和密码的安全认证,当认证失败,抛出AuthenticationException异常;BasicAuthenticationFilter:实现 Basic 安全认证,当认证失败,抛出AuthenticationException异常;AnonymousAuthenticationFilter:如果SecurityContext中没有Authentication对象时,它自动创建一个匿名用户anonymousUser,角色为ROLE_ANONYMOUS;FilterSecurityInterceptor:这是 Spring Security 的最后一个Security Filters,它从SecurityContext中获取Authentication对象,然后对请求的资源做权限判断,当授权失败,抛出AccessDeniedException异常;ExceptionTranslationFilter:用于处理过滤器链中抛出的AuthenticationException和AccessDeniedException异常,AuthenticationException异常由AuthenticationEntryPoint来处理,AccessDeniedException异常由AccessDeniedHandler来处理;
认证和授权
有了 Security Filters,我们就可以实现各种 Spring Security 的相关功能了。应用程序的安全性归根结底包括了两个主要问题:认证(Authentication) 和 授权(Authorization)。认证解决的是 你是谁? 的问题,而授权负责解决 你被允许做什么?,授权也被称为 访问控制(Access Control)。这一节将深入学习 Spring Security 是如何实现认证和授权的。
跳转到 /login 页面
让我们回到第一节的例子,当访问 /hello 时,可以看到浏览器自动跳转到了 /login 登录页面,那么 Spring Security 是如何实现的呢?为了一探究竟,我们可以将 Spring Security 的日志级别调到 TRACE:
logging.level.org.springframework.security=TRACE这样我们就能完整地看到这个请求经过 Security Filters 的处理过程:
2023-05-20 09:37:38.558 DEBUG 6632 --- [nio-8080-exec-9] o.s.security.web.FilterChainProxy        : Securing GET /hello
2023-05-20 09:37:38.559 TRACE 6632 --- [nio-8080-exec-9] o.s.security.web.FilterChainProxy        : Invoking DisableEncodeUrlFilter (1/17)
2023-05-20 09:37:38.559 TRACE 6632 --- [nio-8080-exec-9] o.s.security.web.FilterChainProxy        : Invoking WebAsyncManagerIntegrationFilter (2/17)
2023-05-20 09:37:38.560 TRACE 6632 --- [nio-8080-exec-9] o.s.security.web.FilterChainProxy        : Invoking SecurityContextPersistenceFilter (3/17)
2023-05-20 09:37:38.561 TRACE 6632 --- [nio-8080-exec-9] w.c.HttpSessionSecurityContextRepository : No HttpSession currently exists
2023-05-20 09:37:38.561 TRACE 6632 --- [nio-8080-exec-9] w.c.HttpSessionSecurityContextRepository : Created SecurityContextImpl [Null authentication]
2023-05-20 09:37:38.562 DEBUG 6632 --- [nio-8080-exec-9] s.s.w.c.SecurityContextPersistenceFilter : Set SecurityContextHolder to empty SecurityContext
2023-05-20 09:37:38.562 TRACE 6632 --- [nio-8080-exec-9] o.s.security.web.FilterChainProxy        : Invoking HeaderWriterFilter (4/17)
2023-05-20 09:37:38.562 TRACE 6632 --- [nio-8080-exec-9] o.s.security.web.FilterChainProxy        : Invoking CorsFilter (5/17)
2023-05-20 09:37:38.566 TRACE 6632 --- [nio-8080-exec-9] o.s.security.web.FilterChainProxy        : Invoking CsrfFilter (6/17)
2023-05-20 09:37:38.567 TRACE 6632 --- [nio-8080-exec-9] o.s.security.web.csrf.CsrfFilter         : Did not protect against CSRF since request did not match CsrfNotRequired [TRACE, HEAD, GET, OPTIONS]
2023-05-20 09:37:38.568 TRACE 6632 --- [nio-8080-exec-9] o.s.security.web.FilterChainProxy        : Invoking LogoutFilter (7/17)
2023-05-20 09:37:38.571 TRACE 6632 --- [nio-8080-exec-9] o.s.s.w.a.logout.LogoutFilter            : Did not match request to Ant [pattern='/logout', POST]
2023-05-20 09:37:38.573 TRACE 6632 --- [nio-8080-exec-9] o.s.security.web.FilterChainProxy        : Invoking UsernamePasswordAuthenticationFilter (8/17)
2023-05-20 09:37:38.574 TRACE 6632 --- [nio-8080-exec-9] w.a.UsernamePasswordAuthenticationFilter : Did not match request to Ant [pattern='/login', POST]
2023-05-20 09:37:38.576 TRACE 6632 --- [nio-8080-exec-9] o.s.security.web.FilterChainProxy        : Invoking DefaultLoginPageGeneratingFilter (9/17)
2023-05-20 09:37:38.578 TRACE 6632 --- [nio-8080-exec-9] o.s.security.web.FilterChainProxy        : Invoking DefaultLogoutPageGeneratingFilter (10/17)
2023-05-20 09:37:38.582 TRACE 6632 --- [nio-8080-exec-9] .w.a.u.DefaultLogoutPageGeneratingFilter : Did not render default logout page since request did not match [Ant [pattern='/logout', GET]]
2023-05-20 09:37:38.583 TRACE 6632 --- [nio-8080-exec-9] o.s.security.web.FilterChainProxy        : Invoking BasicAuthenticationFilter (11/17)
2023-05-20 09:37:38.584 TRACE 6632 --- [nio-8080-exec-9] o.s.s.w.a.www.BasicAuthenticationFilter  : Did not process authentication request since failed to find username and password in Basic Authorization header
2023-05-20 09:37:38.587 TRACE 6632 --- [nio-8080-exec-9] o.s.security.web.FilterChainProxy        : Invoking RequestCacheAwareFilter (12/17)
2023-05-20 09:37:38.588 TRACE 6632 --- [nio-8080-exec-9] o.s.s.w.s.HttpSessionRequestCache        : No saved request
2023-05-20 09:37:38.590 TRACE 6632 --- [nio-8080-exec-9] o.s.security.web.FilterChainProxy        : Invoking SecurityContextHolderAwareRequestFilter (13/17)
2023-05-20 09:37:38.591 TRACE 6632 --- [nio-8080-exec-9] o.s.security.web.FilterChainProxy        : Invoking AnonymousAuthenticationFilter (14/17)
2023-05-20 09:37:38.592 TRACE 6632 --- [nio-8080-exec-9] o.s.s.w.a.AnonymousAuthenticationFilter  : Set SecurityContextHolder to AnonymousAuthenticationToken [Principal=anonymousUser, Credentials=[PROTECTED], Authenticated=true, Details=WebAuthenticationDetails [RemoteIpAddress=127.0.0.1, SessionId=null], Granted Authorities=[ROLE_ANONYMOUS]]
2023-05-20 09:37:38.593 TRACE 6632 --- [nio-8080-exec-9] o.s.security.web.FilterChainProxy        : Invoking SessionManagementFilter (15/17)
2023-05-20 09:37:38.593 TRACE 6632 --- [nio-8080-exec-9] o.s.security.web.FilterChainProxy        : Invoking ExceptionTranslationFilter (16/17)
2023-05-20 09:37:38.594 TRACE 6632 --- [nio-8080-exec-9] o.s.security.web.FilterChainProxy        : Invoking FilterSecurityInterceptor (17/17)
2023-05-20 09:37:38.596 TRACE 6632 --- [nio-8080-exec-9] edFilterInvocationSecurityMetadataSource : Did not match request to EndpointRequestMatcher includes=[health], excludes=[], includeLinks=false - [permitAll] (1/2)
2023-05-20 09:37:38.610 TRACE 6632 --- [nio-8080-exec-9] o.s.s.w.a.i.FilterSecurityInterceptor    : Did not re-authenticate AnonymousAuthenticationToken [Principal=anonymousUser, Credentials=[PROTECTED], Authenticated=true, Details=WebAuthenticationDetails [RemoteIpAddress=127.0.0.1, SessionId=null], Granted Authorities=[ROLE_ANONYMOUS]] before authorizing
2023-05-20 09:37:38.619 TRACE 6632 --- [nio-8080-exec-9] o.s.s.w.a.i.FilterSecurityInterceptor    : Authorizing filter invocation [GET /hello] with attributes [authenticated]
2023-05-20 09:37:38.626 TRACE 6632 --- [nio-8080-exec-9] o.s.s.w.a.expression.WebExpressionVoter  : Voted to deny authorization
2023-05-20 09:37:38.632 TRACE 6632 --- [nio-8080-exec-9] o.s.s.w.a.i.FilterSecurityInterceptor    : Failed to authorize filter invocation [GET /hello] with attributes [authenticated] using AffirmativeBased [DecisionVoters=[org.springframework.security.web.access.expression.WebExpressionVoter@f613067], AllowIfAllAbstainDecisions=false]
2023-05-20 09:37:38.640 TRACE 6632 --- [nio-8080-exec-9] o.s.s.w.a.ExceptionTranslationFilter     : Sending AnonymousAuthenticationToken [Principal=anonymousUser, Credentials=[PROTECTED], Authenticated=true, Details=WebAuthenticationDetails [RemoteIpAddress=127.0.0.1, SessionId=null], Granted Authorities=[ROLE_ANONYMOUS]]
to authentication entry point since access is denied

org.springframework.security.access.AccessDeniedException: Access is denied
        at org.springframework.security.access.vote.AffirmativeBased.decide(AffirmativeBased.java:73) ~[spring-security-core-5.7.8.jar:5.7.8]

2023-05-20 09:37:38.691 DEBUG 6632 --- [nio-8080-exec-9] o.s.s.w.s.HttpSessionRequestCache        : Saved request http://localhost:8080/hello to session
2023-05-20 09:37:38.693 DEBUG 6632 --- [nio-8080-exec-9] s.w.a.DelegatingAuthenticationEntryPoint : Trying to match using And [Not [RequestHeaderRequestMatcher [expectedHeaderName=X-Requested-With, expectedHeaderValue=XMLHttpRequest]], MediaTypeRequestMatcher [contentNegotiationStrategy=org.springframework.web.accept.HeaderContentNegotiationStrategy@4b95451, matchingMediaTypes=[application/xhtml+xml, image/*, text/html, text/plain], useEquals=false, ignoredMediaTypes=[*/*]]]
2023-05-20 09:37:38.701 DEBUG 6632 --- [nio-8080-exec-9] s.w.a.DelegatingAuthenticationEntryPoint : Match found! Executing org.springframework.security.web.authentication.LoginUrlAuthenticationEntryPoint@168ad26f
2023-05-20 09:37:38.709 DEBUG 6632 --- [nio-8080-exec-9] o.s.s.web.DefaultRedirectStrategy        : Redirecting to http://localhost:8080/login
2023-05-20 09:37:38.712 TRACE 6632 --- [nio-8080-exec-9] o.s.s.w.header.writers.HstsHeaderWriter  : Not injecting HSTS header since it did not match request to [Is Secure]
2023-05-20 09:37:38.720 DEBUG 6632 --- [nio-8080-exec-9] w.c.HttpSessionSecurityContextRepository : Did not store empty SecurityContext
2023-05-20 09:37:38.730 DEBUG 6632 --- [nio-8080-exec-9] w.c.HttpSessionSecurityContextRepository : Did not store empty SecurityContext
2023-05-20 09:37:38.731 DEBUG 6632 --- [nio-8080-exec-9] s.s.w.c.SecurityContextPersistenceFilter : Cleared SecurityContextHolder to complete request
这个过程中有两点比较重要:第一点是经过 AnonymousAuthenticationFilter 时,将当前用户设置为 anonymousUser,角色为 ROLE_ANONYMOUS;第二点是经过 FilterSecurityInterceptor 时,校验当前用户是否有访问 /hello 页面的权限,在上面的 defaultSecurityFilterChain 中,可以看到 http.authorizeRequests().anyRequest().authenticated() 这样的代码,这说明 Spring Security 默认对所有的页面都开启了鉴权,所以会抛出 AccessDeniedException 异常,而这个异常被 ExceptionTranslationFilter 拦截,并将这个异常交给 LoginUrlAuthenticationEntryPoint 处理,从而重定向到 /login 页面,整个过程的示意图如下:
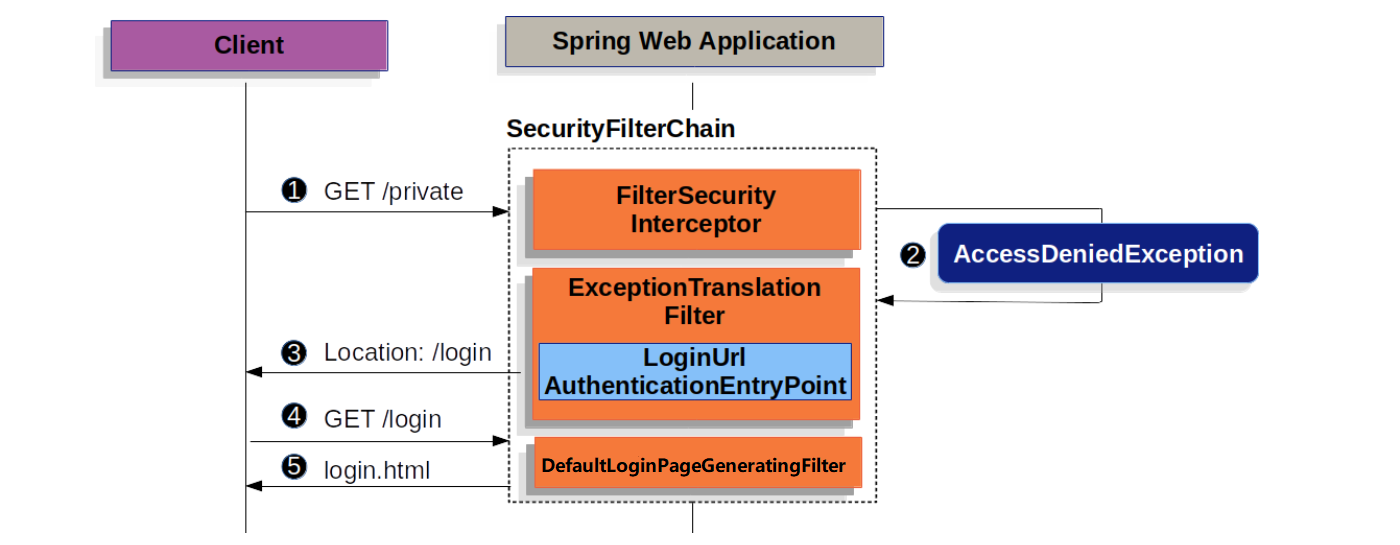
接下来,浏览器开始访问重定向后的 /login 页面,这时请求又会再一次经历一系列的 Security Filters,和上面的 /hello 请求不一样的是,/login 请求经过 DefaultLoginPageGeneratingFilter 时,会生成上面我们看到的登录页面并结束整个调用链:
public class DefaultLoginPageGeneratingFilter extends GenericFilterBean {

    private void doFilter(HttpServletRequest request, HttpServletResponse response, FilterChain chain)
            throws IOException, ServletException {
        boolean loginError = isErrorPage(request);
        boolean logoutSuccess = isLogoutSuccess(request);
        if (isLoginUrlRequest(request) || loginError || logoutSuccess) {
            String loginPageHtml = generateLoginPageHtml(request, loginError, logoutSuccess);
            response.setContentType("text/html;charset=UTF-8");
            response.setContentLength(loginPageHtml.getBytes(StandardCharsets.UTF_8).length);
            response.getWriter().write(loginPageHtml);
            return;
        }
        chain.doFilter(request, response);
    }
}AuthenticationManager:剖析认证流程
接下来,输入用户名和密码并提交,请求会再一次经历 Security Filters,这一次,请求在 UsernamePasswordAuthenticationFilter 这里被拦截下来,并开始了用户名和密码的认证过程:
public class UsernamePasswordAuthenticationFilter extends AbstractAuthenticationProcessingFilter {

    @Override
    public Authentication attemptAuthentication(HttpServletRequest request, HttpServletResponse response)
            throws AuthenticationException {
        if (this.postOnly && !request.getMethod().equals("POST")) {
            throw new AuthenticationServiceException("Authentication method not supported: " + request.getMethod());
        }
        String username = obtainUsername(request);
        username = (username != null) ? username.trim() : "";
        String password = obtainPassword(request);
        password = (password != null) ? password : "";
        UsernamePasswordAuthenticationToken authRequest = UsernamePasswordAuthenticationToken.unauthenticated(username,
                password);
        // Allow subclasses to set the "details" property
        setDetails(request, authRequest);
        return this.getAuthenticationManager().authenticate(authRequest);
    }
}
这里将遇到 Spring Security 中处理认证的核心接口:AuthenticationManager:
public interface AuthenticationManager {

    Authentication authenticate(Authentication authentication) throws AuthenticationException;
}
这个接口只有一个 authenticate() 方法,它的入参是一个未认证的 Authentication,从 UsernamePasswordAuthenticationFilter 的代码中可以看到使用了 UsernamePasswordAuthenticationToken,它的返回有三种情况:
- 如果认证成功,则返回认证成功后的
Authentication(通常带有authenticated=true); - 如果认证失败,则抛出
AuthenticationException异常; - 如果无法判断,则返回
null;
AuthenticationManager 接口最常用的一个实现是 ProviderManager 类,它包含了一个或多个 AuthenticationProvider 实例:
public class ProviderManager implements AuthenticationManager {

    private List<AuthenticationProvider> providers;
}
AuthenticationProvider 有点像 AuthenticationManager,但它有一个额外的方法 boolean supports(Class<?> authentication):
public interface AuthenticationProvider {

    Authentication authenticate(Authentication authentication) throws AuthenticationException;

    boolean supports(Class<?> authentication);
}
Spring Security 会遍历列表中所有的 AuthenticationProvider,并通过 supports() 方法来选取合适的 AuthenticationProvider 实例来实现认证,从上文中我们知道,UsernamePasswordAuthenticationFilter 在认证时使用的 Authentication 类型为 UsernamePasswordAuthenticationToken,对于这个 Authentication,默认使用的 AuthenticationProvider 是 DaoAuthenticationProvider,它继承自抽象类 AbstractUserDetailsAuthenticationProvider:
public abstract class AbstractUserDetailsAuthenticationProvider
        implements AuthenticationProvider, InitializingBean, MessageSourceAware {

    @Override
    public Authentication authenticate(Authentication authentication) throws AuthenticationException {

        String username = determineUsername(authentication);
        UserDetails user = retrieveUser(username, (UsernamePasswordAuthenticationToken) authentication);

        this.preAuthenticationChecks.check(user);
        additionalAuthenticationChecks(user, (UsernamePasswordAuthenticationToken) authentication);
        this.postAuthenticationChecks.check(user);

        Object principalToReturn = user;
        if (this.forcePrincipalAsString) {
            principalToReturn = user.getUsername();
        }
        return createSuccessAuthentication(principalToReturn, authentication, user);
    }
}
其中,最关键的代码有两行,第一行是通过 retrieveUser() 方法获取 UserDetails:
public class DaoAuthenticationProvider extends AbstractUserDetailsAuthenticationProvider {

    @Override
    protected final UserDetails retrieveUser(String username, UsernamePasswordAuthenticationToken authentication)
            throws AuthenticationException {

        UserDetails loadedUser = this.getUserDetailsService().loadUserByUsername(username);
        return loadedUser;
    }
}
进入 retrieveUser() 方法内部,可以看到它是通过 UserDetailsService 的 loadUserByUsername() 方法来获取 UserDetails 的,而这个 UserDetailsService 默认实现是 InMemoryUserDetailsManager:
public class InMemoryUserDetailsManager implements UserDetailsManager, UserDetailsPasswordService {

    @Override
    public UserDetails loadUserByUsername(String username) throws UsernameNotFoundException {
        UserDetails user = this.users.get(username.toLowerCase());
        if (user == null) {
            throw new UsernameNotFoundException(username);
        }
        return new User(user.getUsername(), user.getPassword(), user.isEnabled(), user.isAccountNonExpired(),
                user.isCredentialsNonExpired(), user.isAccountNonLocked(), user.getAuthorities());
    }
}
它的实现非常简单,就是从 users 这个 Map 中直接获取 UserDetails,那么 users 这个 Map 又是从哪来的呢? 答案就是我们在配置文件中配置的 spring.security.user,我们可以从自动配置类 UserDetailsServiceAutoConfiguration 中找到 InMemoryUserDetailsManager 的初始化代码:
public class UserDetailsServiceAutoConfiguration {

    @Bean
    @Lazy
    public InMemoryUserDetailsManager inMemoryUserDetailsManager(SecurityProperties properties,
            ObjectProvider<PasswordEncoder> passwordEncoder) {
        SecurityProperties.User user = properties.getUser();
        List<String> roles = user.getRoles();
        return new InMemoryUserDetailsManager(User.withUsername(user.getName())
            .password(getOrDeducePassword(user, passwordEncoder.getIfAvailable()))
            .roles(StringUtils.toStringArray(roles))
            .build());
    }
}
另一行关键代码是通过 additionalAuthenticationChecks() 方法对 UserDetails 和 UsernamePasswordAuthenticationToken 进行校验,一般来说,就是验证密码是否正确:
public class DaoAuthenticationProvider extends AbstractUserDetailsAuthenticationProvider {

    @Override
    protected void additionalAuthenticationChecks(UserDetails userDetails,
            UsernamePasswordAuthenticationToken authentication) throws AuthenticationException {

        String presentedPassword = authentication.getCredentials().toString();
        if (!this.passwordEncoder.matches(presentedPassword, userDetails.getPassword())) {
            this.logger.debug("Failed to authenticate since password does not match stored value");
            throw new BadCredentialsException(this.messages
                    .getMessage("AbstractUserDetailsAuthenticationProvider.badCredentials", "Bad credentials"));
        }
    }
}
一旦用户名和密码都验证通过,就调用 createSuccessAuthentication() 方法创建并返回一个认证成功后的 Authentication,然后经过一系列的后处理,整个认证的流程如下所示:
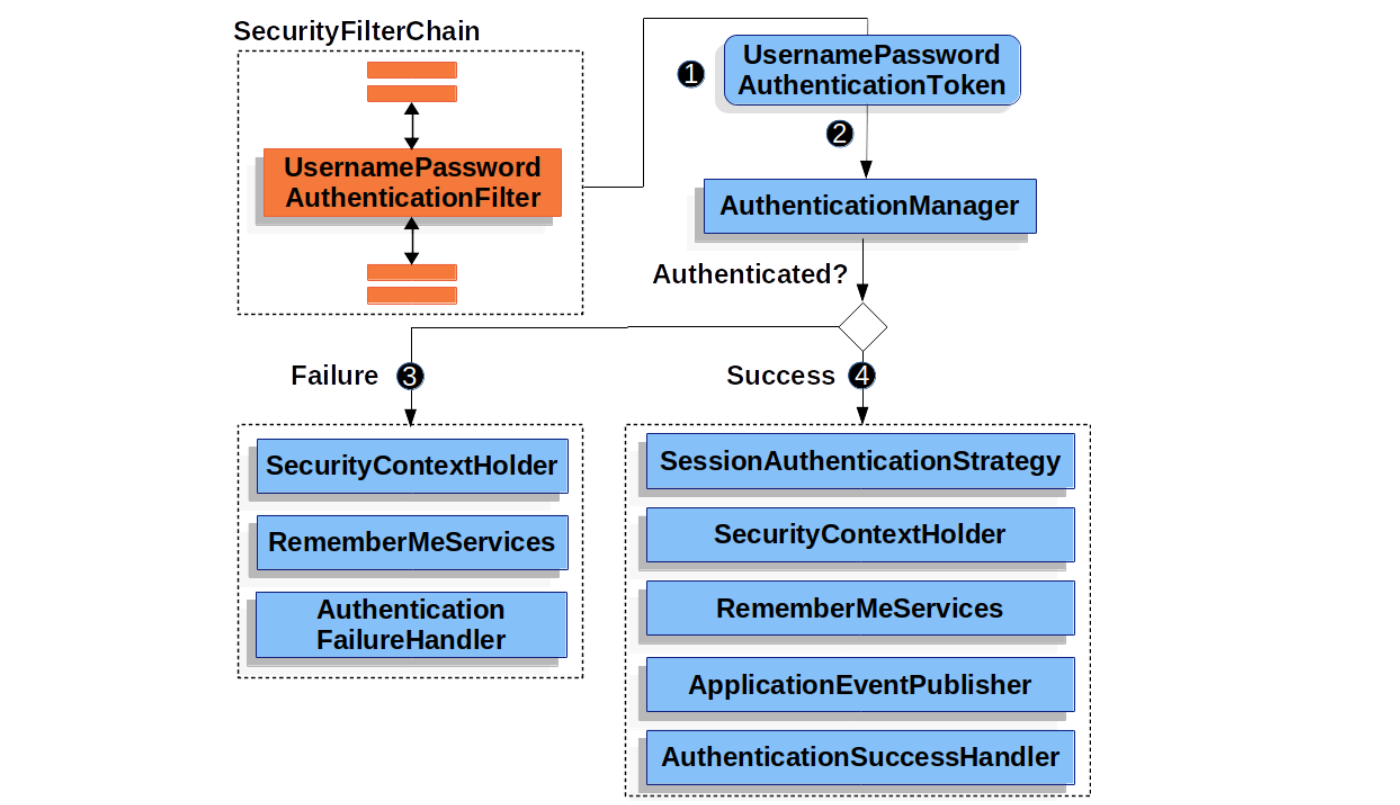
其中,SecurityContextHolder 将认证成功后的 Authentication 保存到安全上下文中供后续 Filter 使用;AuthenticationSuccessHandler 用于定义一些认证成功后的自定义逻辑,默认实现为 SimpleUrlAuthenticationSuccessHandler,它返回一个重定向,将浏览器转到登录之前用户访问的页面。
在我的测试中,
SimpleUrlAuthenticationSuccessHandler貌似并没有触发,新版本的逻辑有变动?
AccessDecisionManager:剖析授权流程
其实,在上面分析重定向 /login 页面的流程时已经大致了解了实现授权的逻辑,请求经过 FilterSecurityInterceptor 时,校验当前用户是否有访问页面的权限,如果没有,则会抛出 AccessDeniedException 异常。FilterSecurityInterceptor 的核心代码如下:
public class FilterSecurityInterceptor extends AbstractSecurityInterceptor implements Filter {

    public void invoke(FilterInvocation filterInvocation) throws IOException, ServletException {

        InterceptorStatusToken token = super.beforeInvocation(filterInvocation);
        try {
            filterInvocation.getChain().doFilter(filterInvocation.getRequest(), filterInvocation.getResponse());
        }
        finally {
            super.finallyInvocation(token);
        }
        super.afterInvocation(token, null);
    }
}
可以看到,主要逻辑就包含在 beforeInvocation()、finallyInvocation() 和 afterInvocation() 这三个方法中,而对授权相关的部分则位于 beforeInvocation() 方法中:
public abstract class AbstractSecurityInterceptor
        implements InitializingBean, ApplicationEventPublisherAware, MessageSourceAware {

    protected InterceptorStatusToken beforeInvocation(Object object) {

        Collection<ConfigAttribute> attributes = this.obtainSecurityMetadataSource().getAttributes(object);

        Authentication authenticated = authenticateIfRequired();

        // Attempt authorization
        attemptAuthorization(object, attributes, authenticated);

        if (this.publishAuthorizationSuccess) {
            publishEvent(new AuthorizedEvent(object, attributes, authenticated));
        }

        return new InterceptorStatusToken(SecurityContextHolder.getContext(), false, attributes, object);
    }

    private void attemptAuthorization(Object object, Collection<ConfigAttribute> attributes,
            Authentication authenticated) {
        try {
            this.accessDecisionManager.decide(authenticated, object, attributes);
        }
        catch (AccessDeniedException ex) {
            publishEvent(new AuthorizationFailureEvent(object, attributes, authenticated, ex));
            throw ex;
        }
    }
}
在这里,我们遇到了 Spring Security 实现授权的核心接口:AccessDecisionManager,Spring Security 就是通过该接口的 decide() 方法来决定用户是否有访问某个资源的权限。AccessDecisionManager 接口的默认实现为 AffirmativeBased,可以从 AbstractInterceptUrlConfigurer 中找到它的踪影:
public abstract class AbstractInterceptUrlConfigurer<C extends AbstractInterceptUrlConfigurer<C, H>, H extends HttpSecurityBuilder<H>>
        extends AbstractHttpConfigurer<C, H> {

    private AccessDecisionManager createDefaultAccessDecisionManager(H http) {
        AffirmativeBased result = new AffirmativeBased(getDecisionVoters(http));
        return postProcess(result);
    }
}
AffirmativeBased 实例中包含一个或多个 AccessDecisionVoter,它通过遍历所有的 AccessDecisionVoter 依次投票决定授权是否允许,只要有一个 AccessDecisionVoter 拒绝,则抛出 AccessDeniedException 异常:
public class AffirmativeBased extends AbstractAccessDecisionManager {

    @Override
    @SuppressWarnings({ "rawtypes", "unchecked" })
    public void decide(Authentication authentication, Object object, Collection<ConfigAttribute> configAttributes)
            throws AccessDeniedException {
        int deny = 0;
        for (AccessDecisionVoter voter : getDecisionVoters()) {
            int result = voter.vote(authentication, object, configAttributes);
            switch (result) {
            case AccessDecisionVoter.ACCESS_GRANTED:
                return;
            case AccessDecisionVoter.ACCESS_DENIED:
                deny++;
                break;
            default:
                break;
            }
        }
        if (deny > 0) {
            throw new AccessDeniedException(
                    this.messages.getMessage("AbstractAccessDecisionManager.accessDenied", "Access is denied"));
        }
        // To get this far, every AccessDecisionVoter abstained
        checkAllowIfAllAbstainDecisions();
    }
}默认情况下,AffirmativeBased 实例中只有一个 AccessDecisionVoter,那就是 WebExpressionVoter:
public class WebExpressionVoter implements AccessDecisionVoter<FilterInvocation> {

    @Override
    public int vote(Authentication authentication, FilterInvocation filterInvocation,
            Collection<ConfigAttribute> attributes) {

        WebExpressionConfigAttribute webExpressionConfigAttribute = findConfigAttribute(attributes);

        EvaluationContext ctx = webExpressionConfigAttribute.postProcess(
                this.expressionHandler.createEvaluationContext(authentication, filterInvocation), filterInvocation);

        boolean granted = ExpressionUtils.evaluateAsBoolean(webExpressionConfigAttribute.getAuthorizeExpression(), ctx);
        if (granted) {
            return ACCESS_GRANTED;
        }
        return ACCESS_DENIED;
    }
}
WebExpressionVoter 将授权转换为 SpEL 表达式,检查授权是否通过,就是看执行 SpEL 表达式的结果是否为 true,这里的细节还有很多,详细内容还是参考 官方文档 吧。
参考
- Spring Security Documentation
- Getting started with Spring Security and Spring Boot
- Spring Security Tutorial 《Spring Security 教程》
- Spring Security 从入门到进阶
- Spring Security 认证流程
- Spring Security 鉴权流程
更多
Spring Security 的安全防护
- Protection Against Exploits
- Configuring CSRF/XSRF with Spring Security
- Configuring CORS with Spring Boot and Spring Security

